Camera Details
On the [ Camera ] screen, you can perform various operations such as setting devices.
Table of Contents
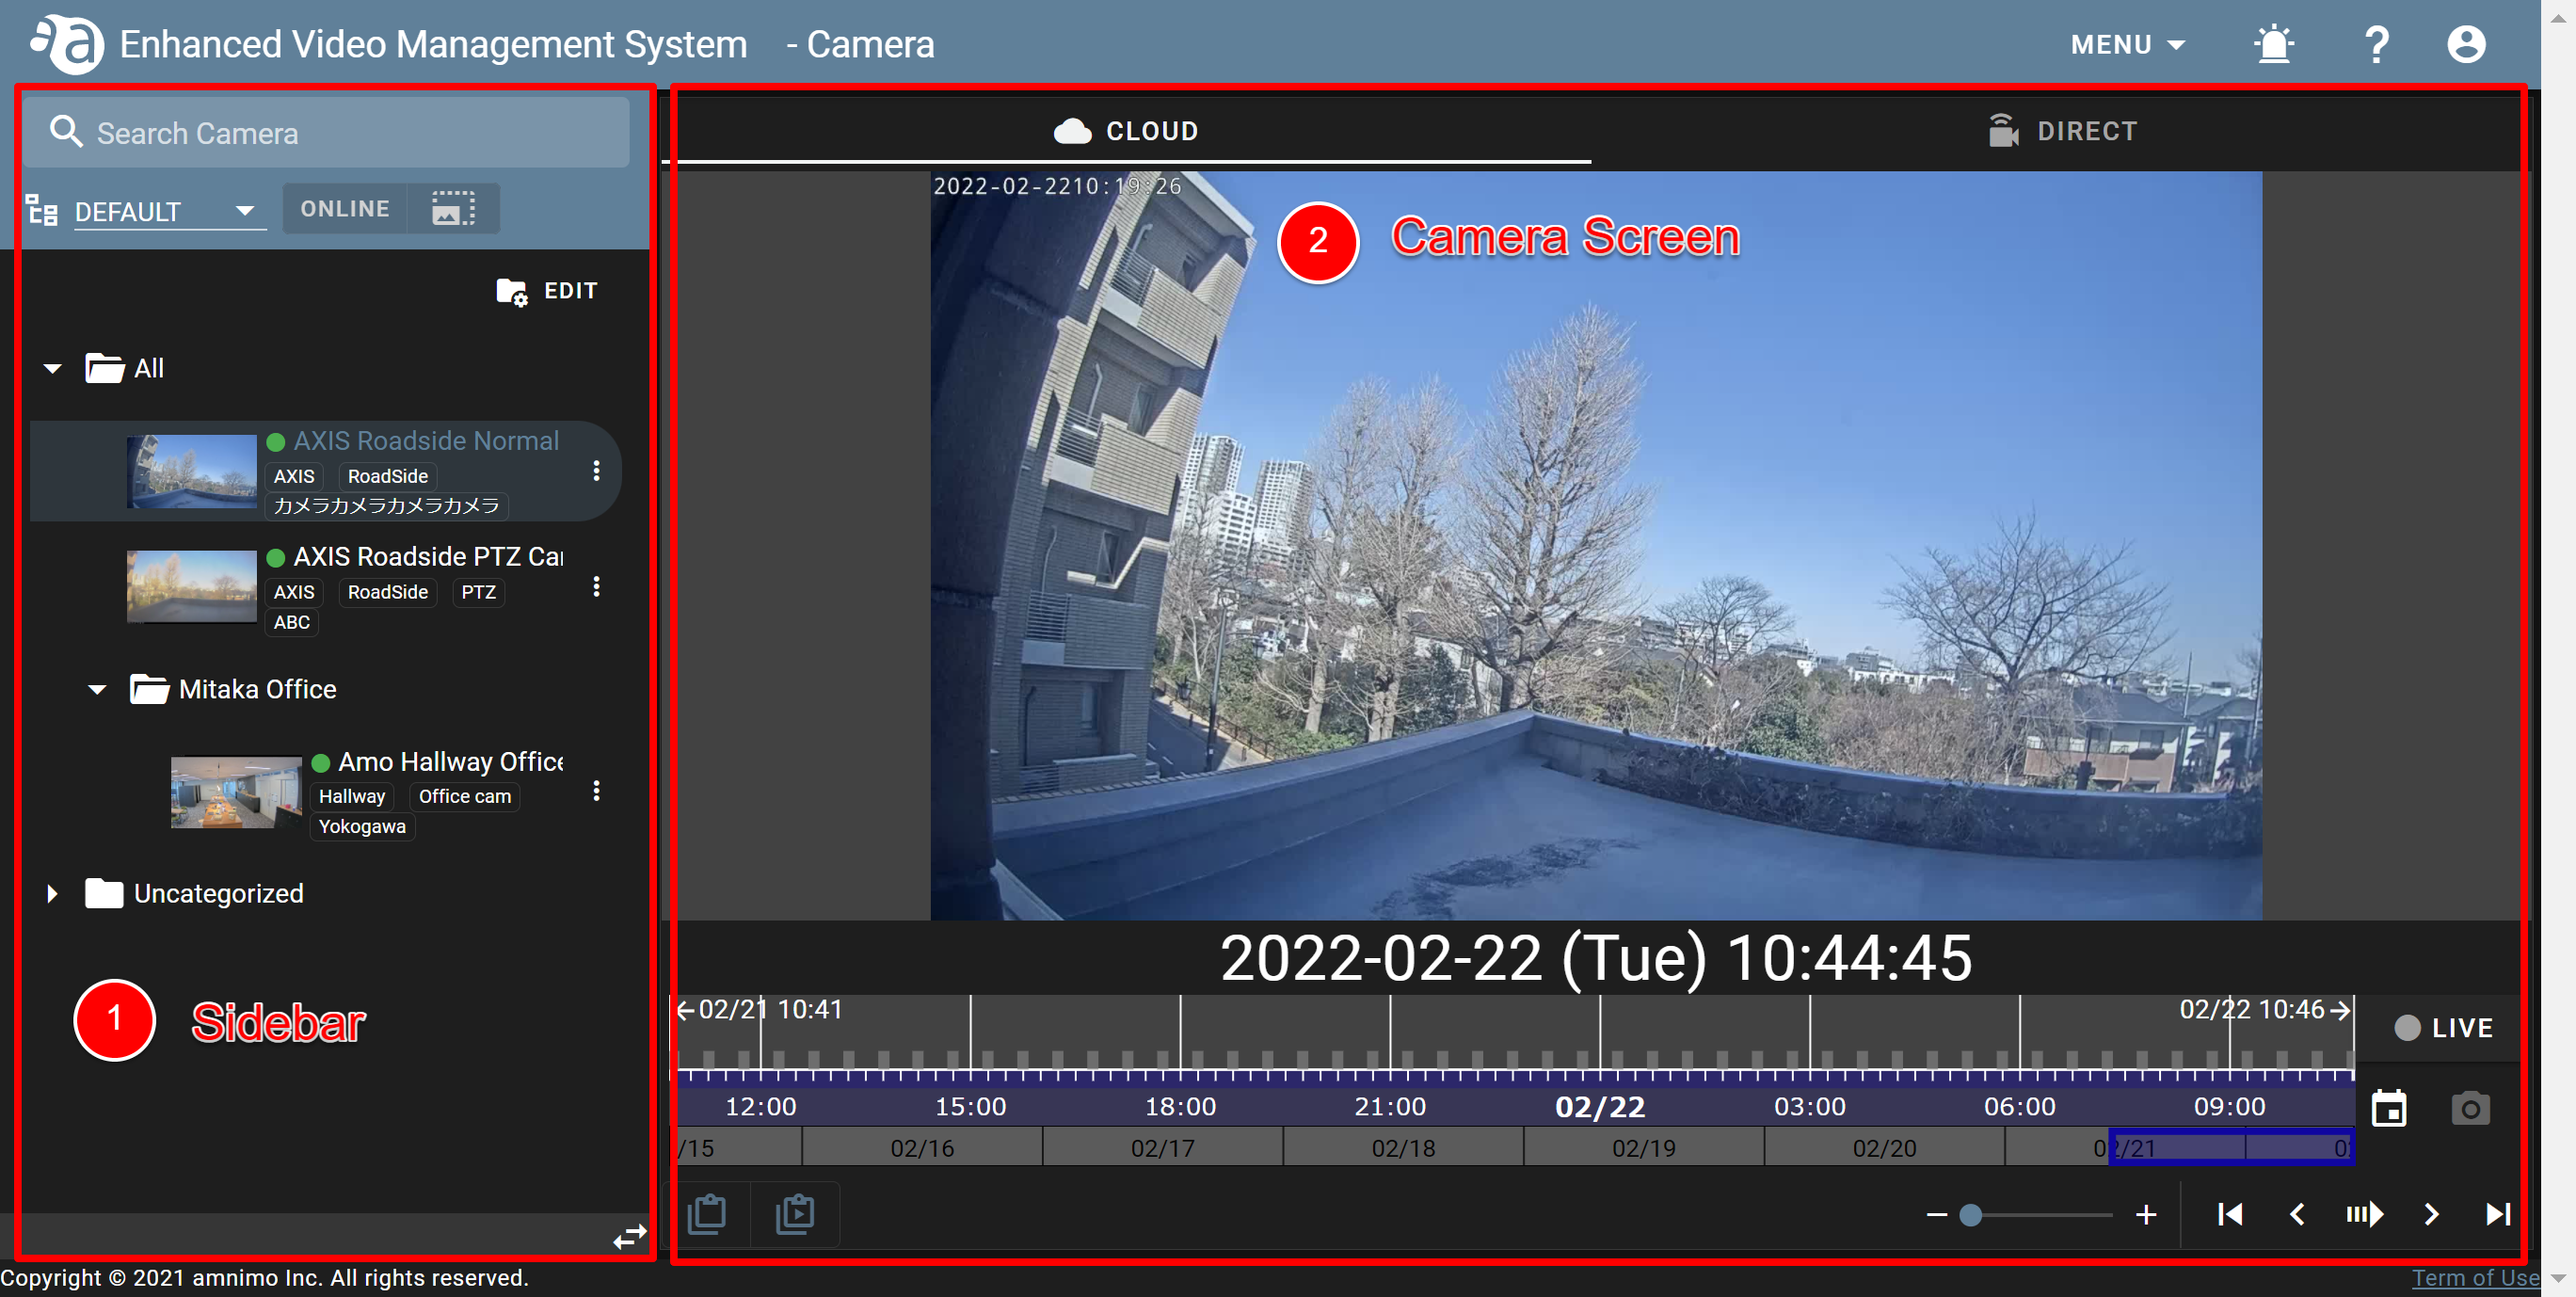
Screen structure
The [ Camera ] screen mainly consists of the following.
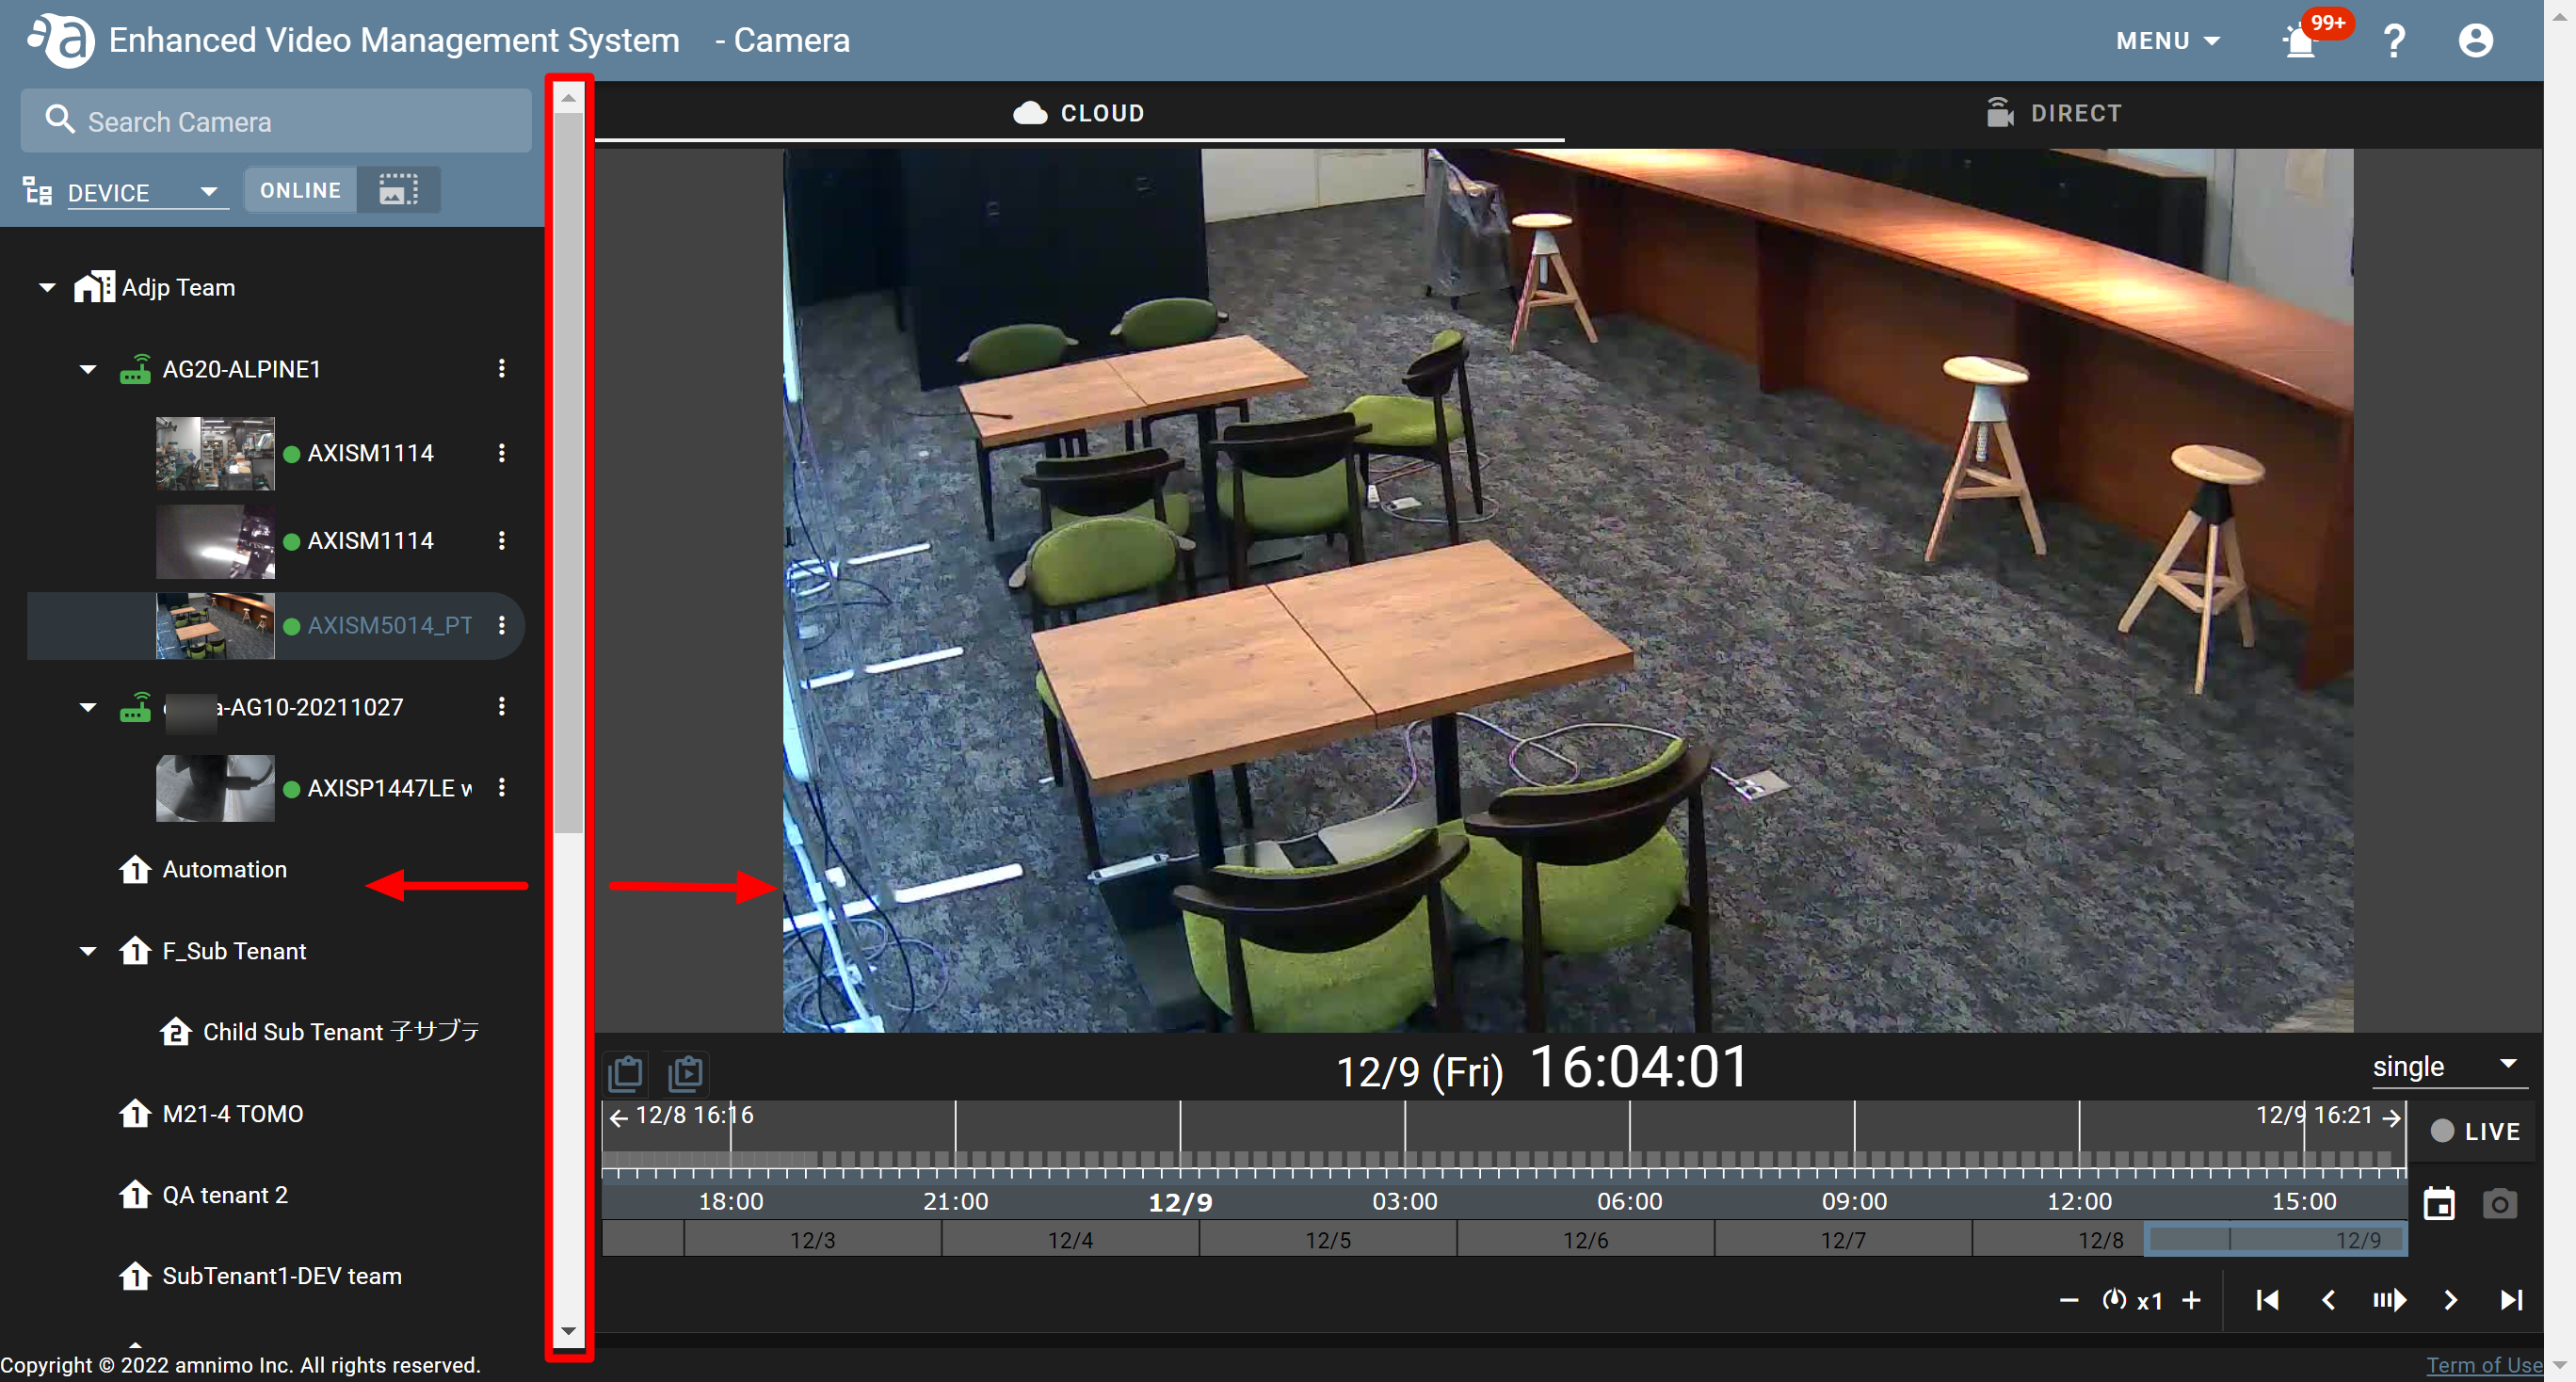
① Sidebar
② Camera screen
- [
 CLOUD ] tab
 - [
 DIRECT ] tab
< [ Camera ] screen >
Initial settings
When you use the Enhanced Video Management System for the first time, you will need to activate the device.
This section explains how to activate devices. (Click each item to display the procedure.)
-
Activating the deviceActivating the device
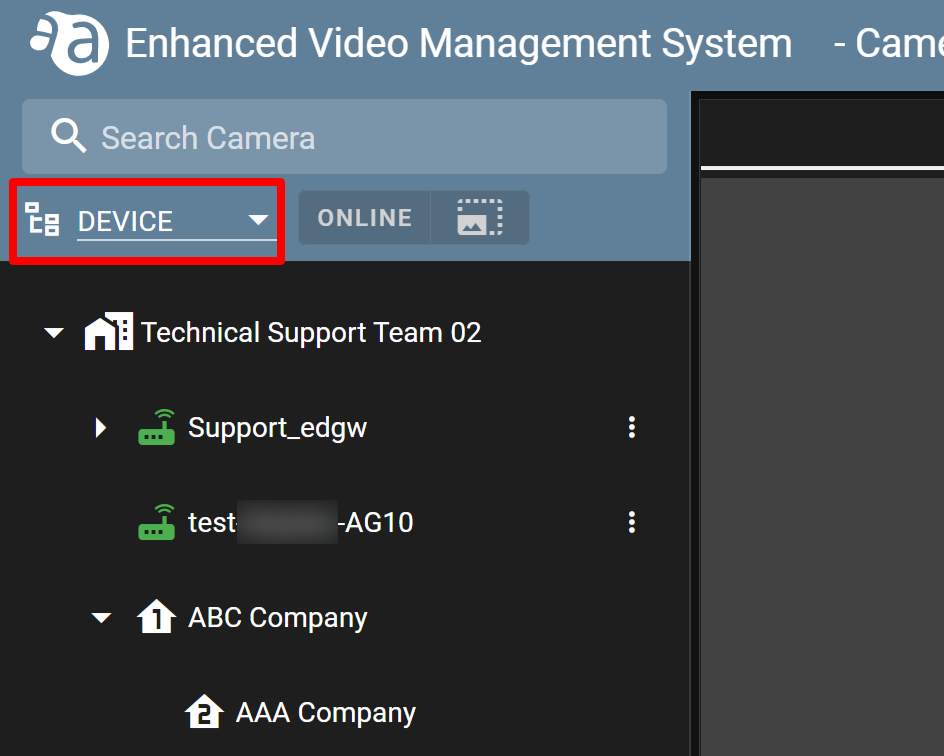
- Click ▼, and select [ DEVICE ].
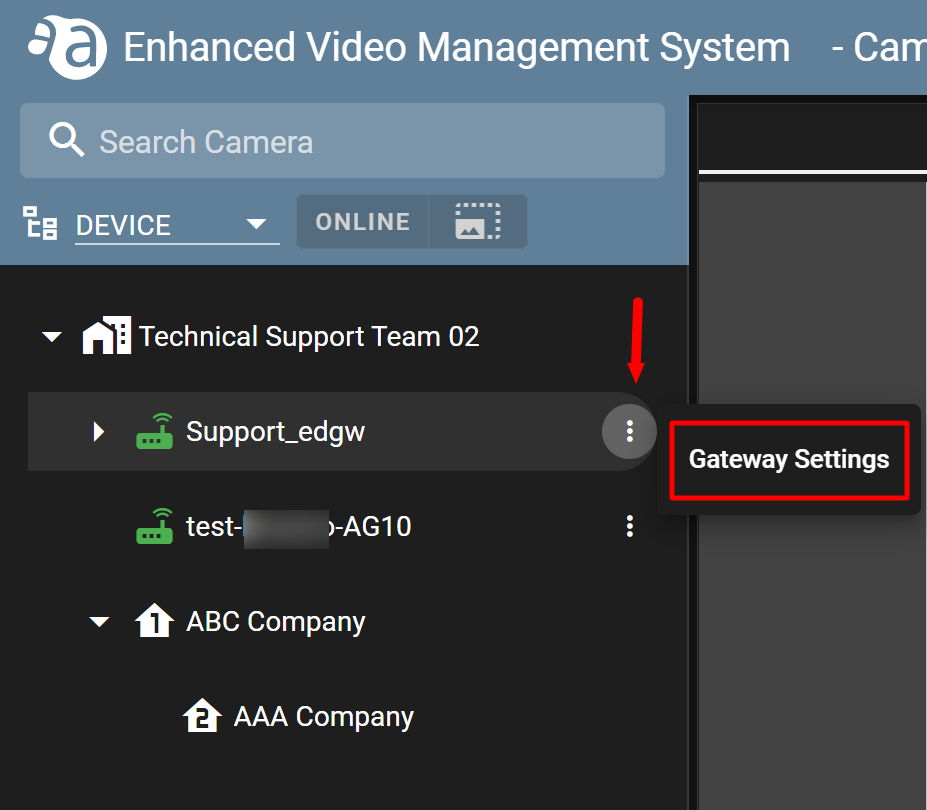
- Click
 for the device you want to activate, and click [ Gateway Settings ].
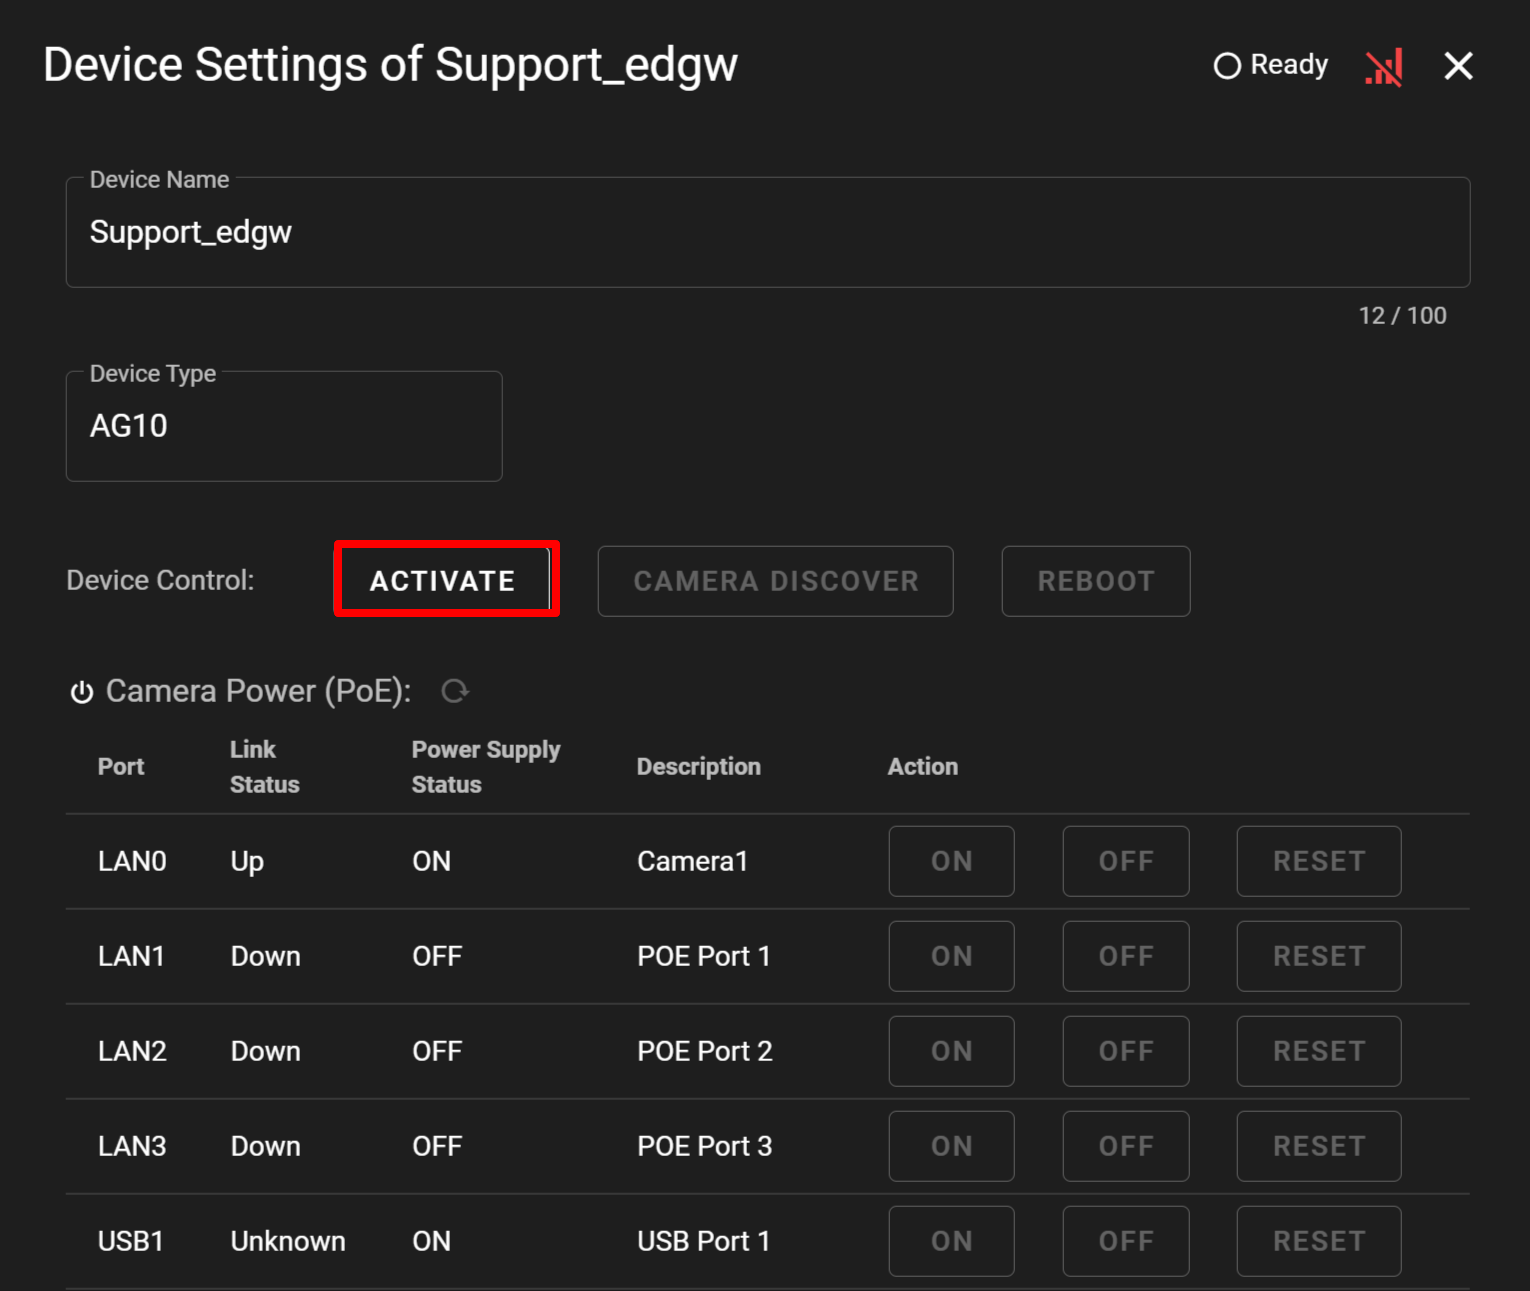
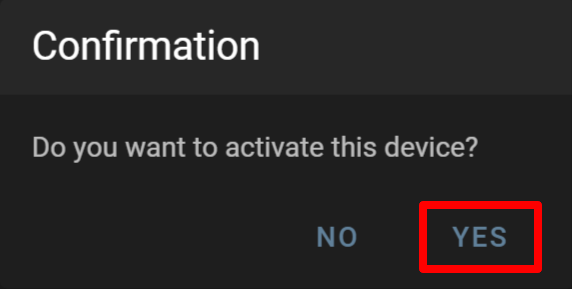
- The settings screen will open. Click [ ACTIVATE ].
- The [ Confirmation ] window will open. Click [ YES ]. (This operation may take several minutes.)
- The screen display will change to [ ACTIVATING ].
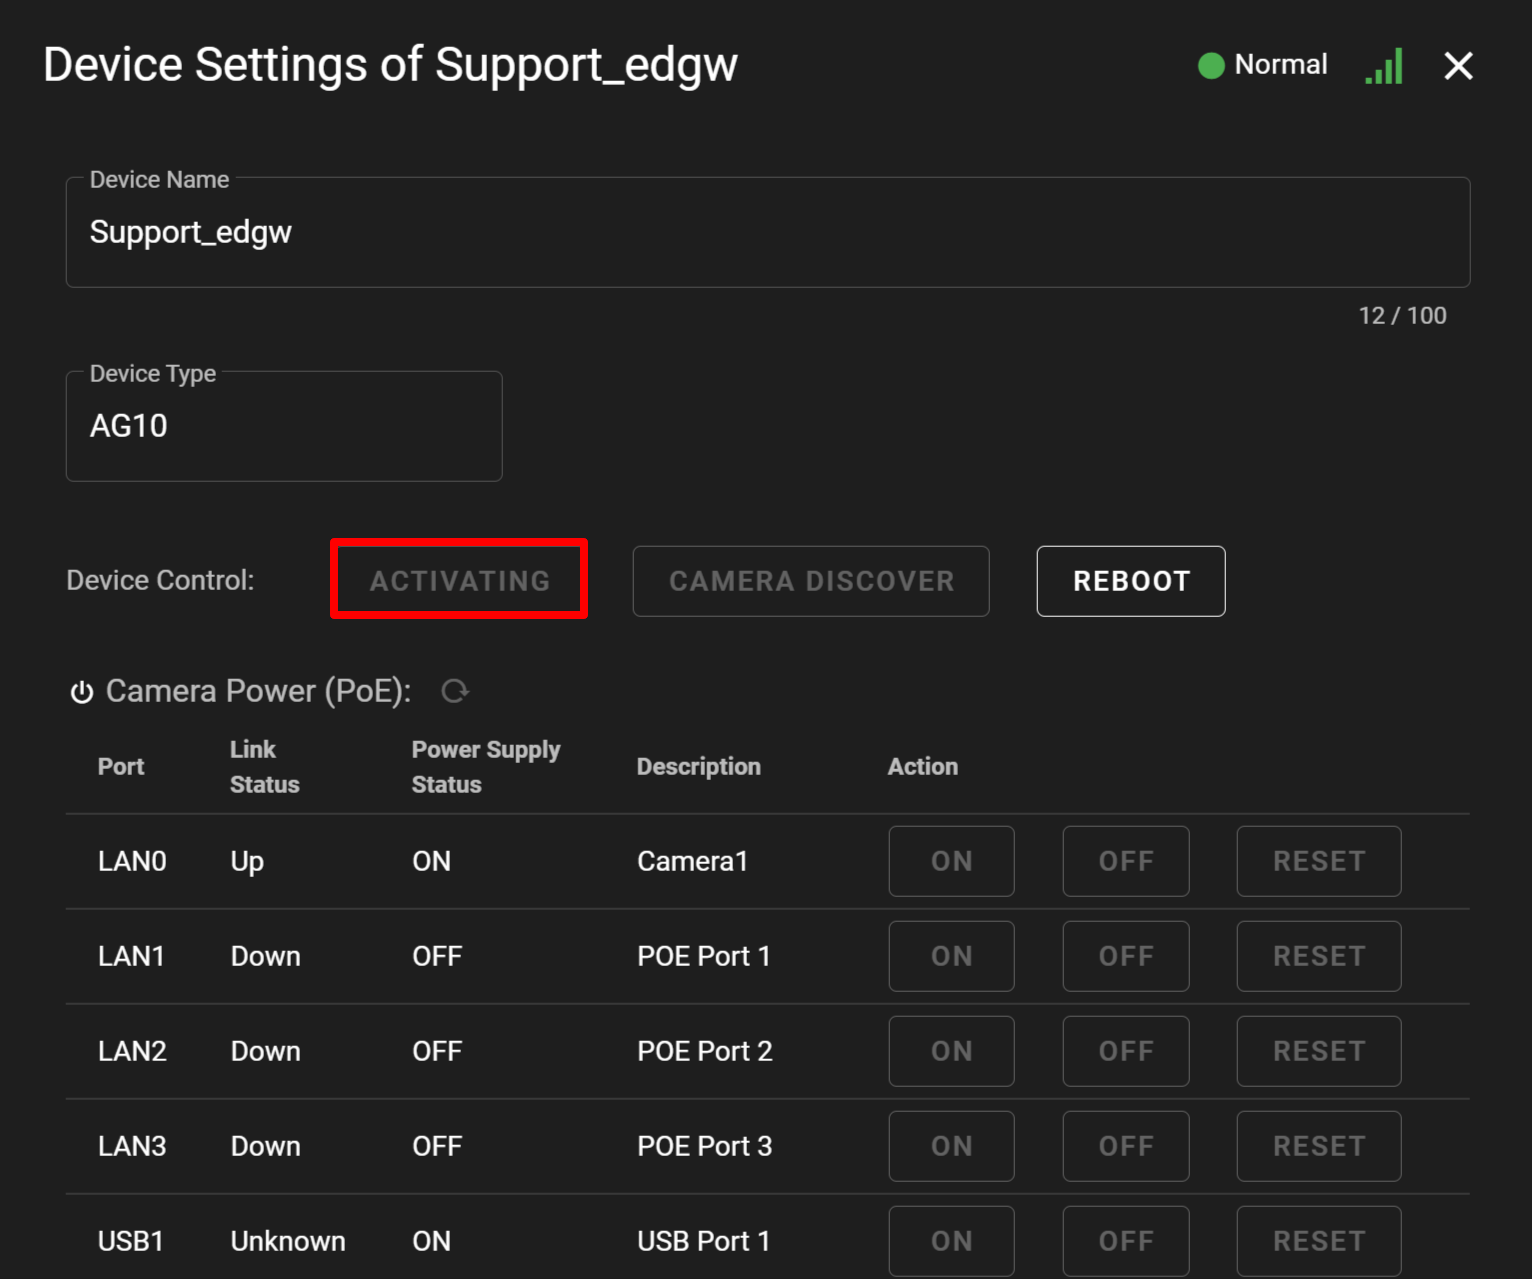
- When activating the device is completed, the [ DEACTIVATE ] button will be activated.
- Click ▼, and select [ DEVICE ].
-
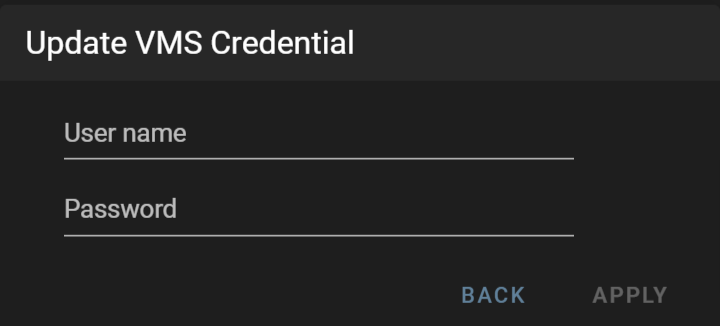
Authenticating the VMSAuthenticating the VMS
This section explains how to authenticate the VMS from [ Gateway Settings ].

Authenticating the VMS is different from authenticating cameras. Authenticating the VMS will require the information of the Nx Witness administrator. - Click the
 icon next to the device, and click [ Gateway Settings ].

- Click [ VMS credential ] from [ OTHERS ].
- The authentication window will be displayed. Enter your user name and password, and click [ APPLY ].
- Click the
-
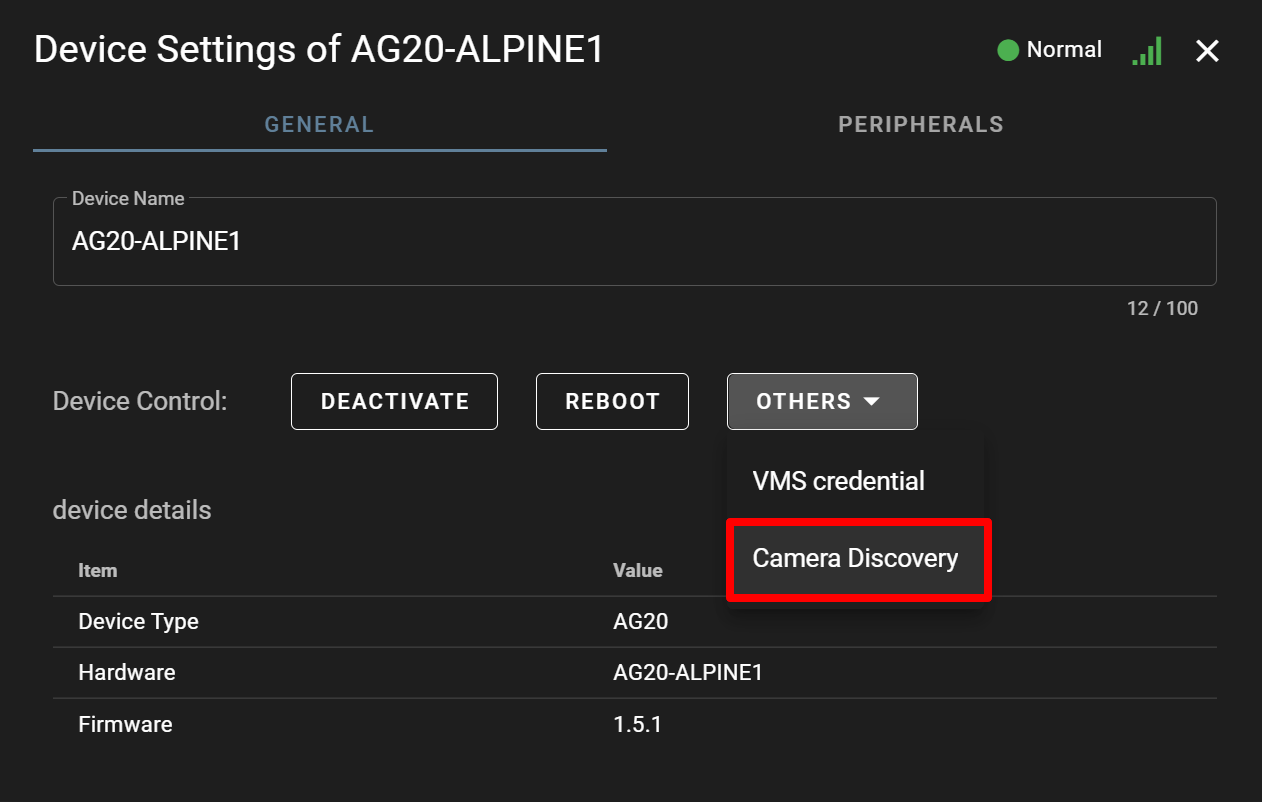
Detecting camerasDetecting cameras
If cameras have been already connected to the device, activate the device to automatically detect them.
If your cameras have been detected, proceed to "❹Configuring the credentials for the camera".
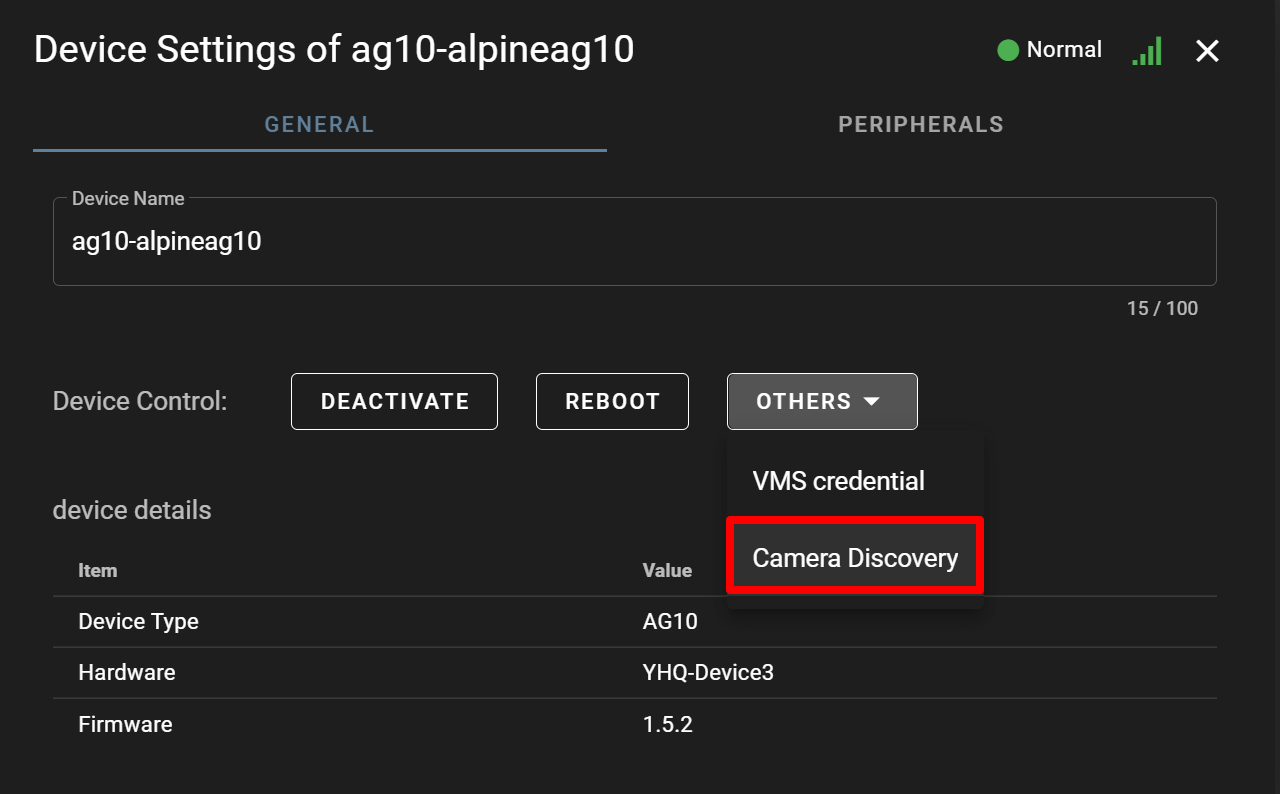
- Click the icon displayed next to the device, and click [ Gateway Settings ].
- Click [ Camera Discovery ] from [ OTHERS ] .
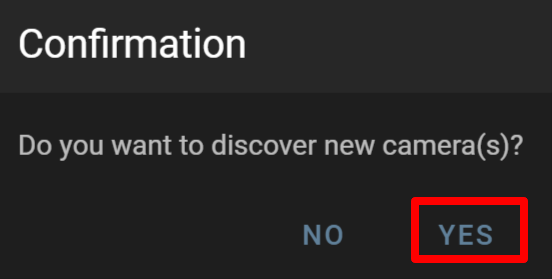
- The [ Confirmation ] window will be displayed. Click [ YES ].
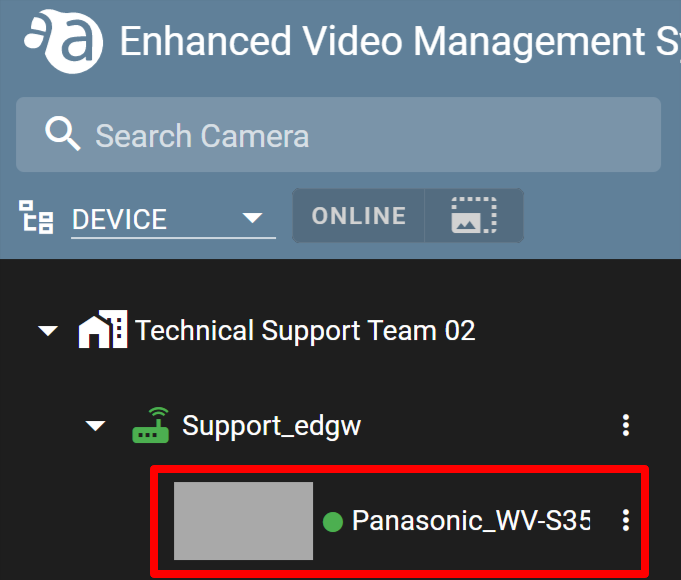
- Confirm that the camera is displayed on the on the sidebar. (Thumbnails will not be displayed until a snapshot is taken.)
- Click the
-
Configuring the credentials and start of use for the cameraConfiguring the credentials and start of use for the camera
Configure the credentials and start of use for the camera.
- Click the icon for the detected camera, and click [ General Settings ].
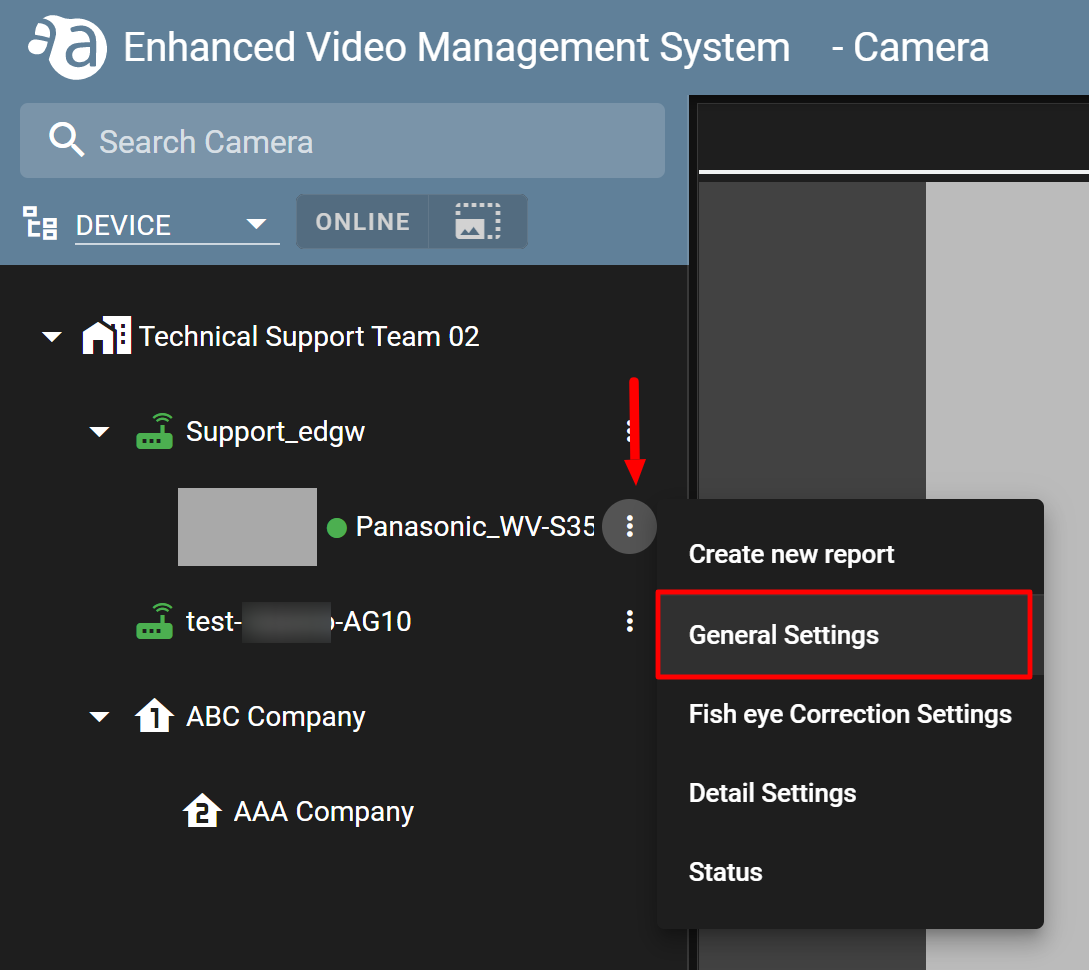
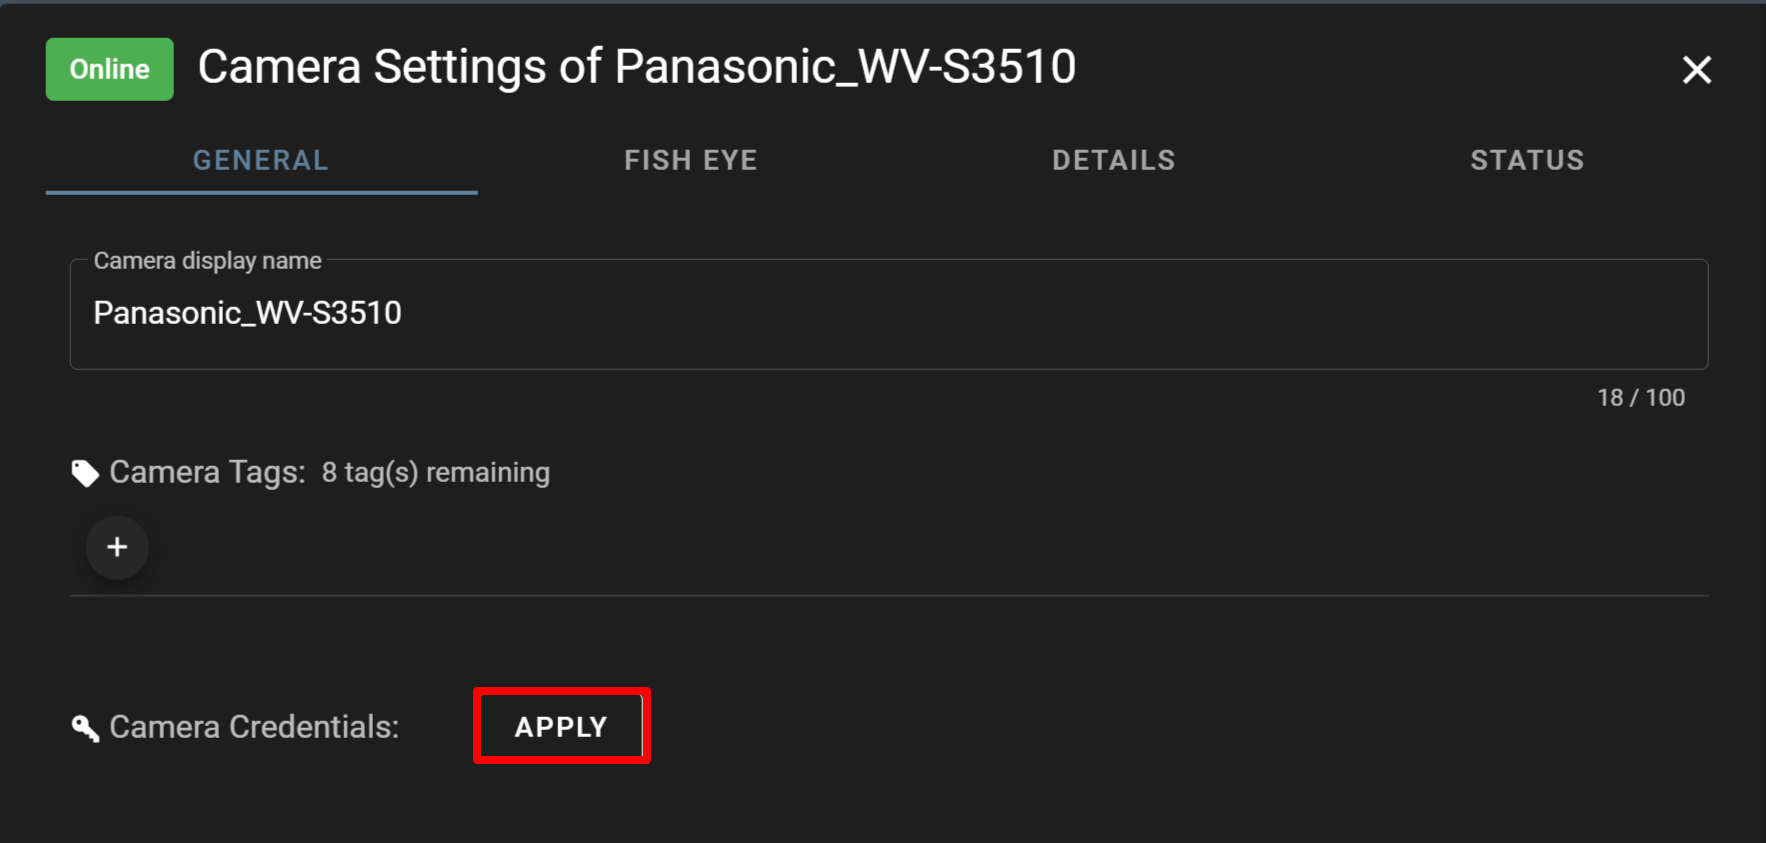
- Click [ APPLY ] for "Camera Credentials".
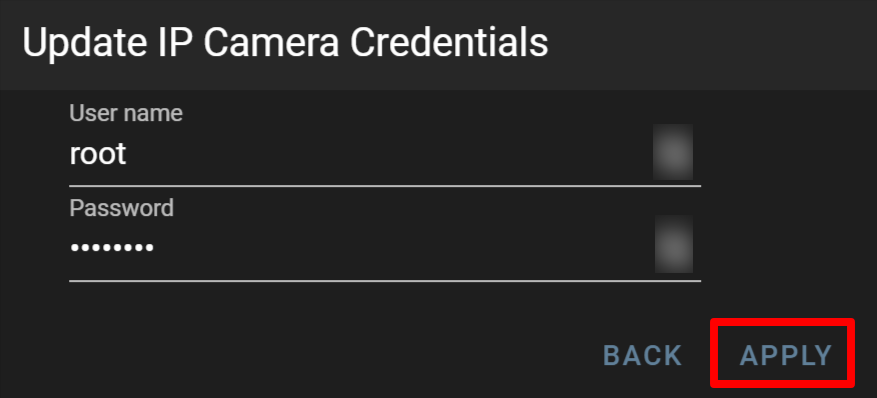
- After you enter the user name and password and click [ APPLY ], close the window.
*For the user name and password, please check the homepage, etc. of each camera manufacturer, or contact them.
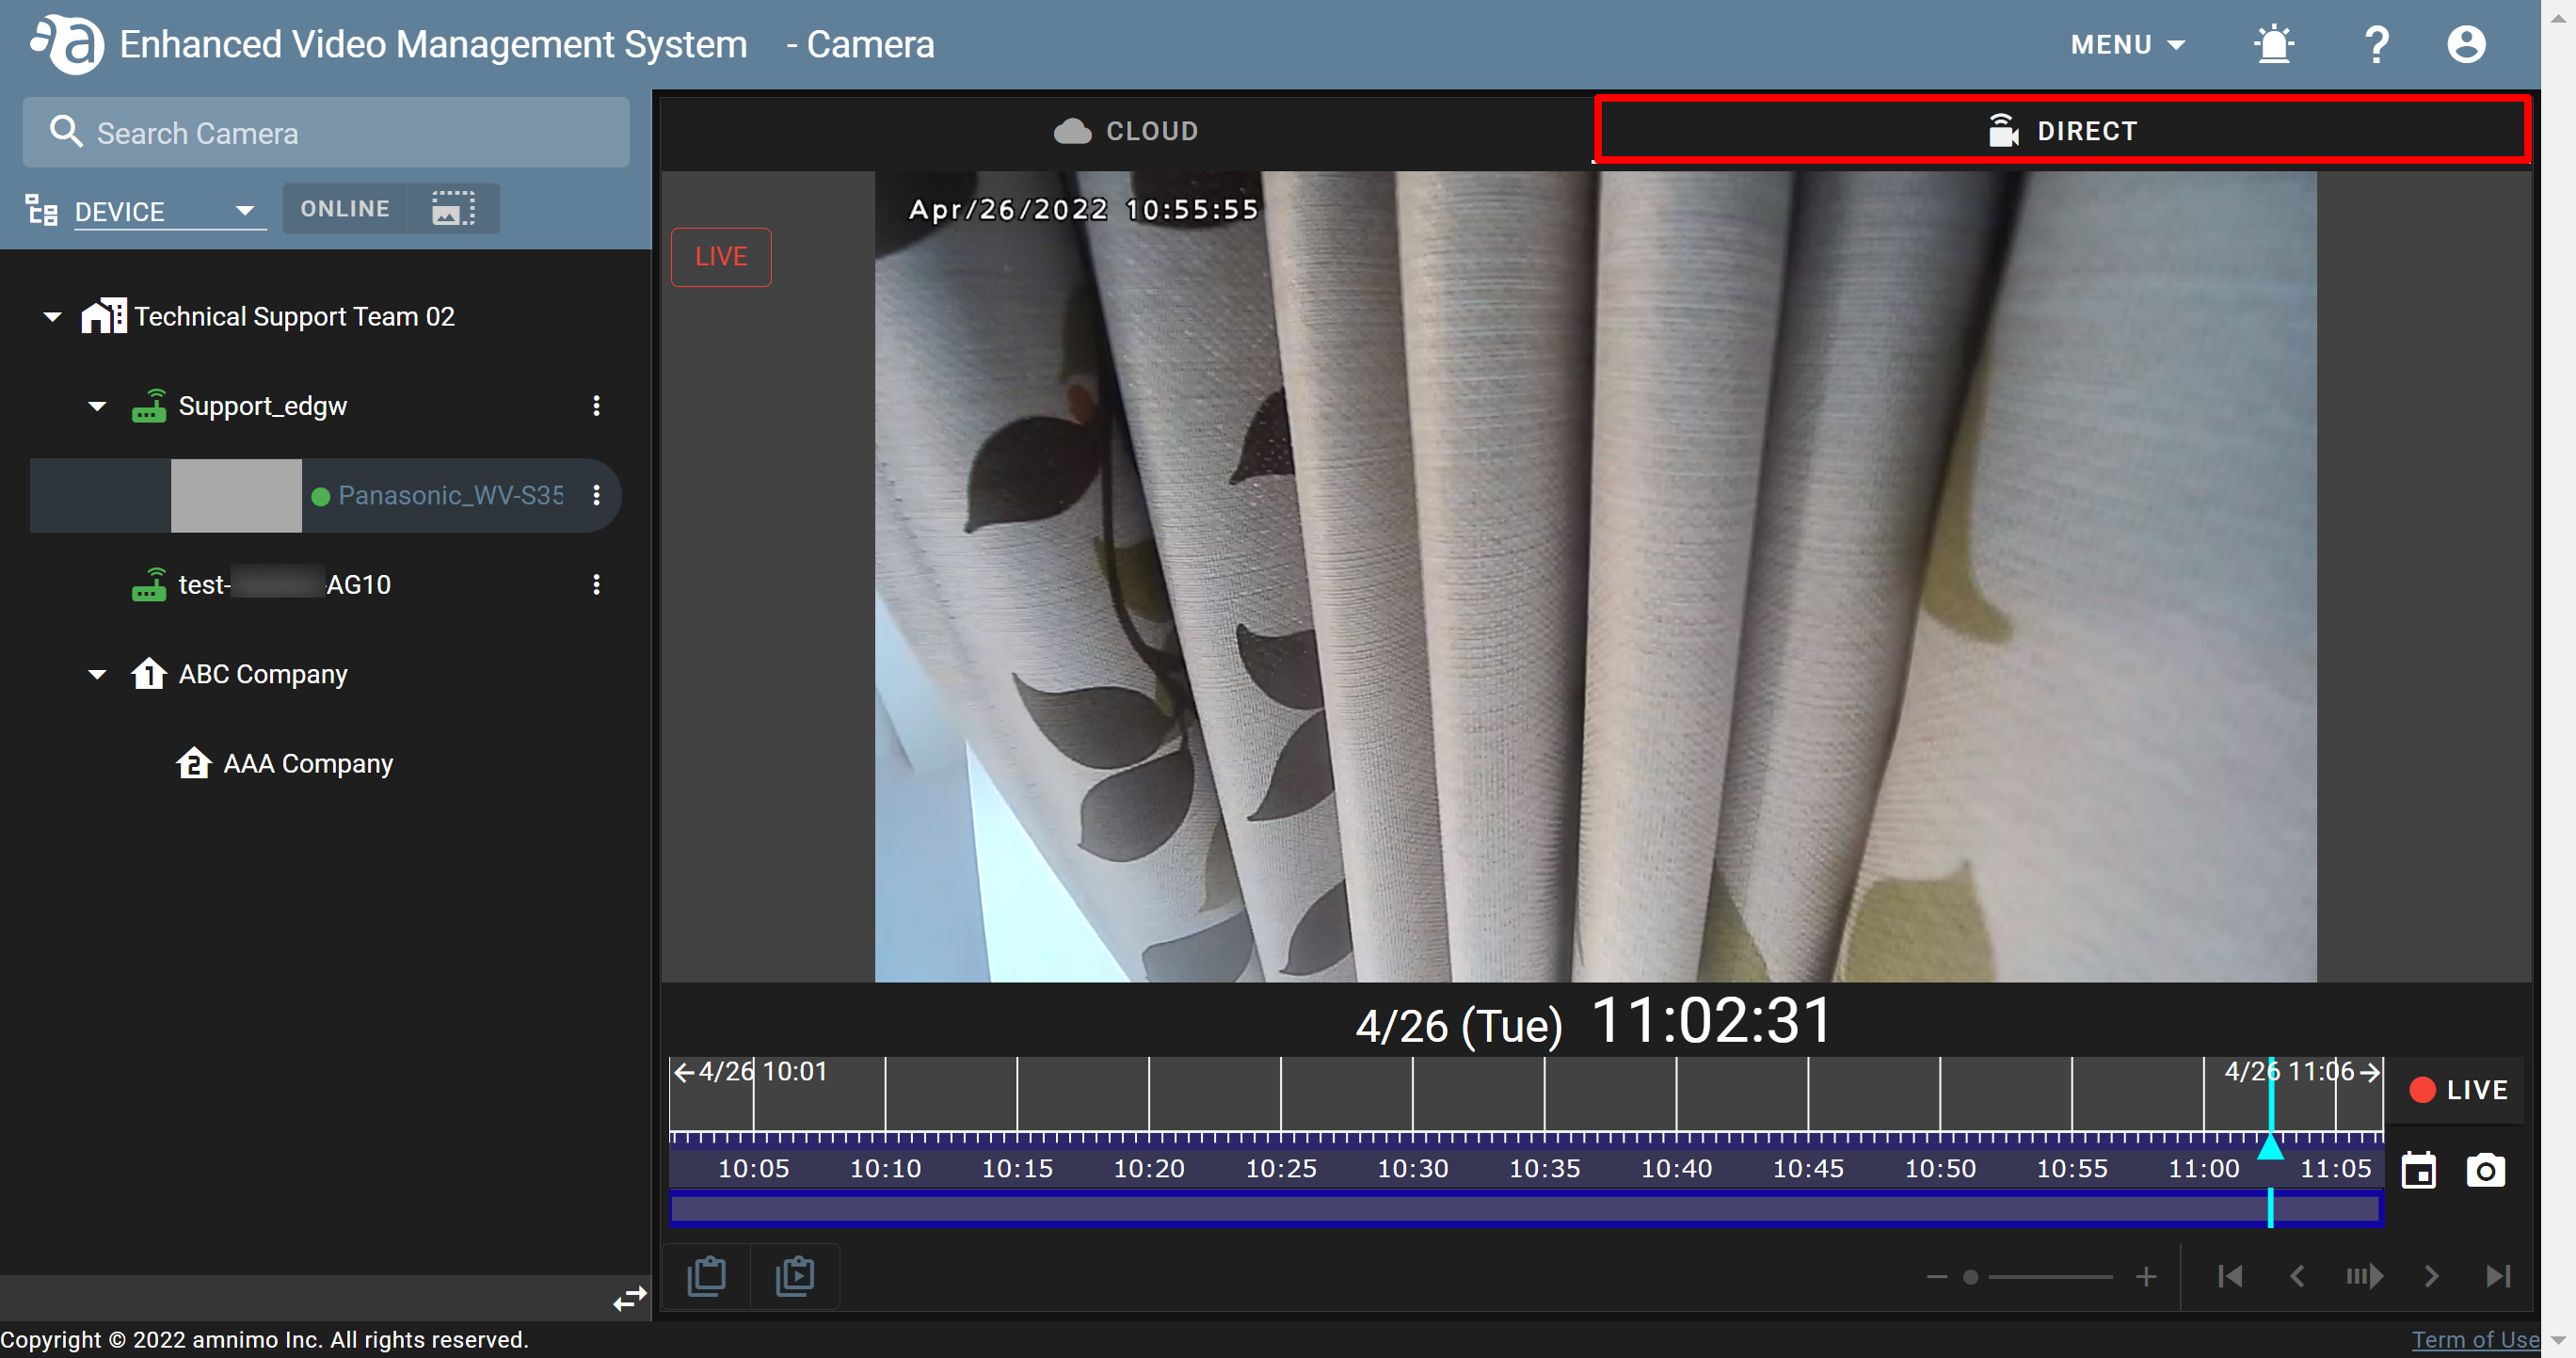
- Select the camera you added and click the [ DIRECT ] tab to confirm that an image is displayed.
- Click the
Device settings
From the fields of [ Gateway Settings ], you can change a device name, activate/deactivate a device, and reboot a device. (Click each item to display the procedure.)
-
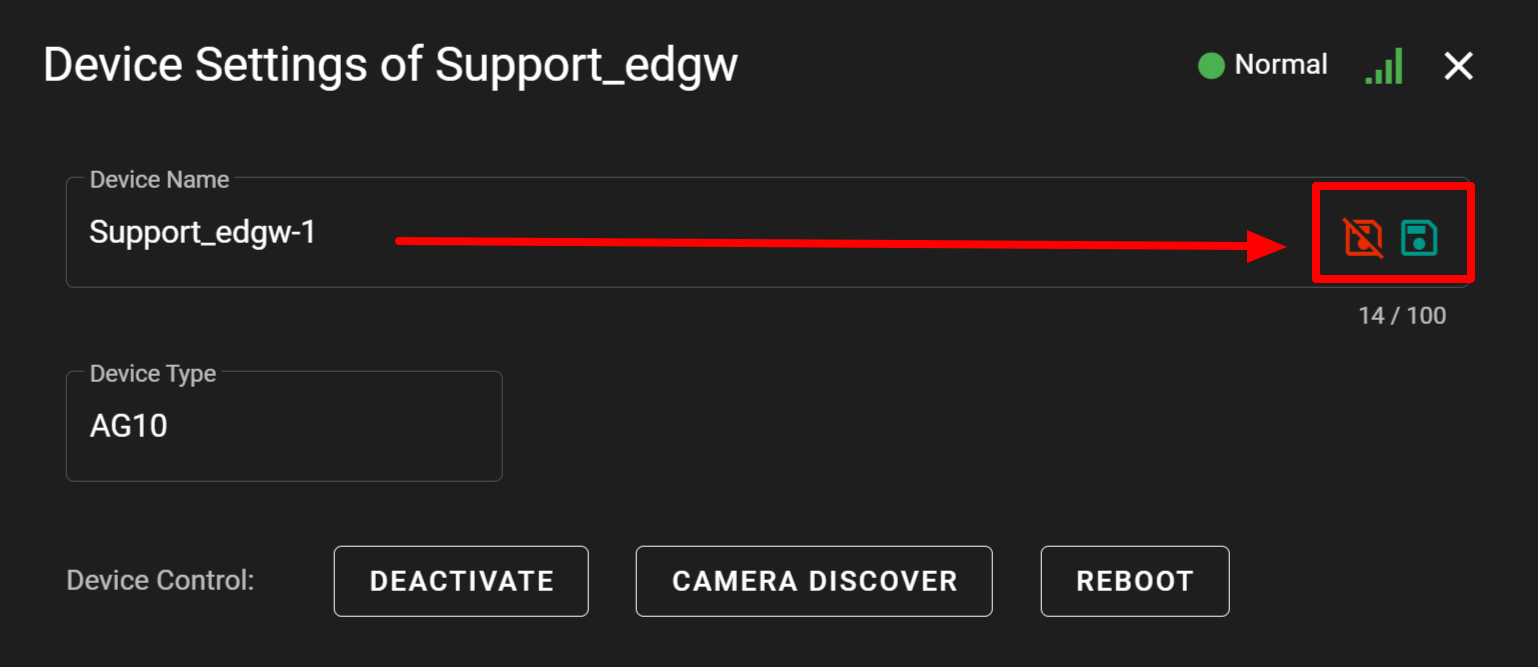
Changing device namesChanging device names
- Click ▼, and select [ DEVICE ].
- Click the icon for the target device, and click [ Gateway Settings ].
- If you change the name in the [ Device Name ] filed, click the save icon (
 ). If you do not reflect the change, click the cancel icon (
 ).
).
- Click ▼, and select [ DEVICE ].
-
Deactivating devicesDeactivating devices
- Click ▼, and select [ DEVICE ].
- Click for the device you want to deactivate, and click [ Gateway Settings ].
- The settings screen will open. Click [ DEACTIVATE ].
- The confirmation window will be displayed. Click [ YES ].

- If deactivating the device is completed, its status will change to "Ready".

- Click ▼, and select [ DEVICE ].
-
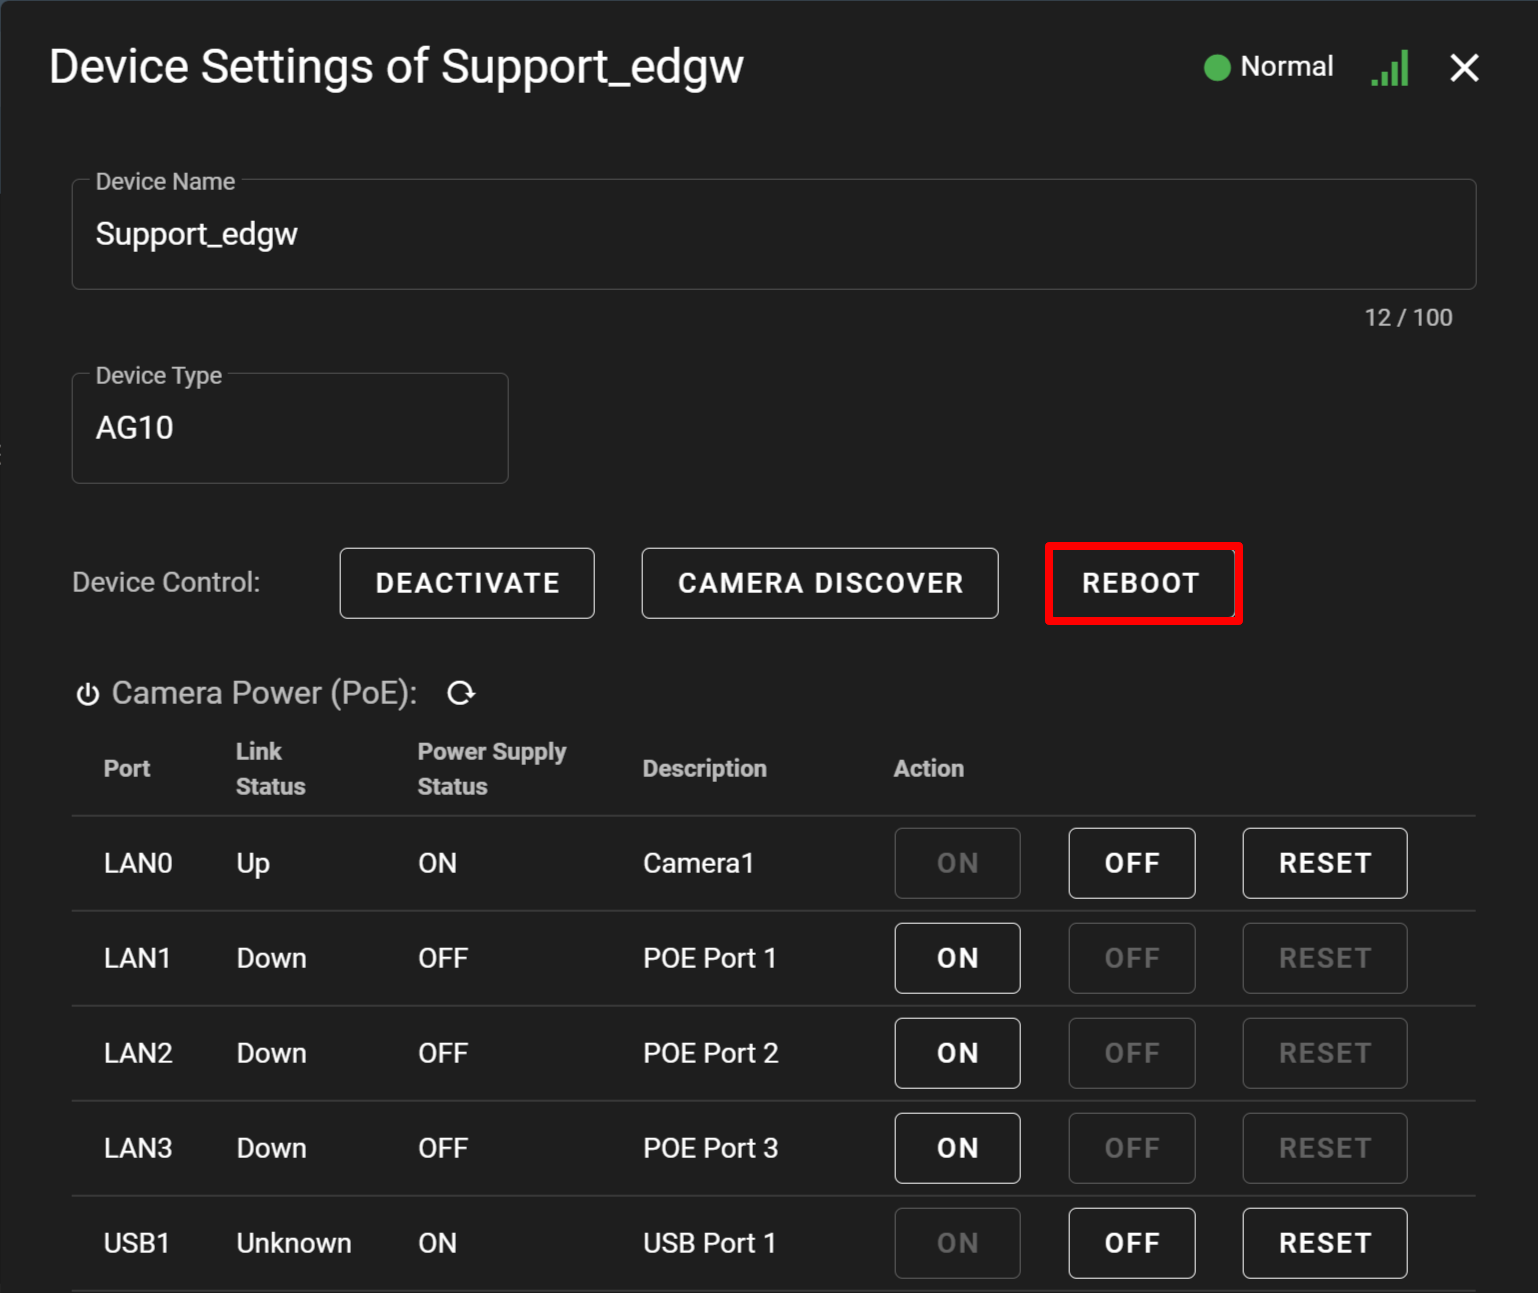
Rebooting devicesRebooting devices
- Click ▼, and select [ DEVICE ].
- Click for the device you want to reboot, and click [ Gateway Settings ].
- Click [ REBOOT ].
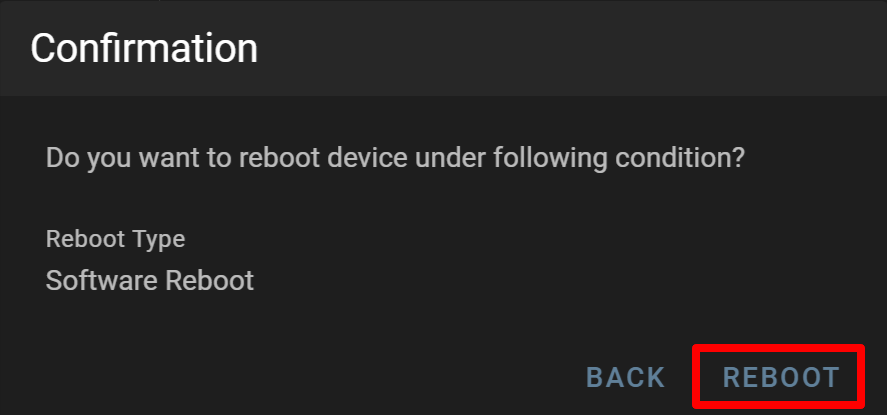
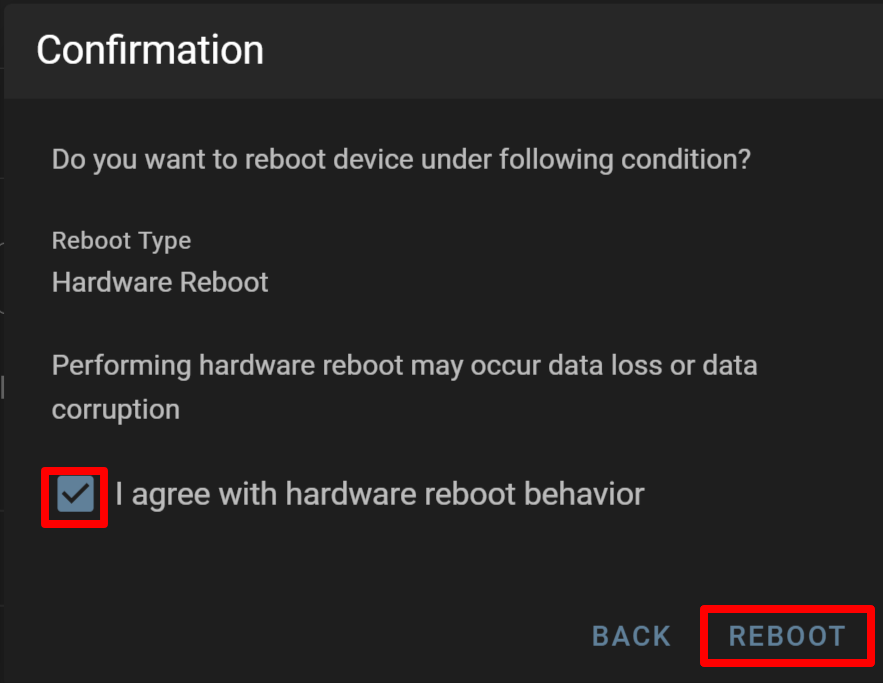
- Select "Software Reboot" or "Hardware Reboot", and click [ CONFIRMATINON ].

- The [ Confirmation ] window will be displayed. Click [ REBOOT ] for each of them.
- Software Reboot
- Hardware Reboot
If you check the cautionary note, select the checkbox to agree, and click [ REBOOT ], the device will be rebooted.
- Software Reboot
- Click ▼, and select [ DEVICE ].
-
Operating the power supply to cameras (PoE)Operating the power supply to cameras (PoE)
From [ Gateway Settings ], you can operate the power supply (PoE) to the camera as follows:
Start/stop/reset the PoE or USB power supply
< Operating the power supply (PoE) to cameras >
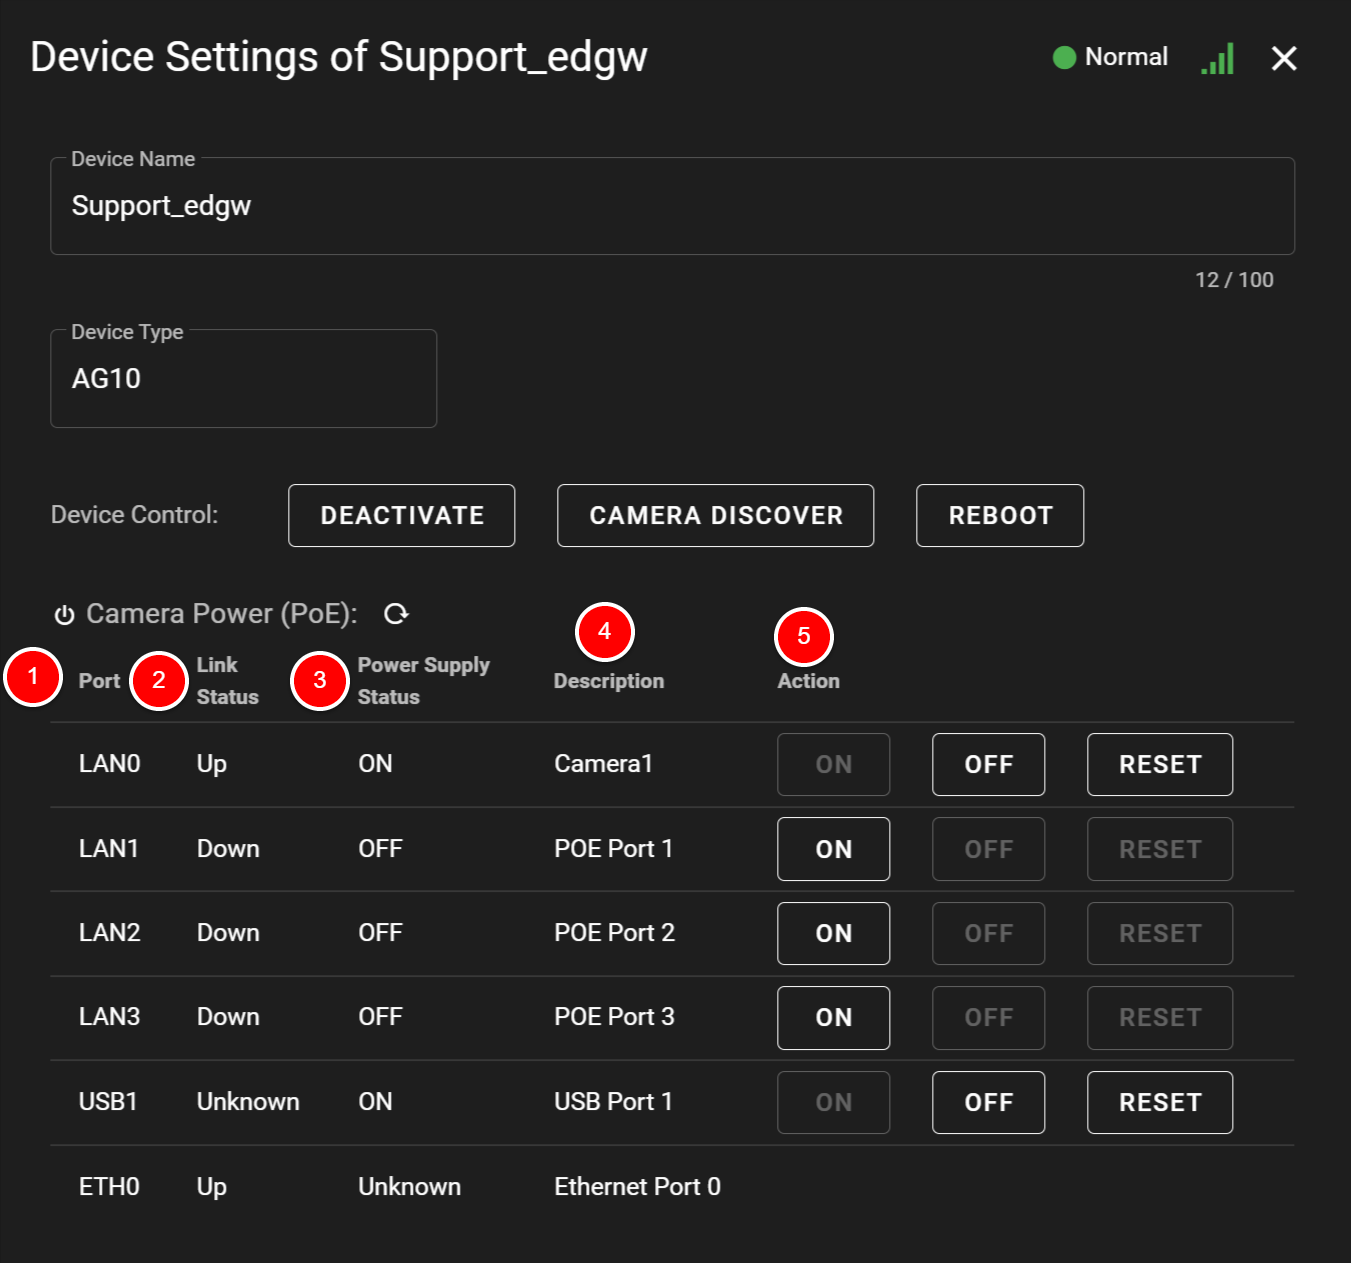
① Port : Indicates the name of each port of a device.② Link Status : Indicates the status of each port.
Up : Link up
Down : Link down
Unknown : The status cannot be obtained.
③ Power Supply Status : Indicates whether or not power is being supplied.
ON : Power is being supplied.
OFF : Power is not being supplied.
Unknown : The status cannot be obtained.
* As the ETH0 port of the AG series is not compatible with PoE power supply, "Unknown" is displayed.
④ Description : You can enter the description of a device connected to each port.
⑤ Action : You can stop or start the power supply to each port.
ON : Starts the power supply.
OFF : Stops the power supply.
RESET : After stopping the power supply to a port, restarts it to the port after a specified time.
Turing ON/OFF and resetting the PoE power supply 1. Click the button you want to perform for the target port.
While turning ON/OFF or resetting the power supply of a port, you can perform an action for another port.
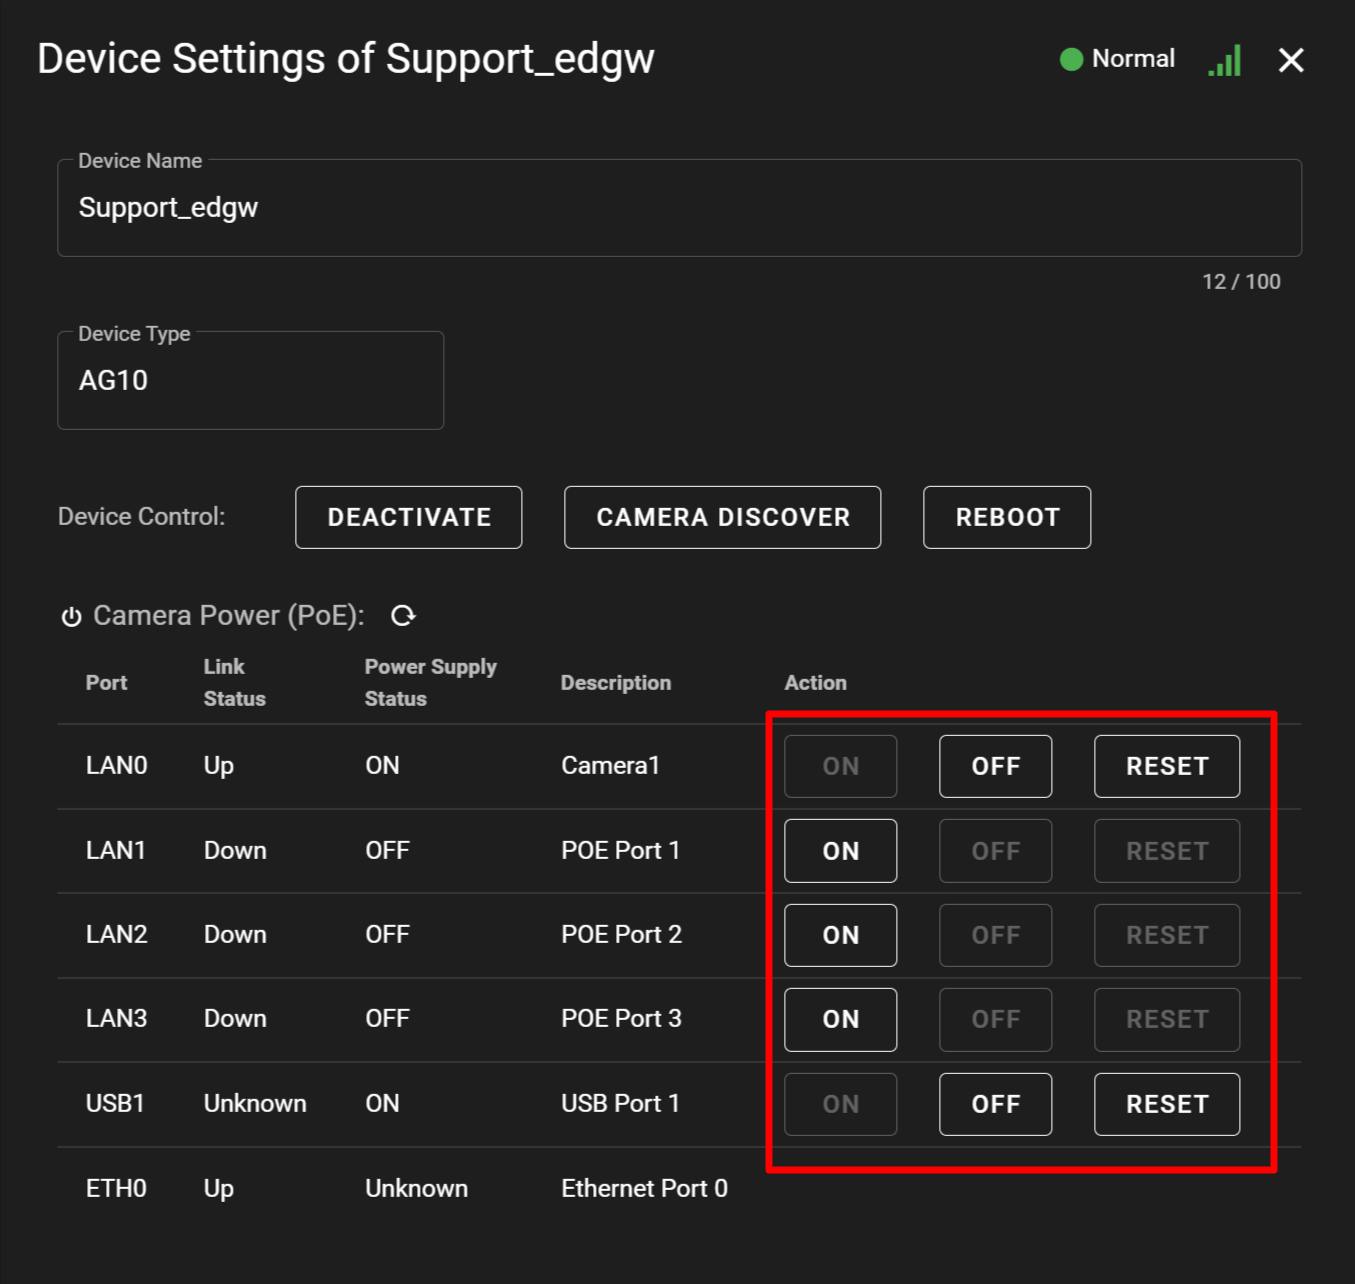
ON: Enables the power supply function.
OFF: Disables the power supply function.
Reset (*): Disables the power supply function only during a specified time (reset time), and automatically enables it after passing the specified time.
・LAN port: 1 second ~ 60 minutes (Default value 1 minute)
・USB port: 1 second ~ 60 minutes (Default value 10 seconds)
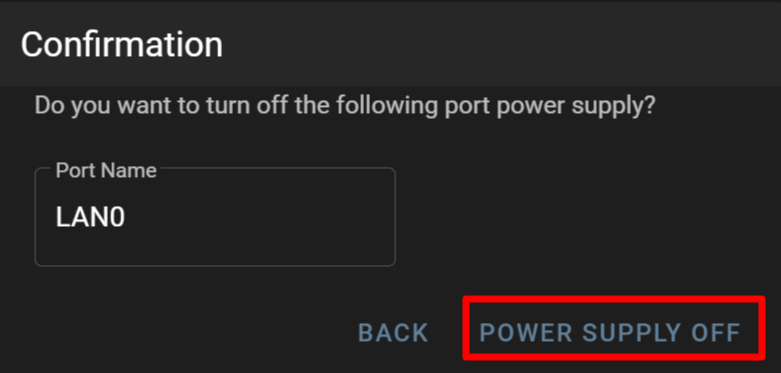
2. The confirmation window will be displayed. Click [ POWER SUPPLY ON ] or [ POWER SUPPLY OFF ].
If resetting the power supply, specify a wait time and click [ RESET ].
Operating screens and searching cameras
-
Viewing camera imagesViewing camera images
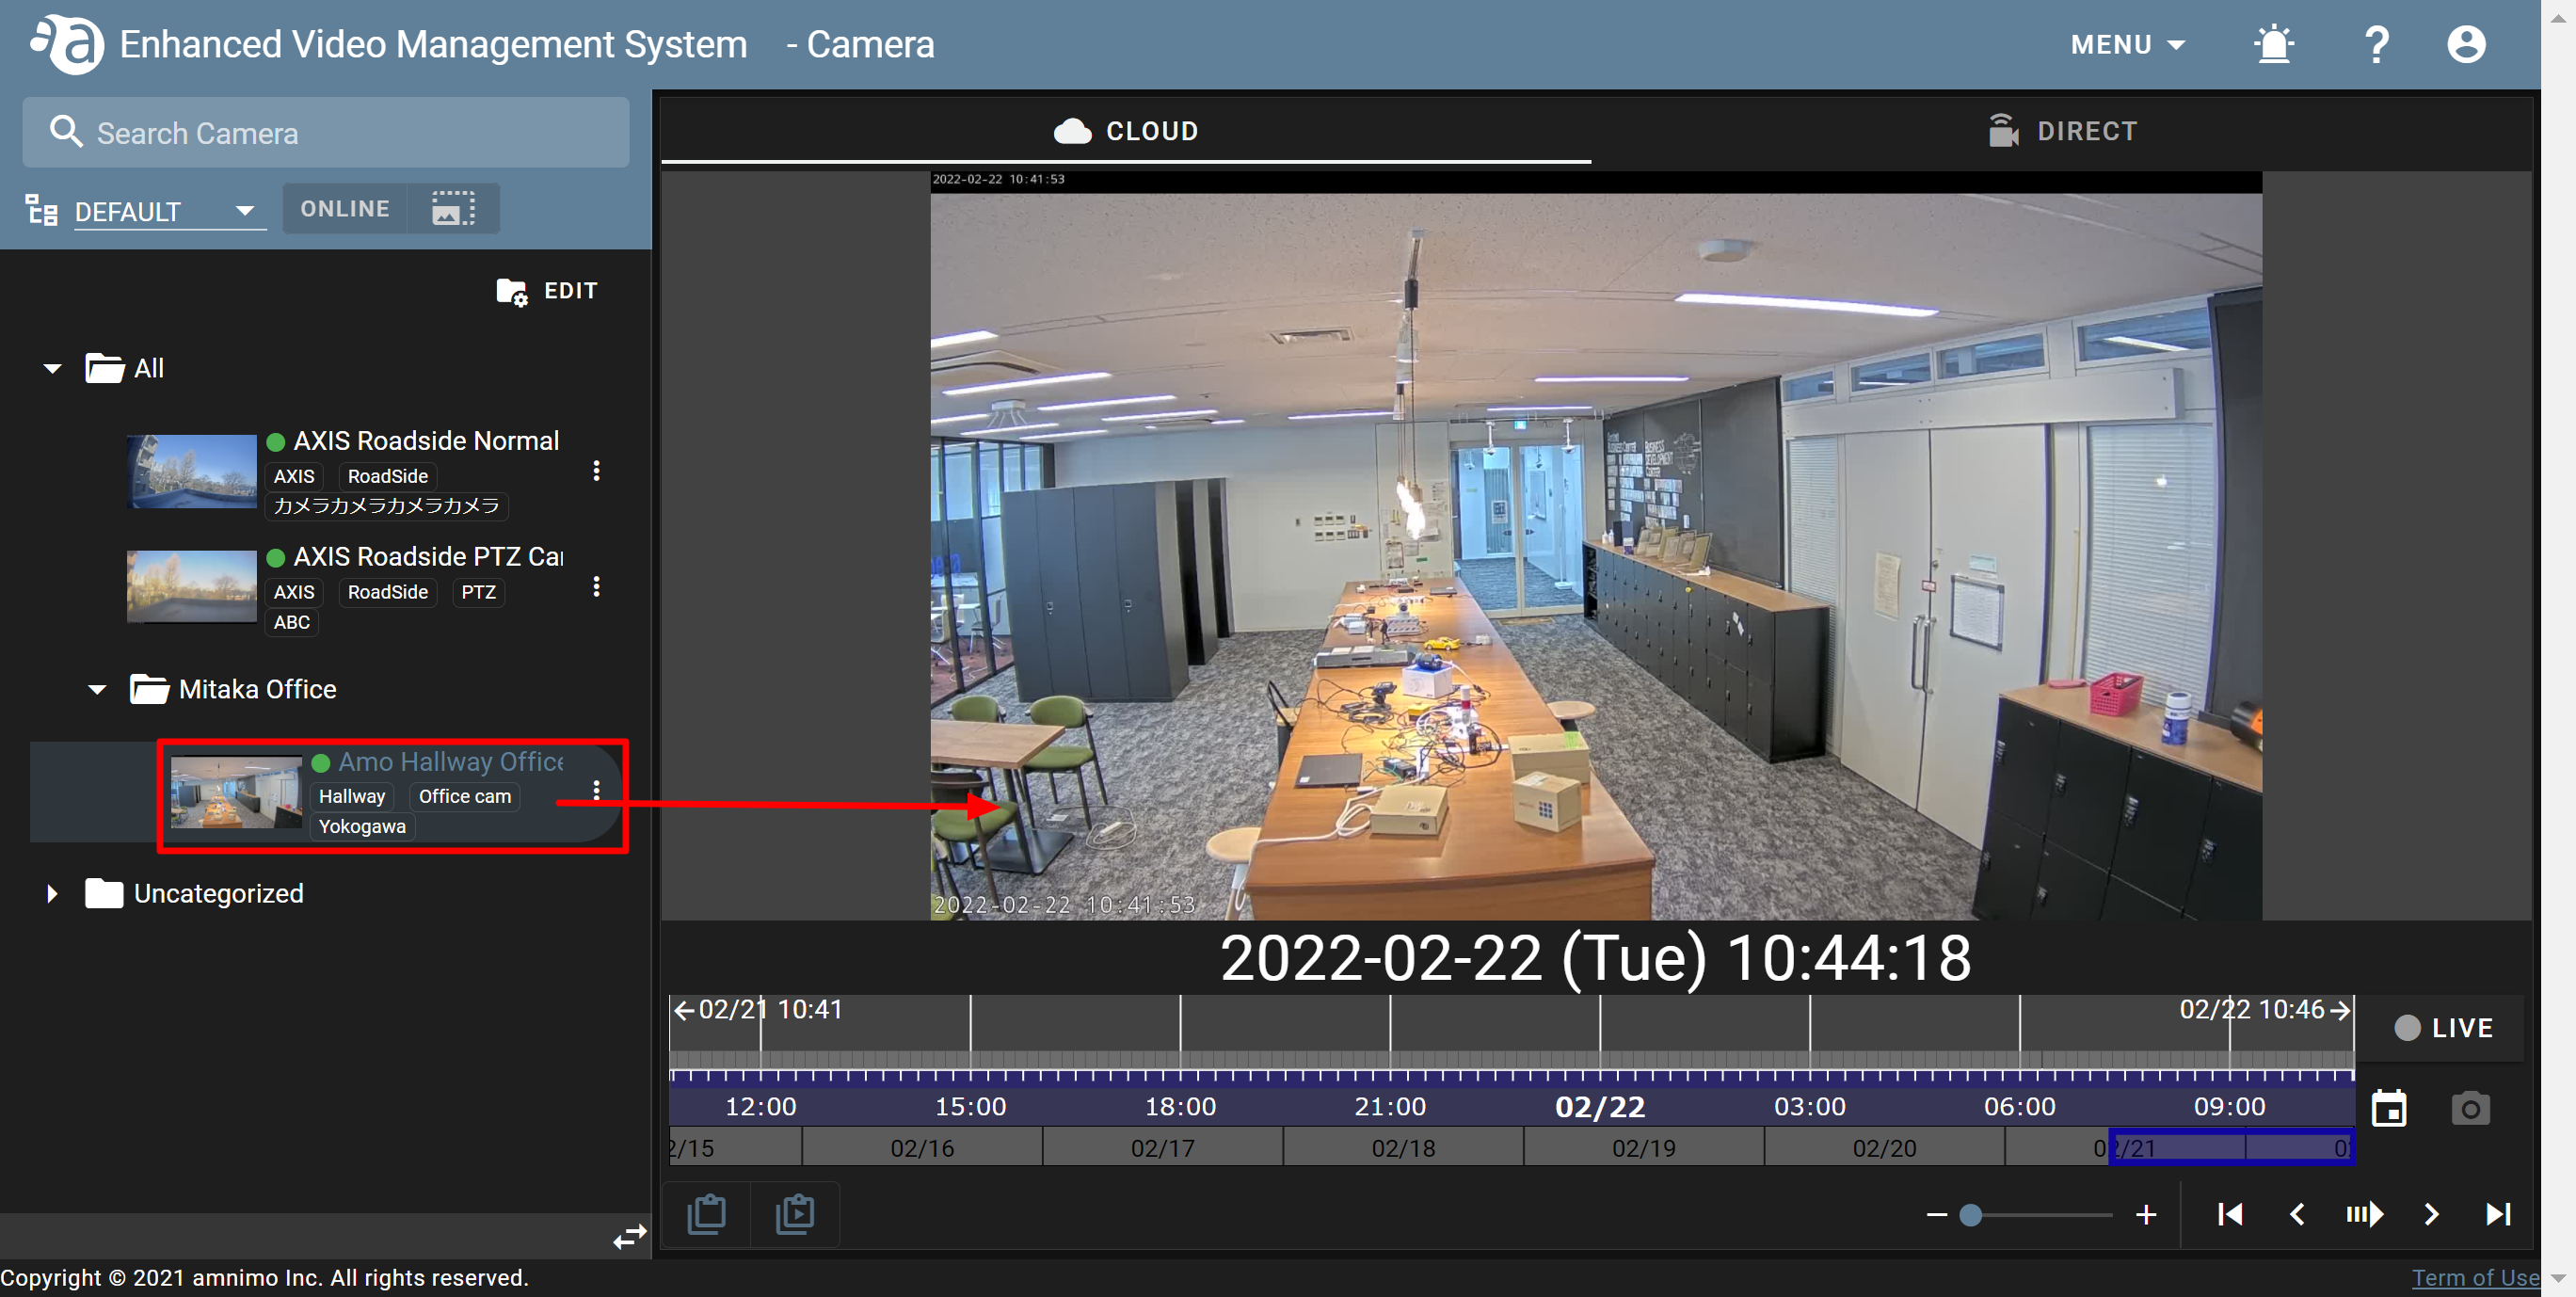
If you click a camera name displayed on the screen, you will be able to check images taken by the camera.
-
Changing the width of the sidebarChanging the width of the sidebar
The width of the sidebar can be changed by dragging the bar between the sidebar and the camera screen to the left or right.
-
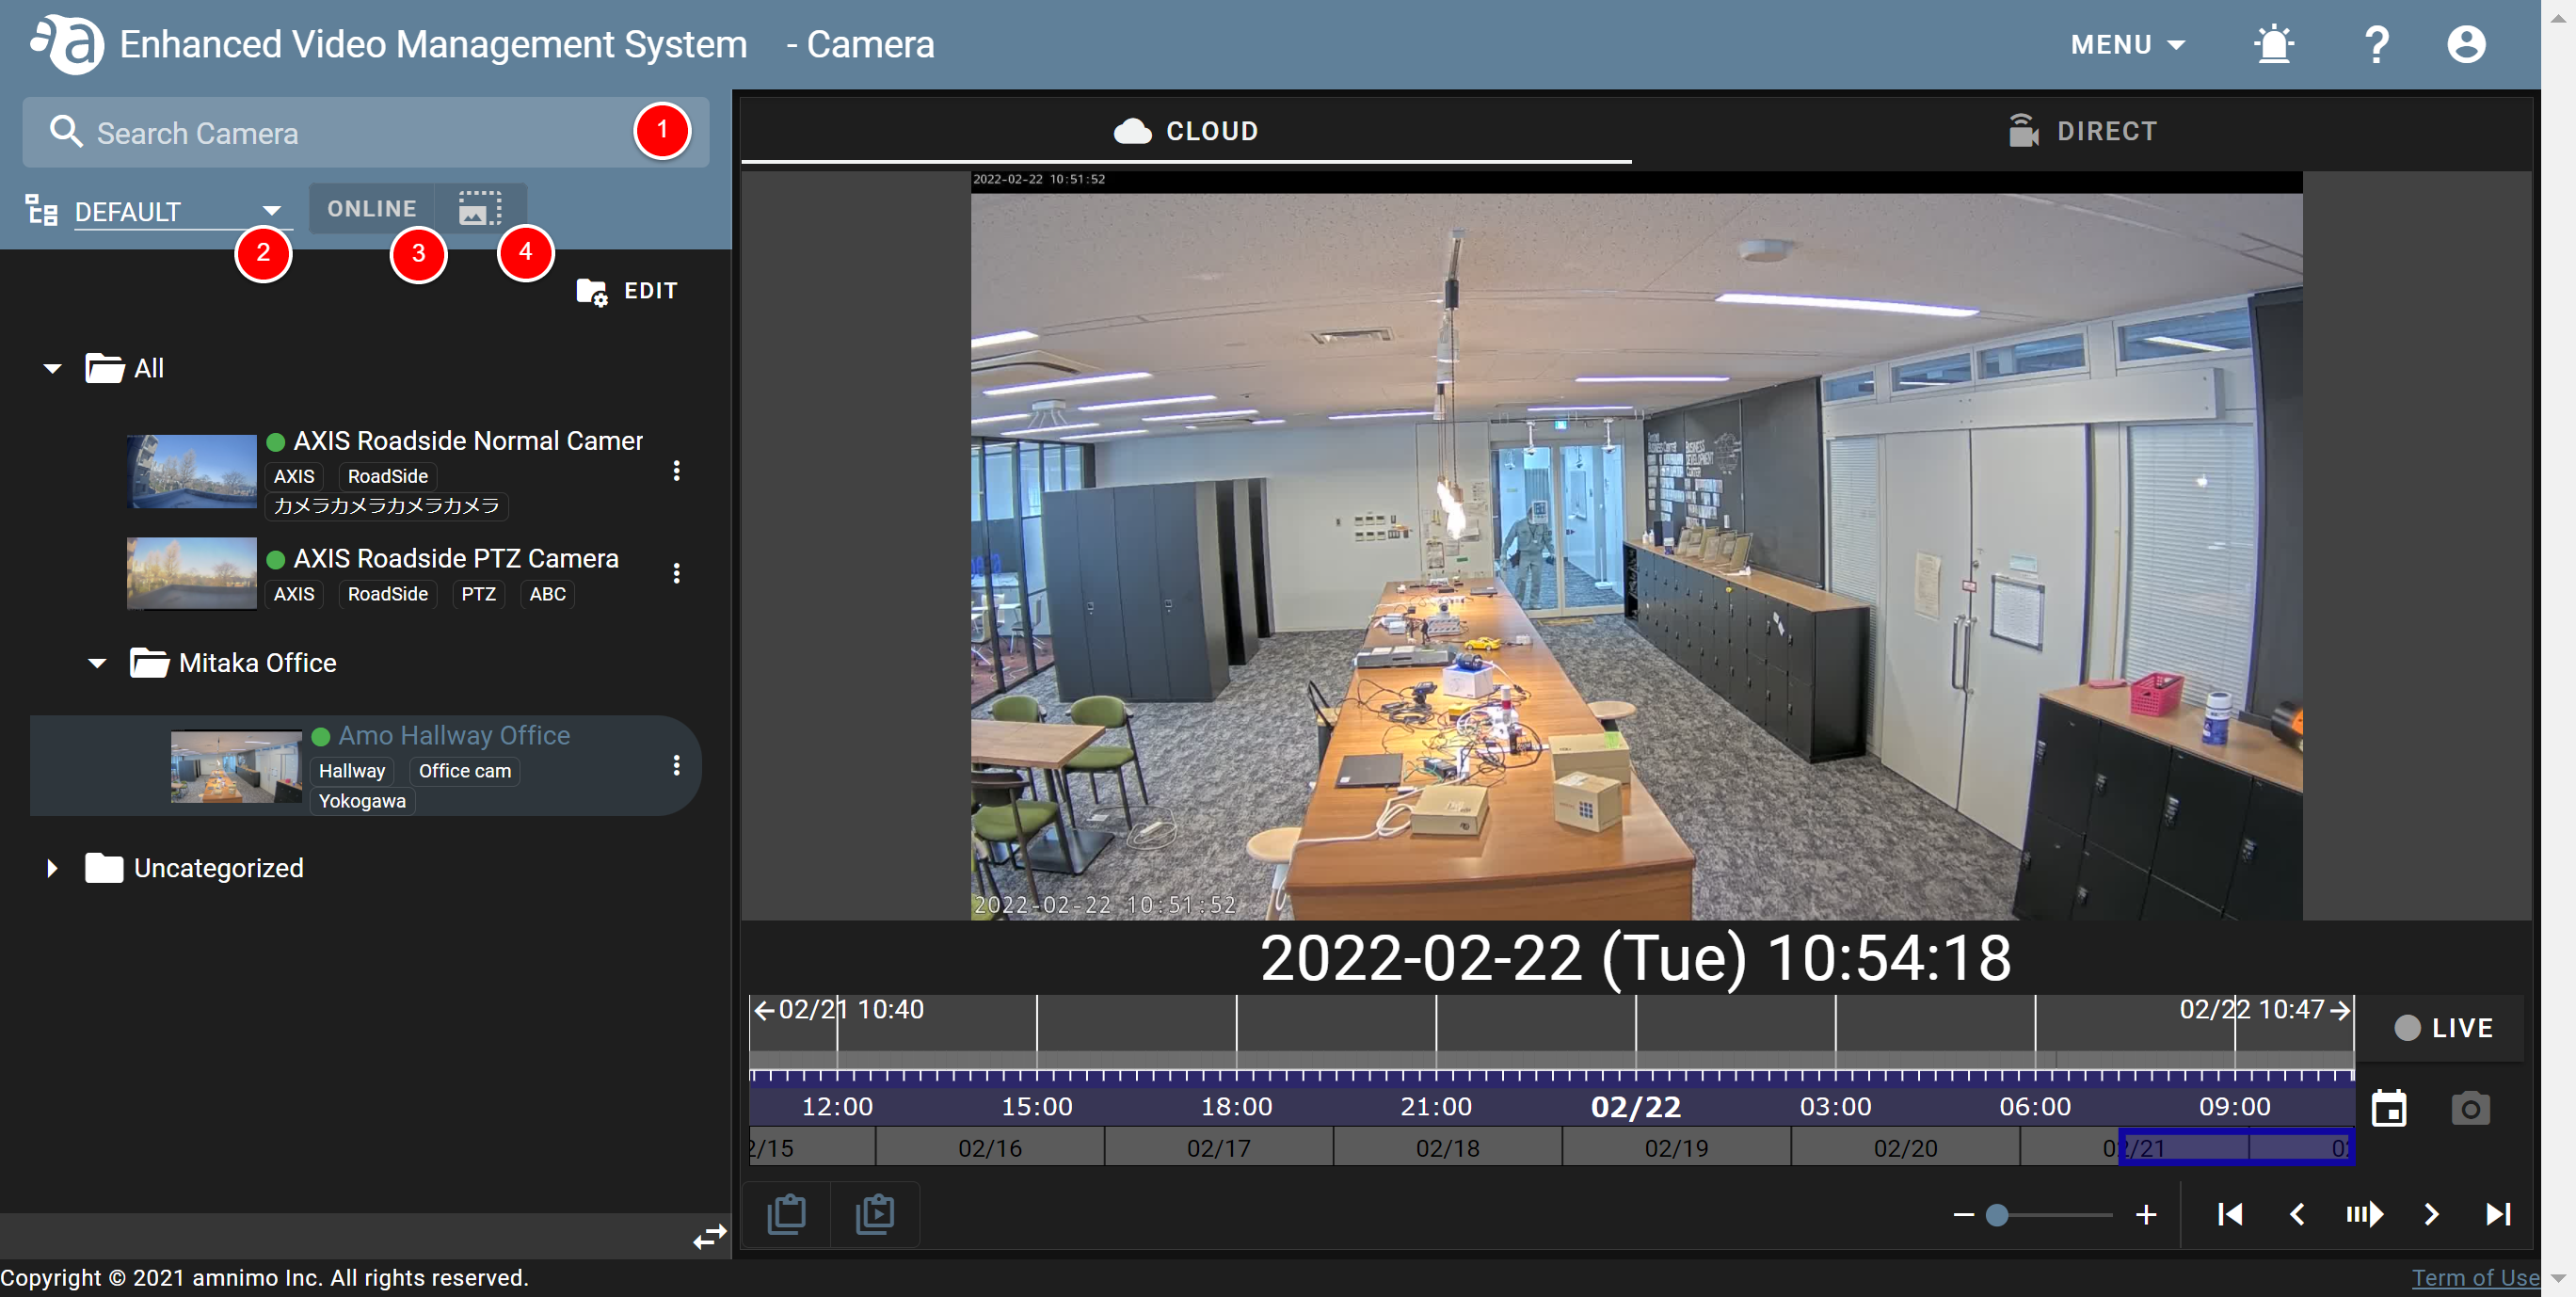
Searching and displaying camerasSearching and displaying cameras
You can filter and search as follows, and change the way to display the list.
① Search box: If you enter a camera name or tag name, cameras that match the search condition will be displayed.
② Display switch: Click ▼ and select the following display.
DEFAULT : Sorts and displays cameras in a folder.
DEVICE : Displays cameras by tenant/gateway.
FLAT : Displays all cameras on a list.
③ ONLINE: Click this to display only online cameras on the camera list.
 : Online
 : Offline
④ Thumbnail view: Click this to display a thumbnail taken by the camera as a large image.
Managing camera folders
If there are multiple cameras, etc., you can create folders and organize the cameras under them.
This section explains the procedures for creating and editing folders and subfolders and the one for deleting folders. (Click each item to display the procedure and detailed information.)
-
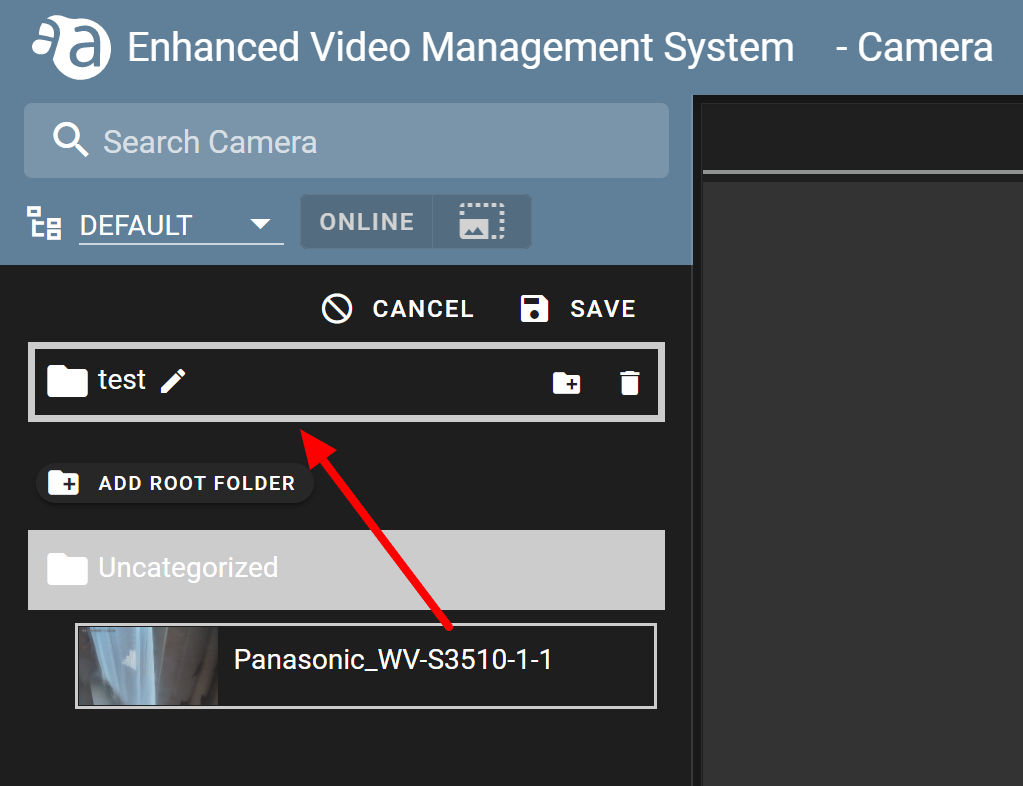
Creating foldersCreating folders
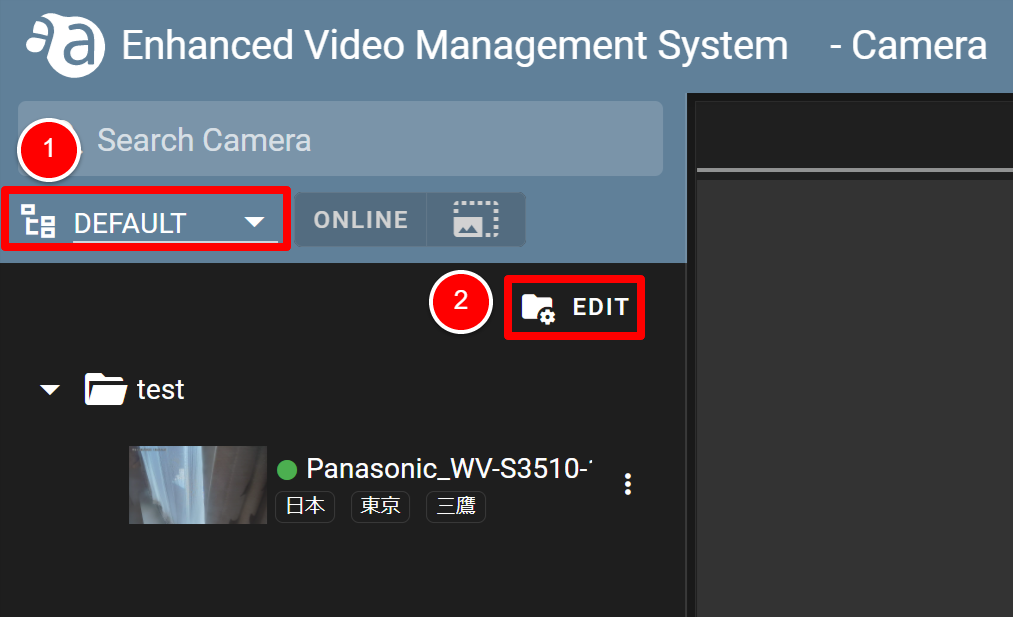
- From the display switch pull-down menu, select [ DEFAULT ]. (① in the figure below)
- Click [ EDIT ]. (② in the figure below)
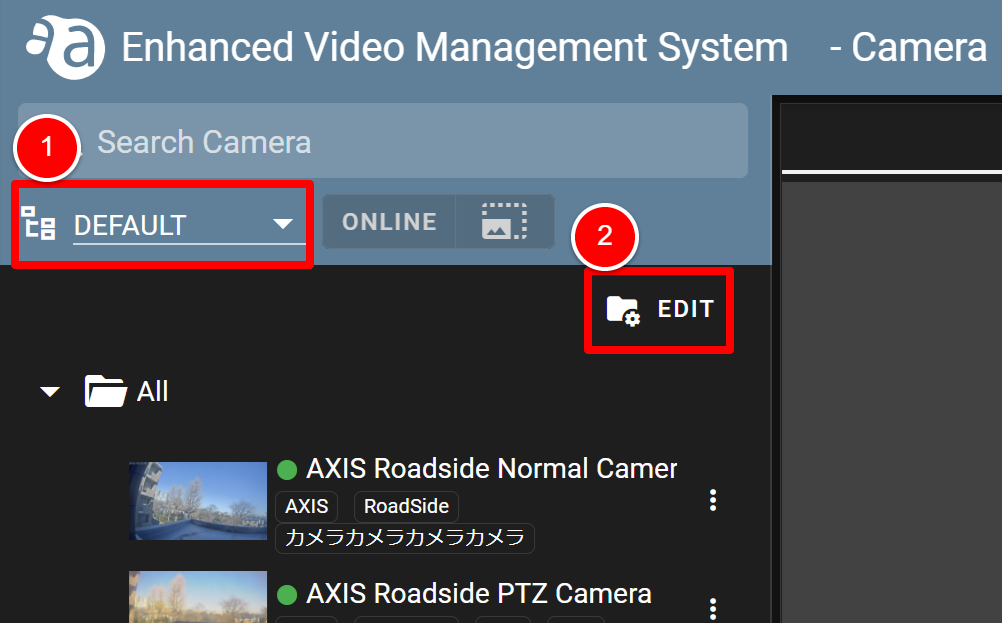
- The [ ADD ROOT FOLDER ] button will be displayed. Click it. (③ in the figure below)
- Enter a folder name, and click [ SAVE ]. (④ in the figure below)
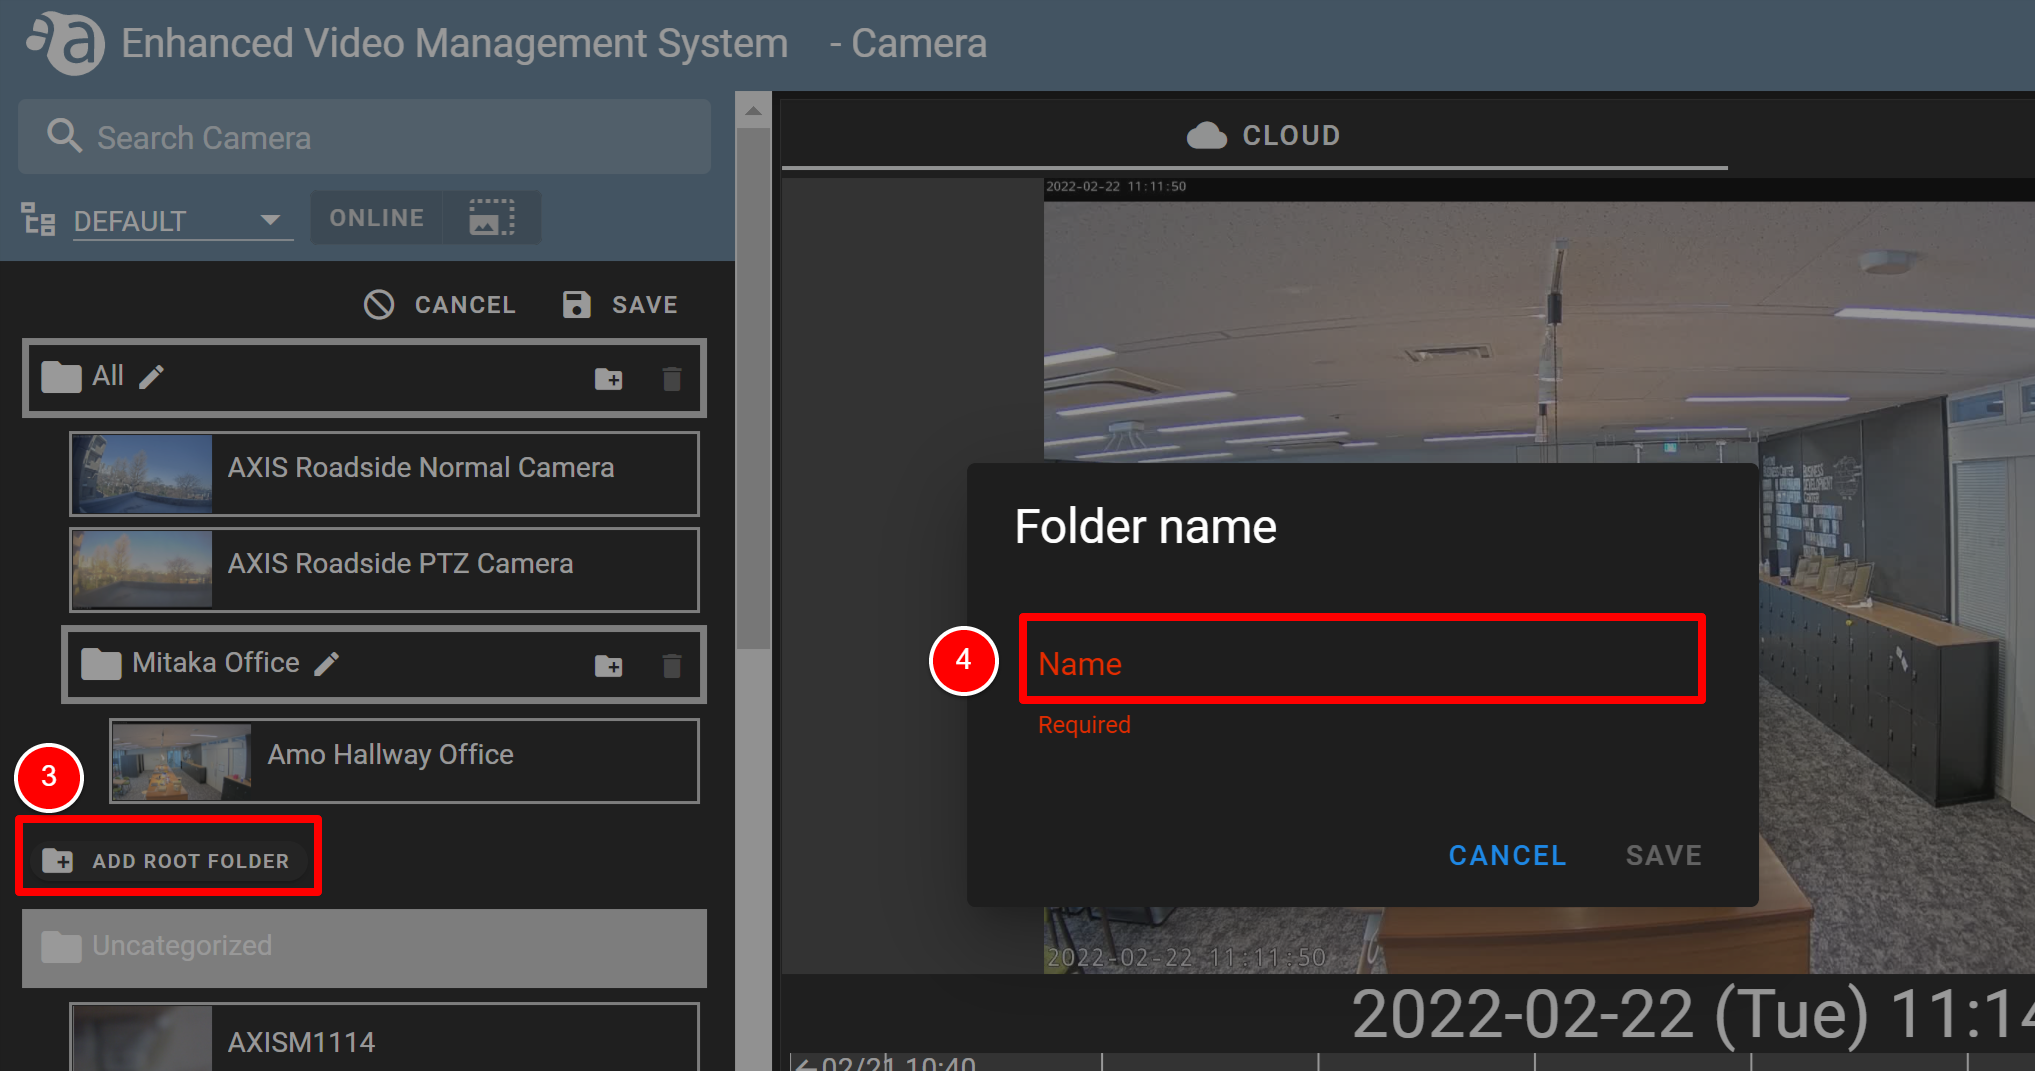
- Drag the camera under the newly created folder. (If you click (
 ), the folder name will be changed.)
- Click [ SAVE ] to save the newly created folder.
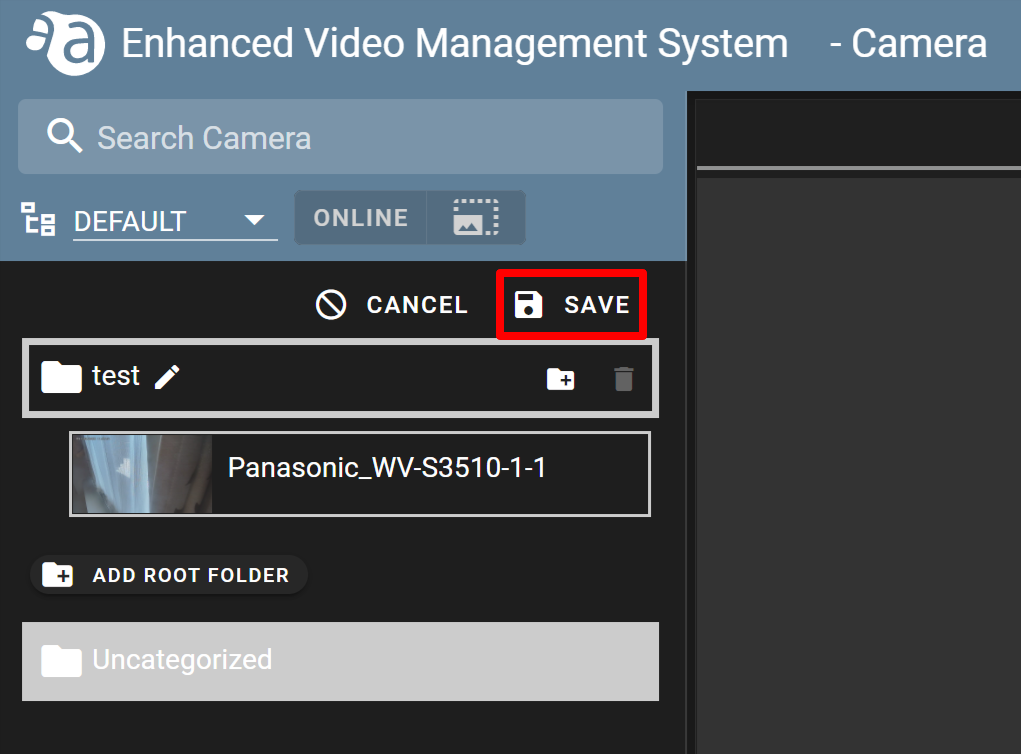
- The camera will have been saved under the new folder.
- From the display switch pull-down menu, select [ DEFAULT ]. (① in the figure below)
-
Creating subfoldersCreating subfolders
You can create subfolders for existing folders. This section explains the procedure for creating subfolders.
- From the display switch pull-down menu, select [ DEFAULT ]. (① in the figure below)
- On the camera list, click [ EDIT ]. (② in the figure below)
- Click the [ Add sub folder ] button in the figure below.
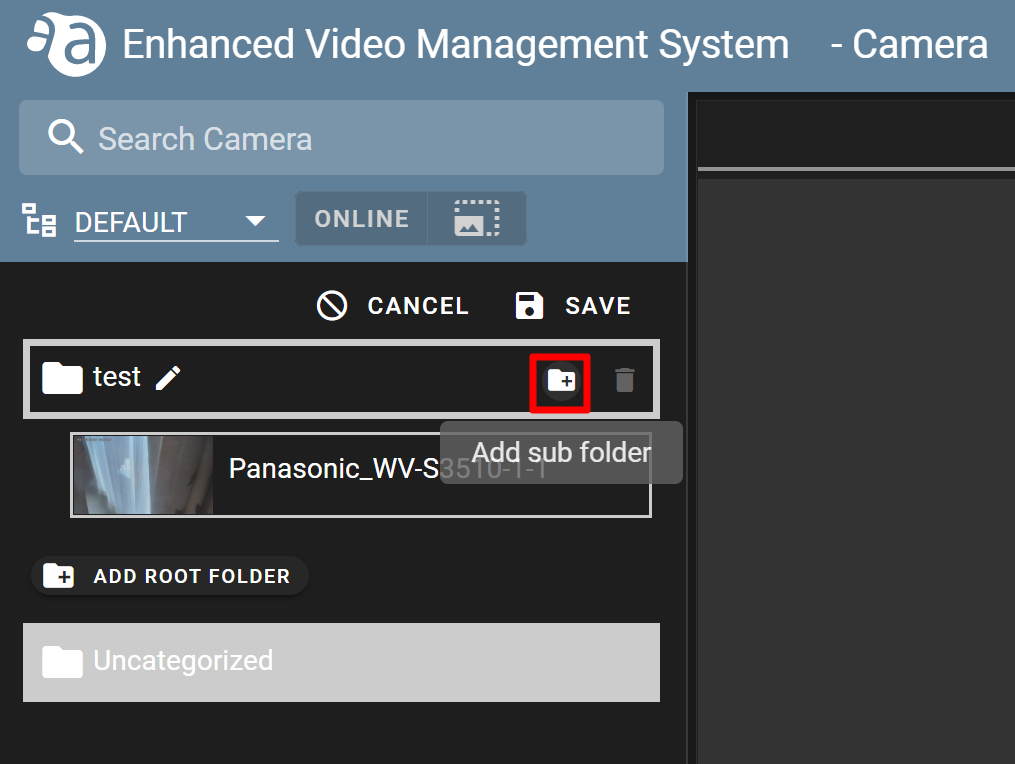
- As shown in the figure below, a subfolder named as "Parent folder name – 2" will be created. (If you click
 , the folder name will be changed.)

- Drag the camera under the new subfolder as necessary, and click [ SAVE ] to save the change.
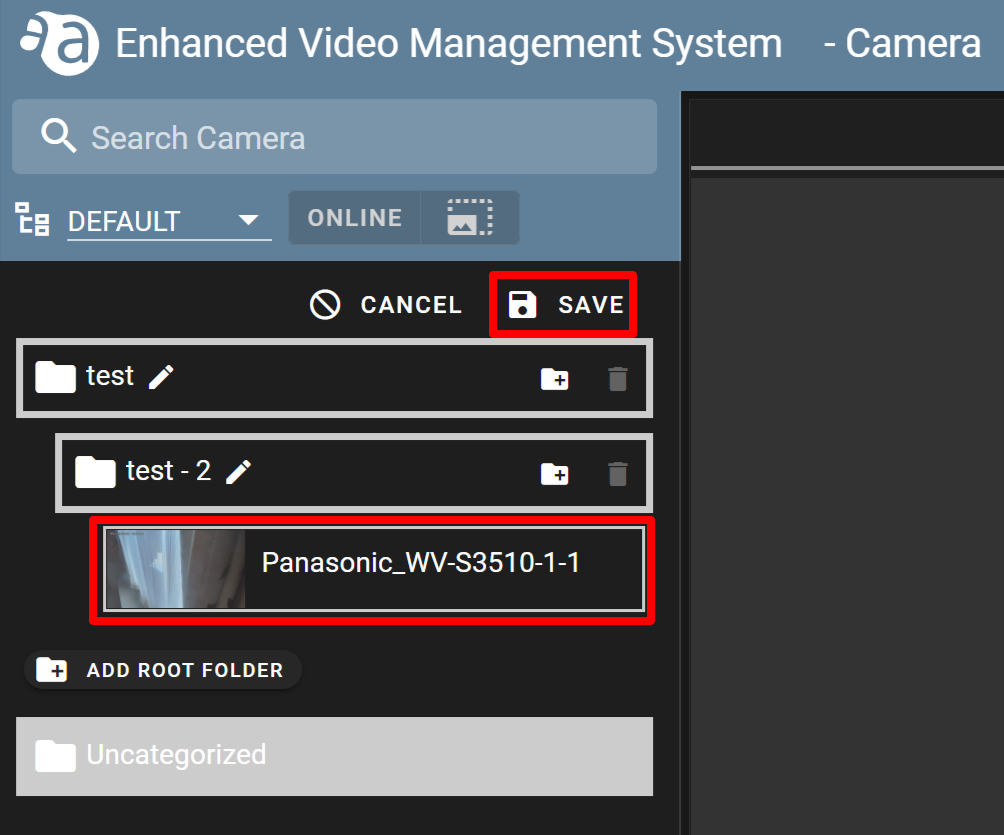
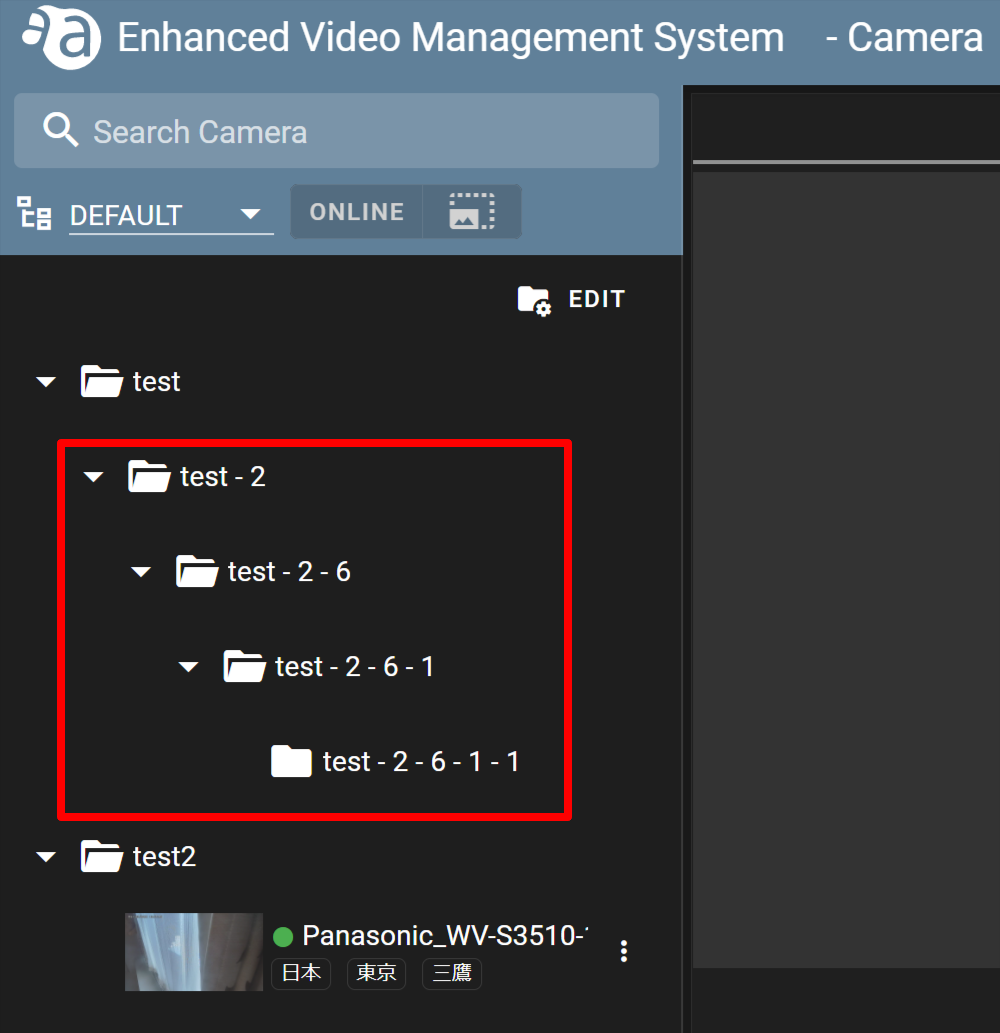
- Subfolders can be created up to 4 layers.
- From the display switch pull-down menu, select [ DEFAULT ]. (① in the figure below)
-
Deleting foldersDeleting folders
From the display switch pull-down menu, select [ DEFAULT ]. (① in the figure below)
On the camera list, click [ EDIT ]. (② in the figure below)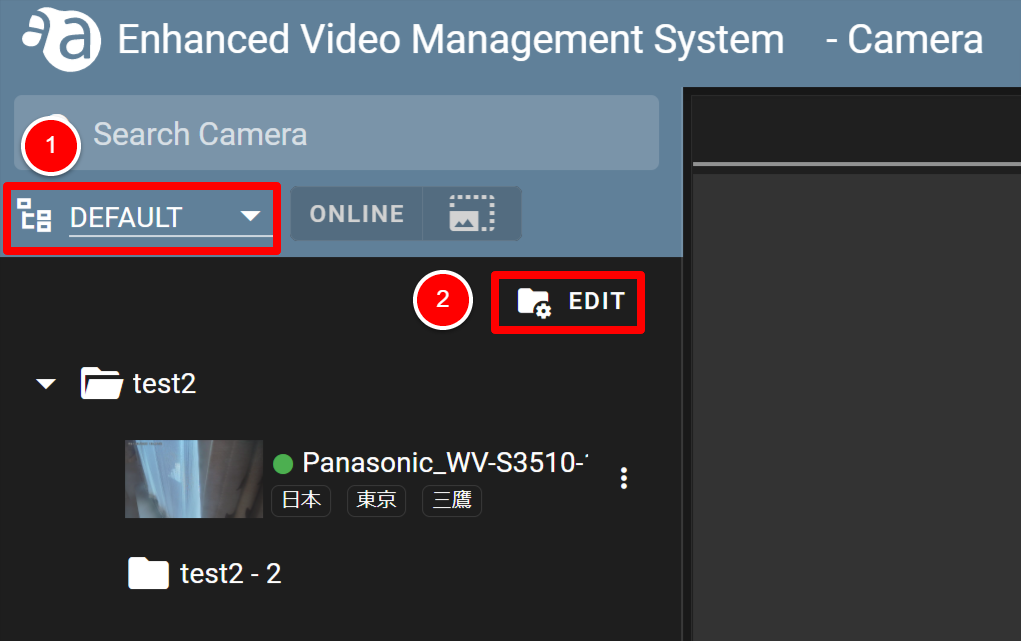
Click the recycle bin icon displayed for the folder you want to delete. The folder will be immediately deleted.
*The folder where the camera is stored cannot be deleted, as the recycle bin icon is not displayed for it.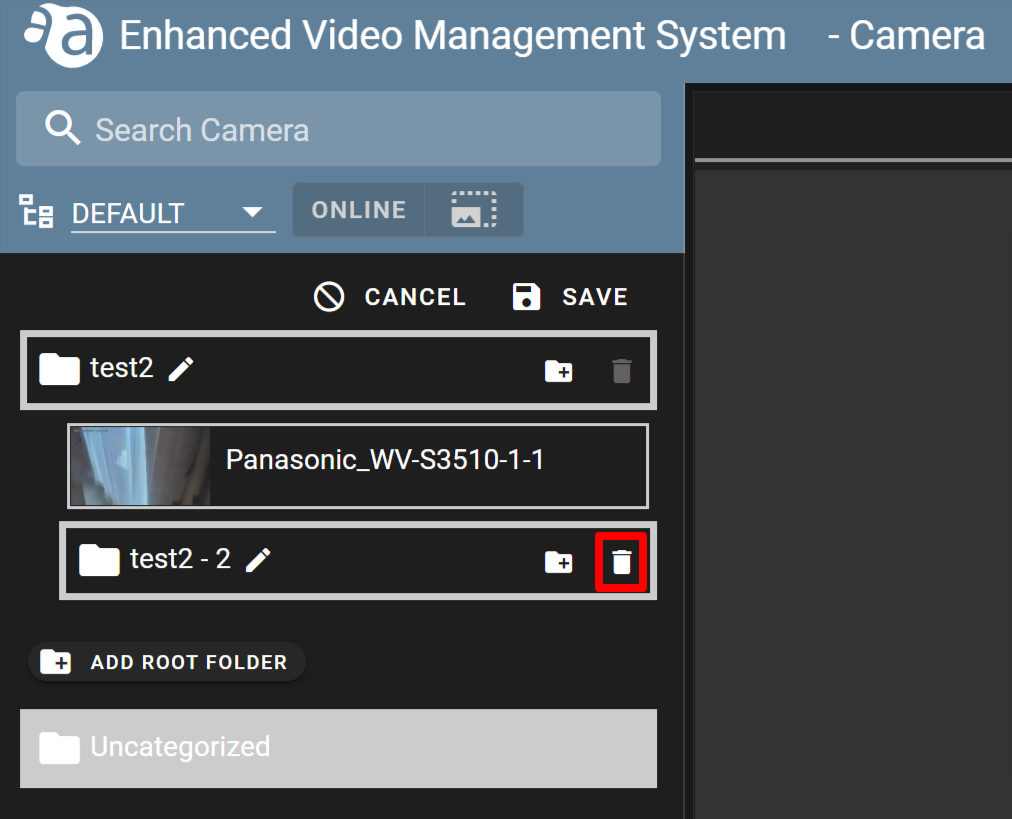
Creating reports
With the report creation function, you can create a report attached with snapshots taken by you. (If you have applied for using this function.)
|
|
Reports you create will not be saved on the Enhanced Video Management System. If you click [ CANCEL ], the contents you have written will be lost. If you want to save a report, save it in PDF format from [ PREVIEW/PRINT ] or print it. |
(Click each item to display the procedure and detailed information.)
-
Creating a report for snapshotsCreating a report for snapshots
You can create a report for snapshots you have taken.
Creating a report attached with the most recently taken thumbnail - Click the icon for the target camera, and click [ Create new report ].
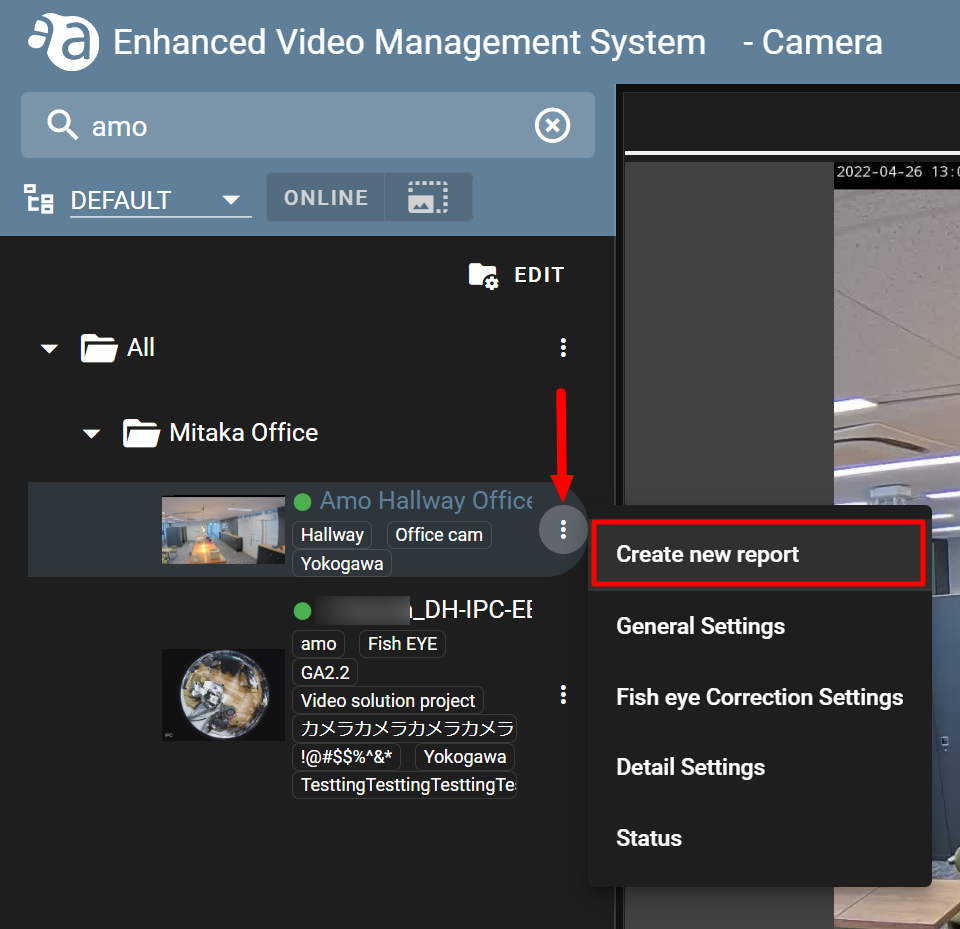
- A report automatically attached with the most recently taken thumbnail image will be displayed. Enter the following:
① Report Title : Enter a title for the report. (within 30 characters)
② Comment : Enter a comment for the image. (Within 5 lines and up to 100 characters)
③ Summary : Enter a summary. (Within 10 lines and up to 500 characters)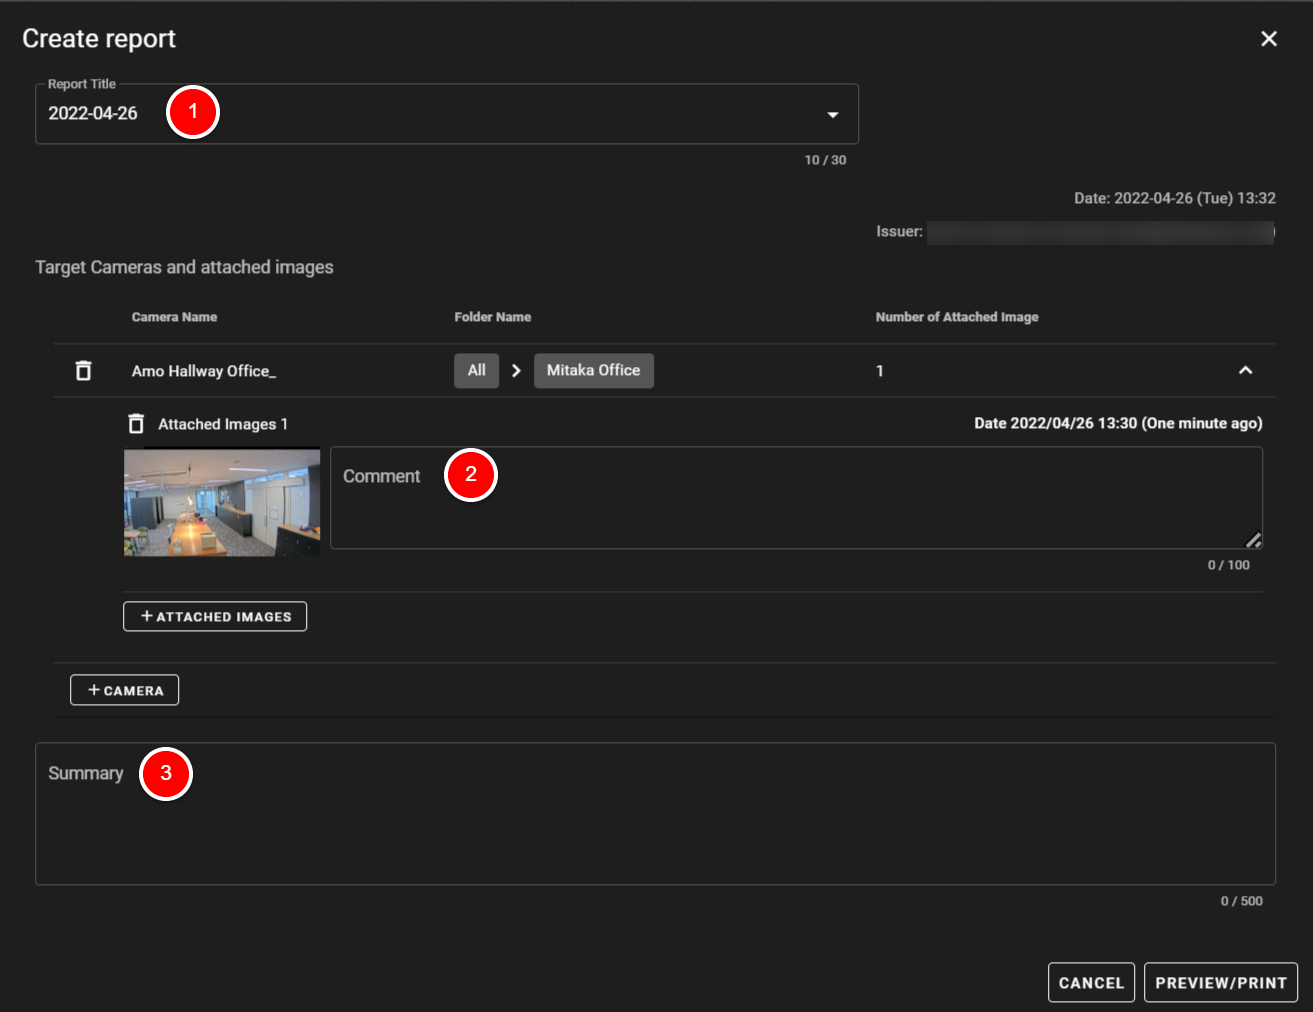
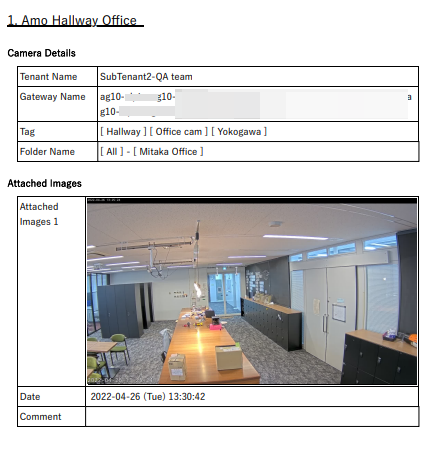
- If you click [ PREVIEW/PRINT ], the preview/print screen will be displayed on the browser you are using. On this screen, you can save a report in PDF format or print it.
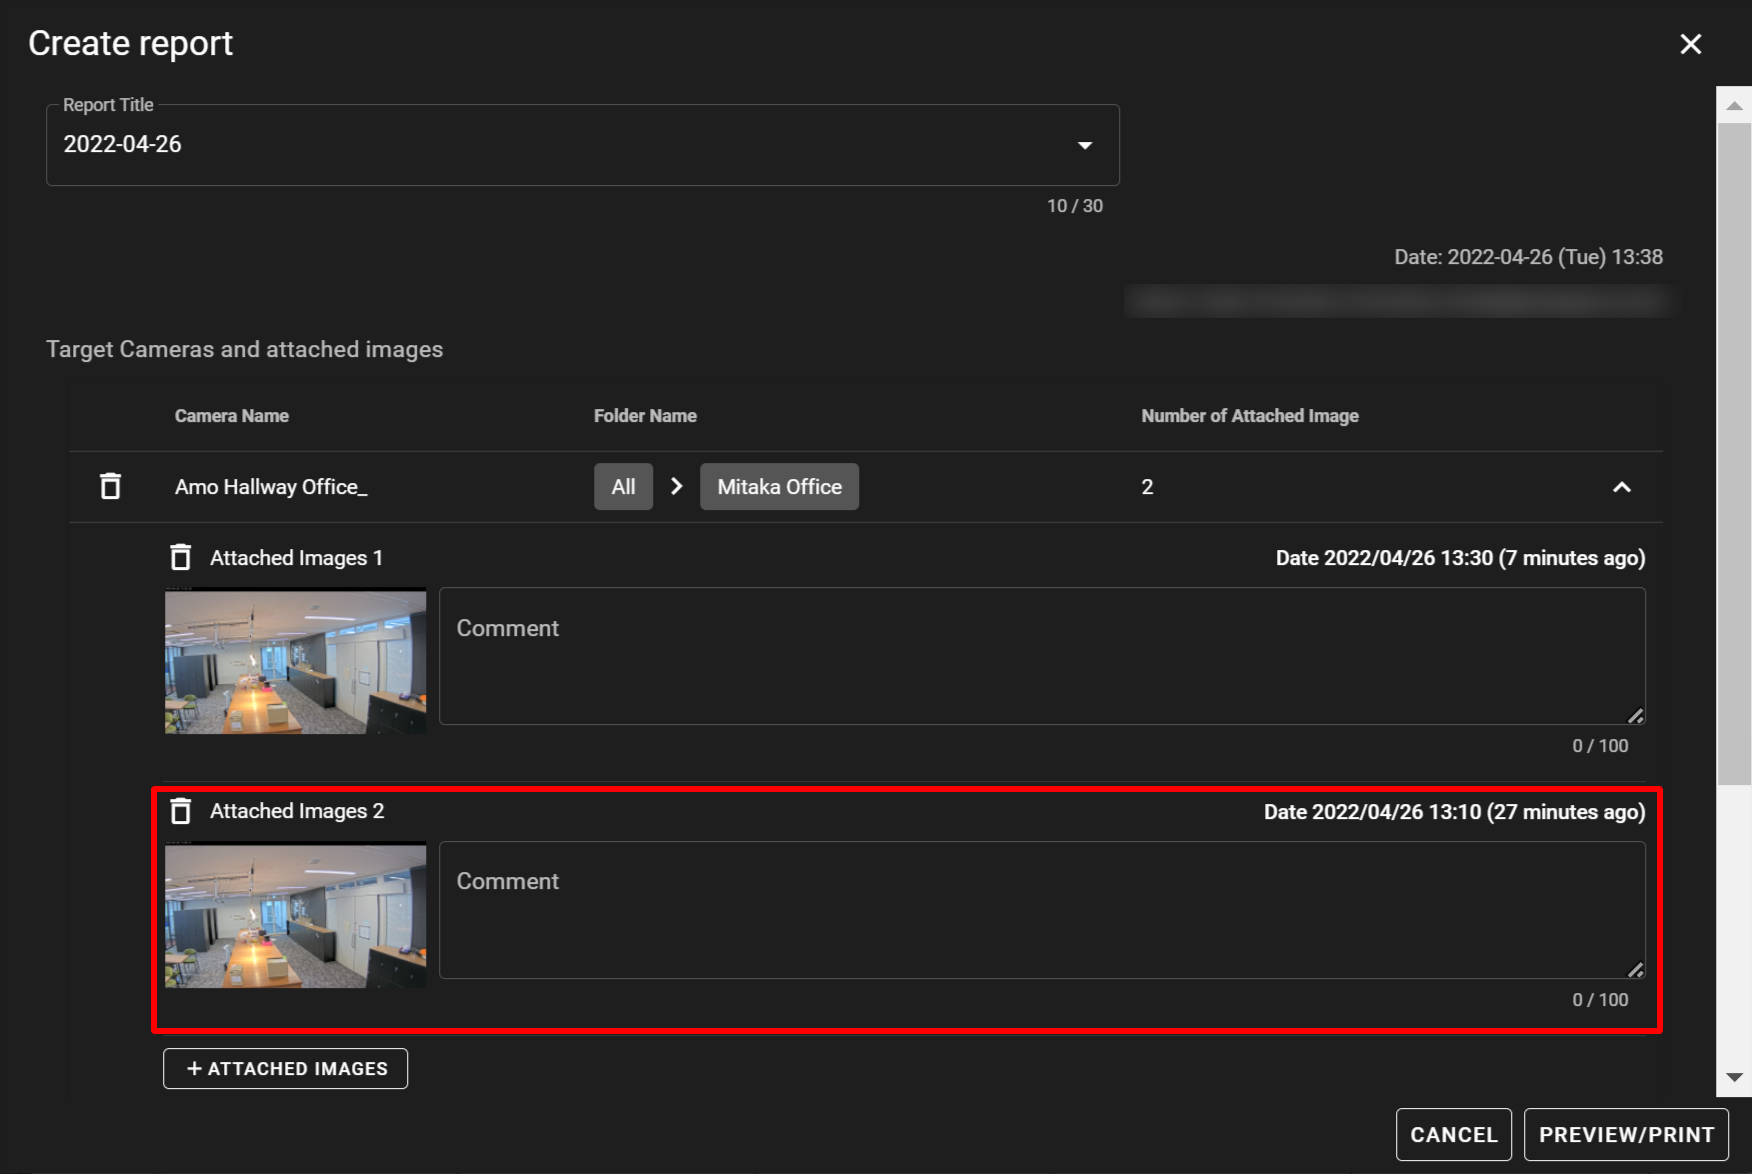
Adding images to a report - You can add multiple images for each camera. (Up to 10 images per camera) On the [ Create report ] screen, click [ + ATTACHED IMAGES ].

- Thumbnails and snapshots you have taken will be displayed as shown in the figure below. Click the image you want to attach to the report.
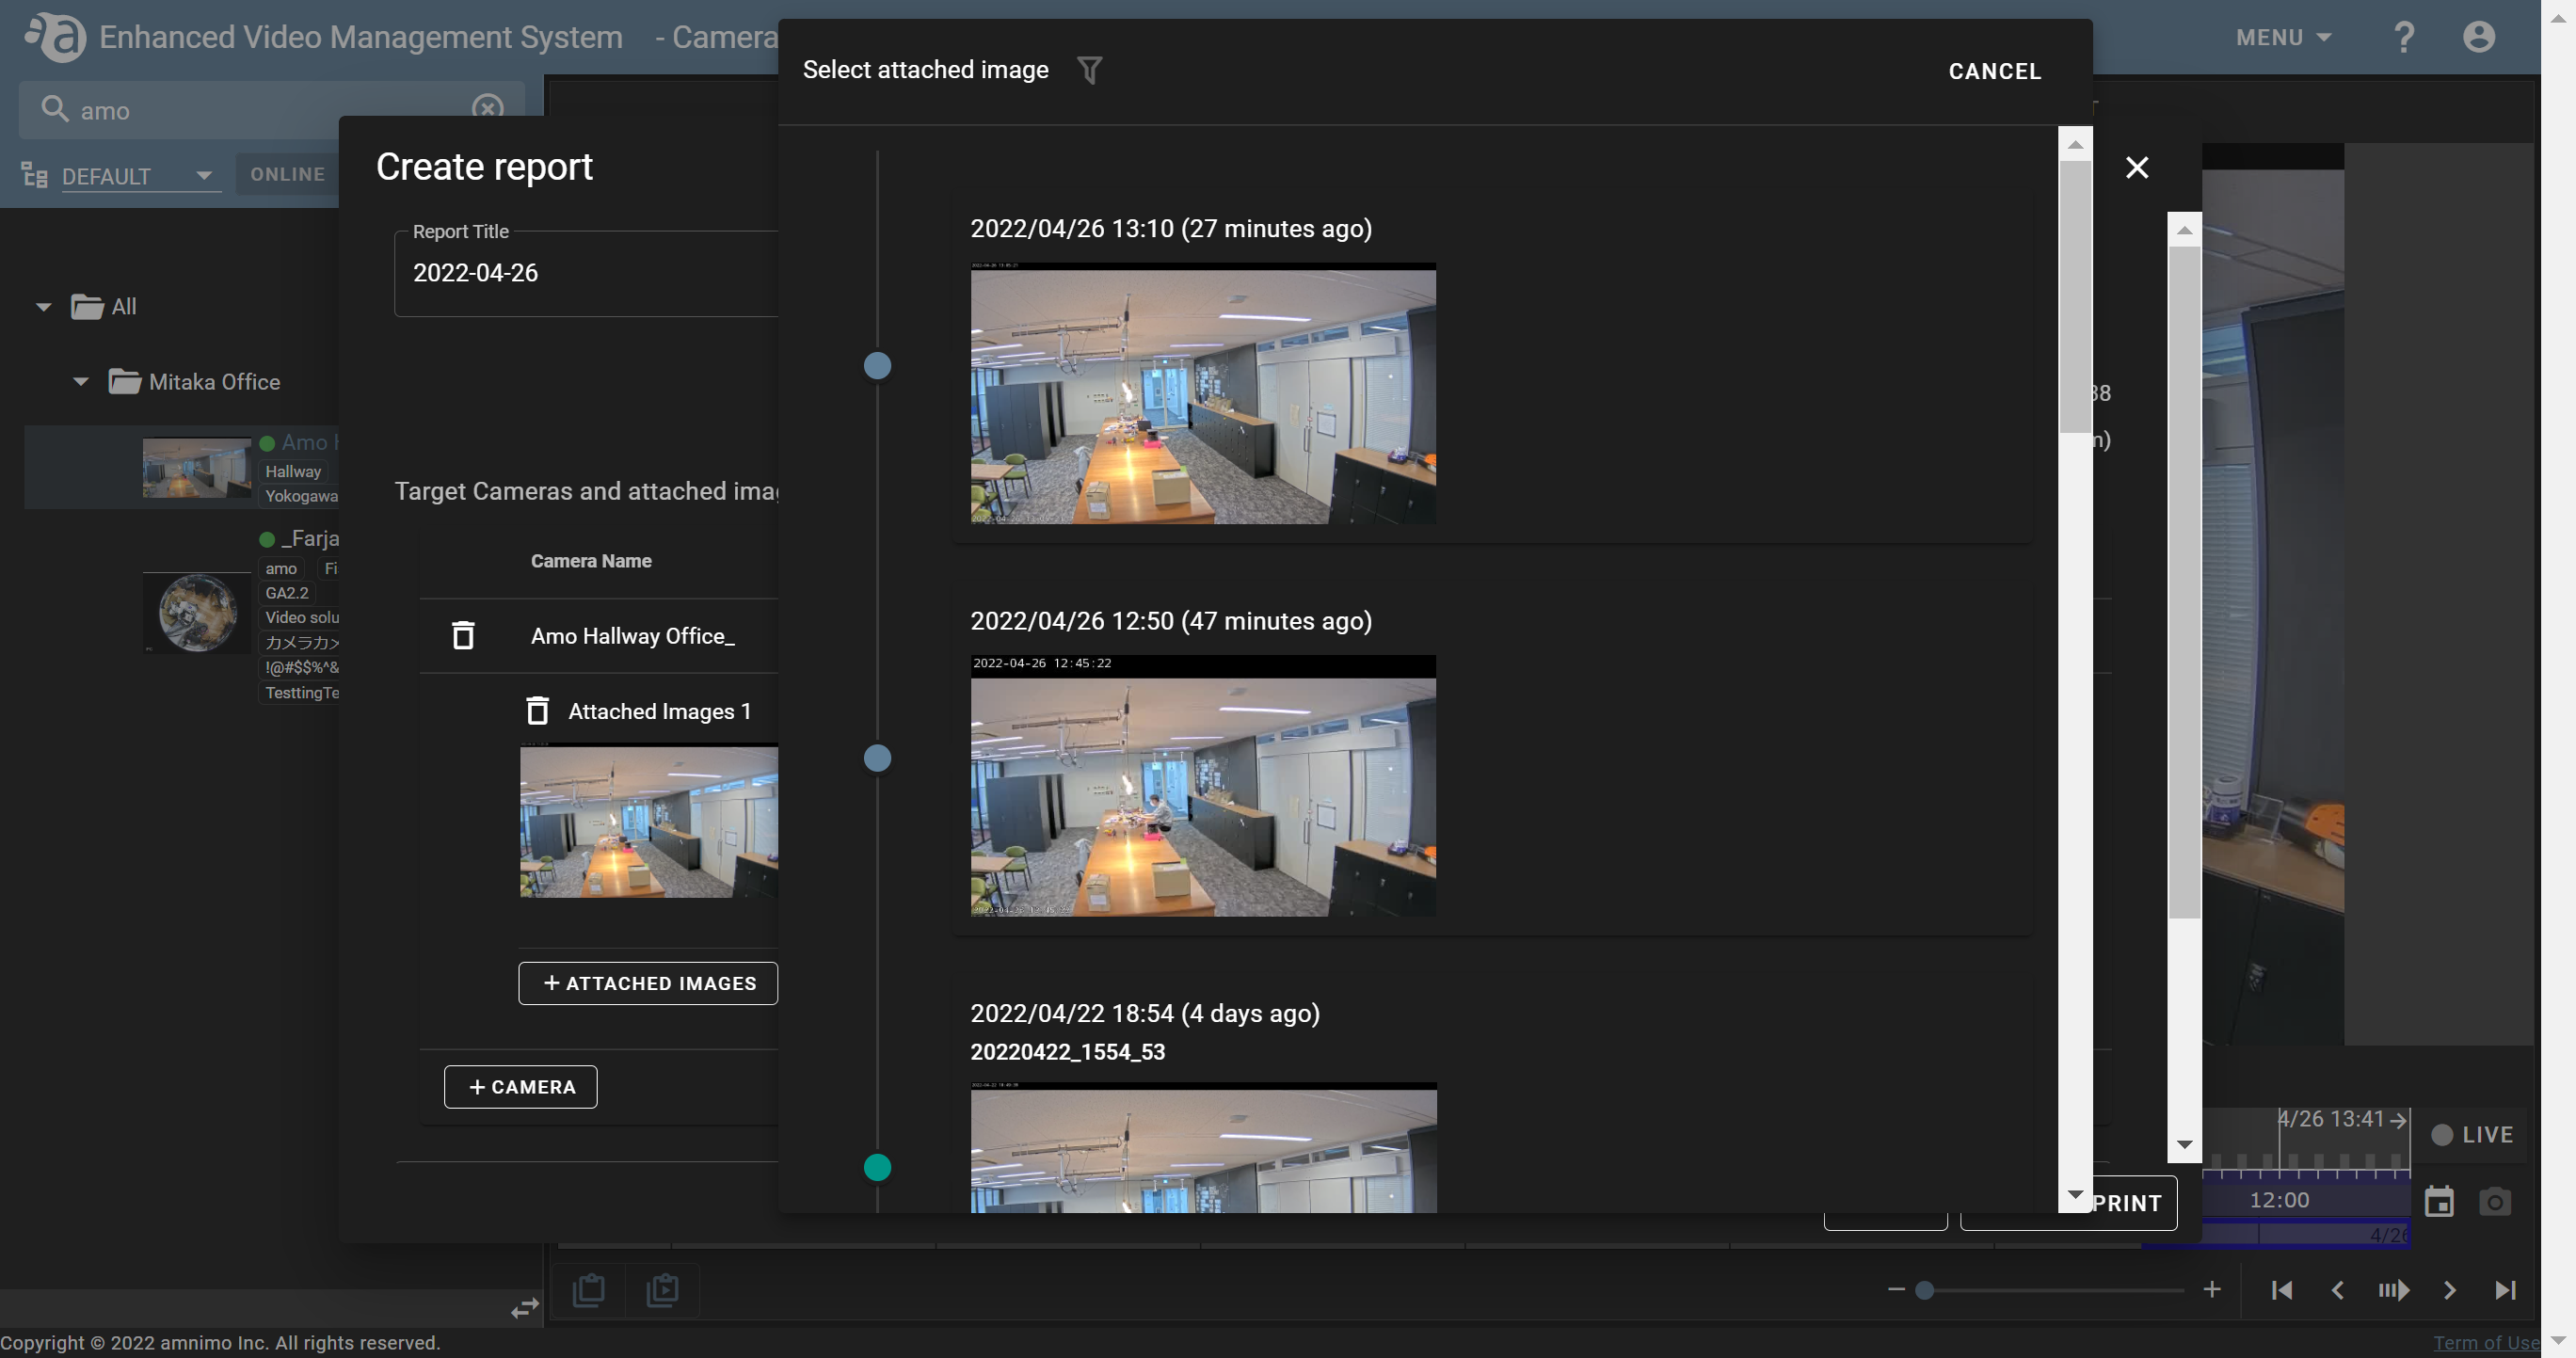
- The image will be added to the report as shown below.
Adding other cameras to a report You can include images taken by multiple cameras in a report. (Up to 20 cameras per report) - On the [ Create report ] screen, click [ + CAMERA ].
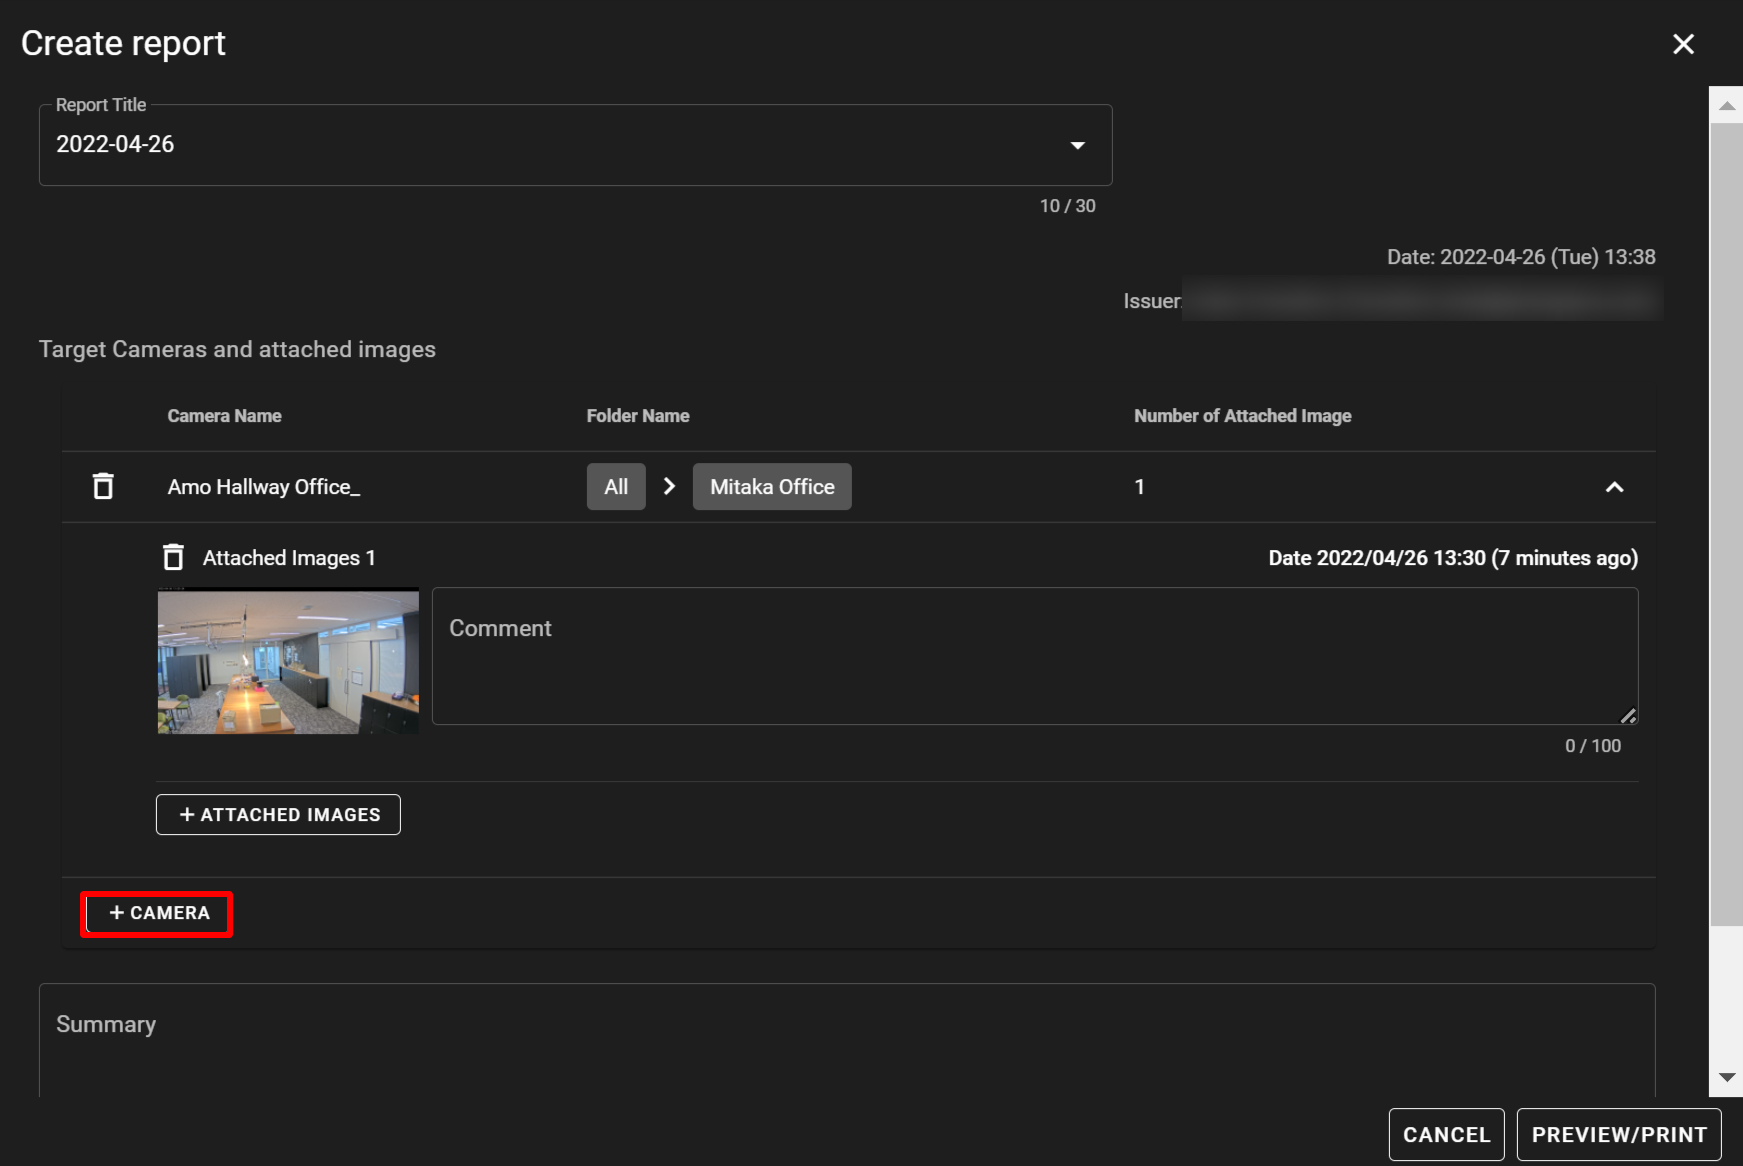
- Select the camera you want to add to the report from the list.
- The camera will be added to the report as shown in the figure below.
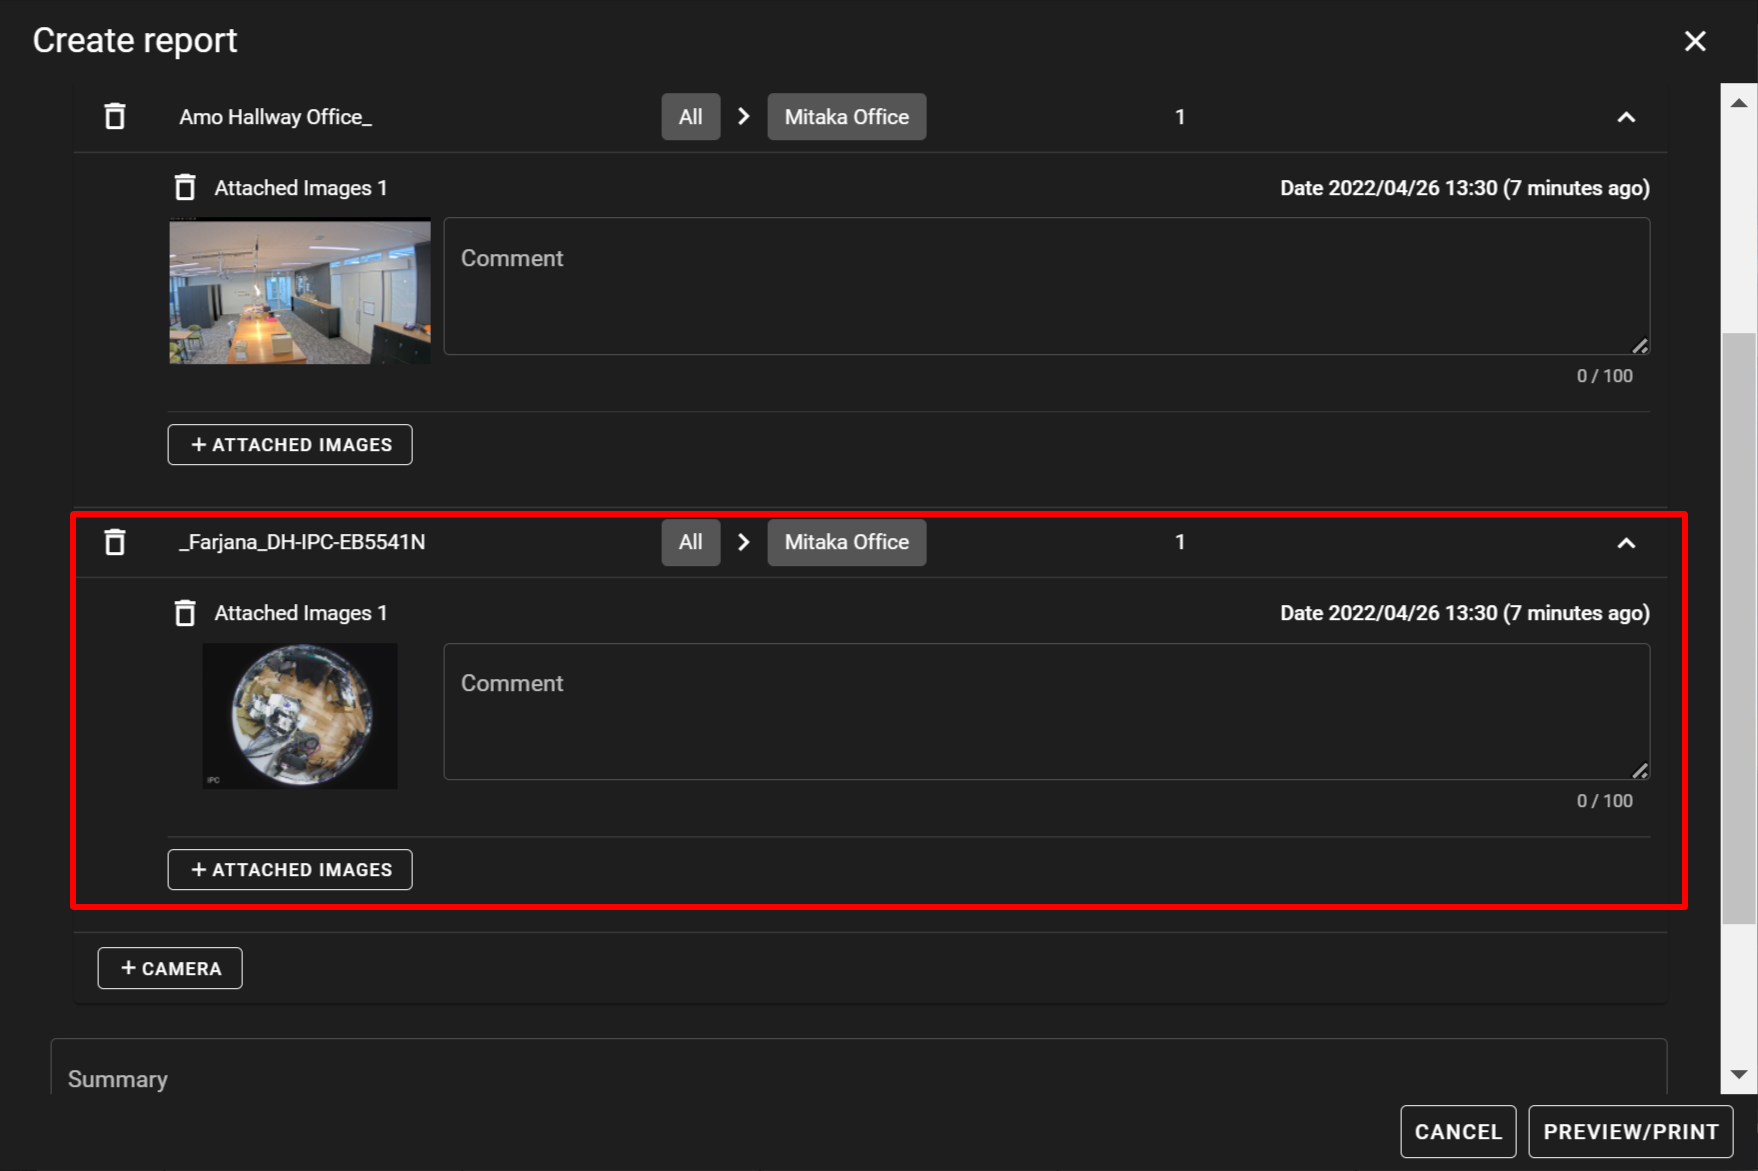
- For the added camera, you can add other images to the report from [ + ATTACHED IMAGES ].
Deleting images and cameras from a report You can delete unnecessary images and cameras from a report with the delete icon (  ) any time. *Deletion is performed without warning.
- If deleting images
Click the delete icon () for the image you want to delete.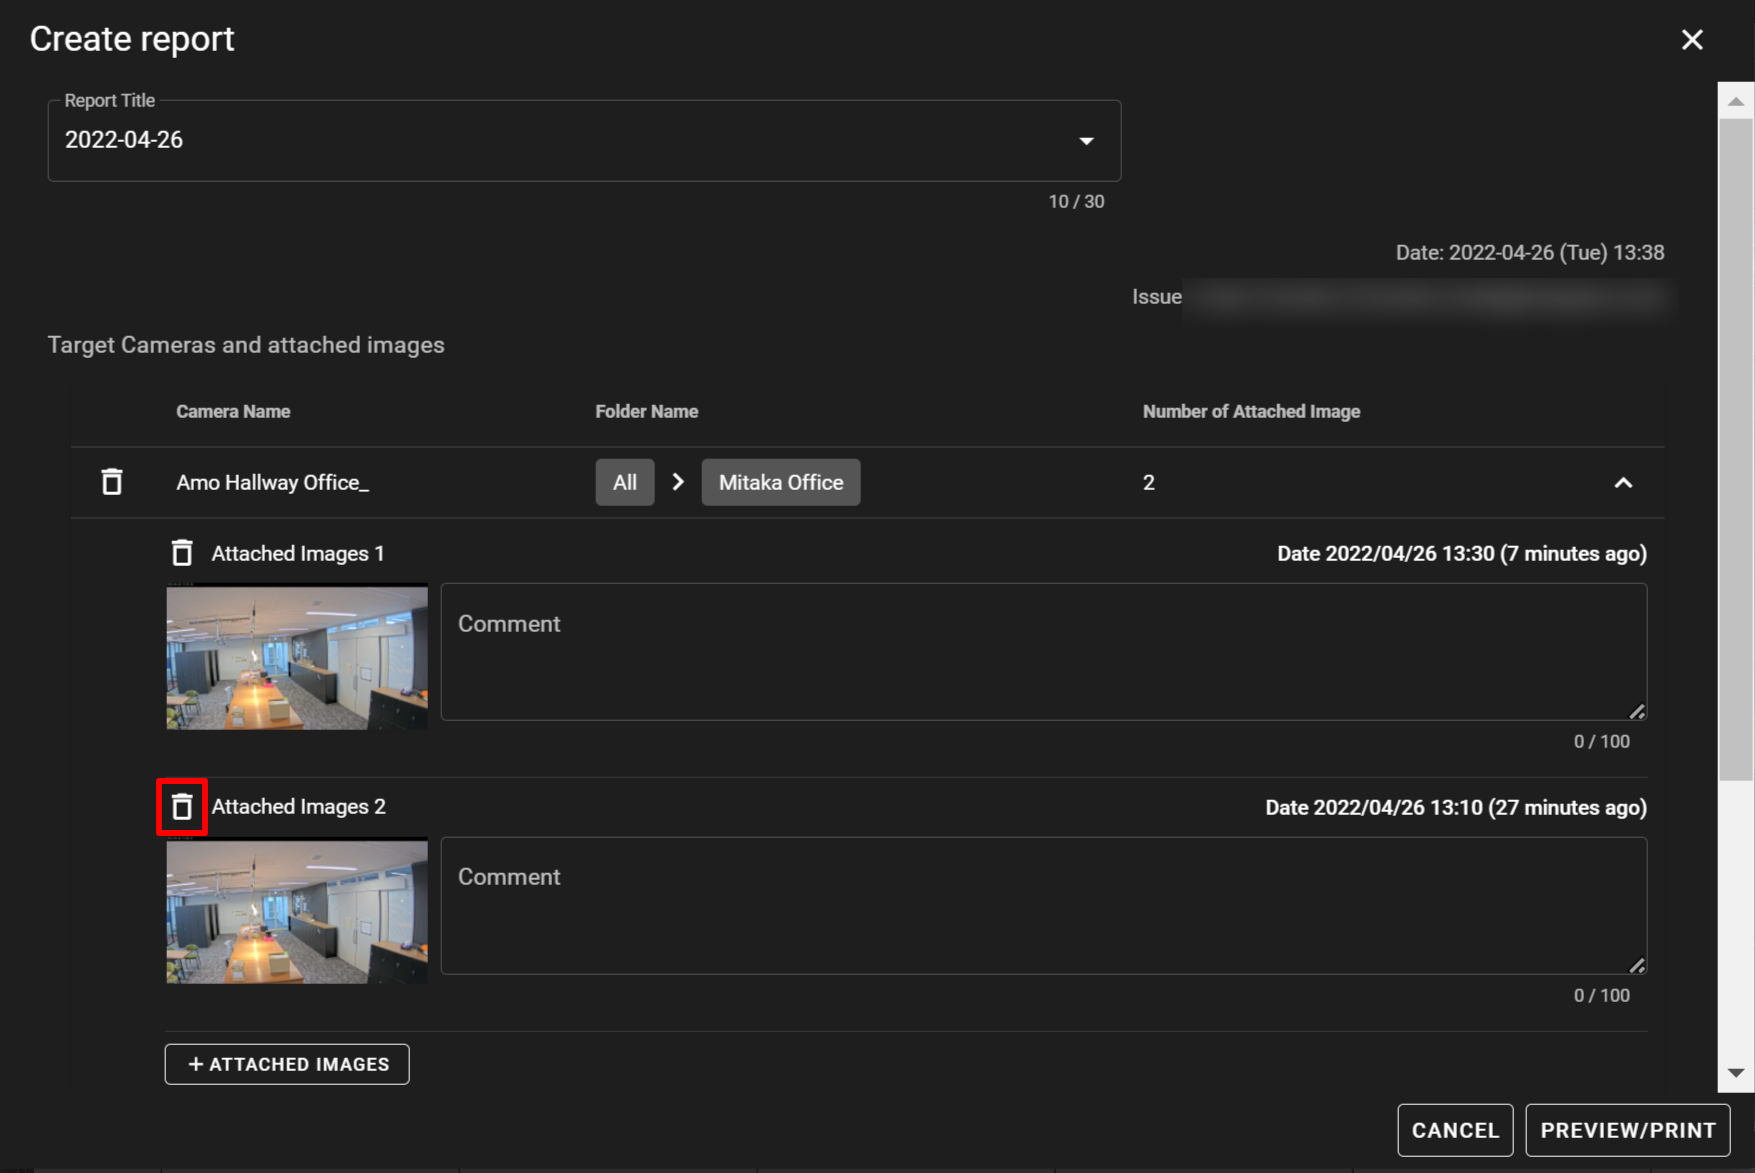
- Deleting cameras
Click the delete icon () displayed for the place where the camera name is shown.
- Click the
Setting cameras
This section explains how to change a camera name and the credentials and how to add tags to a camera. (Click each item to display the procedure and detailed information.)
-
Changing a camera display nameChanging a camera display name
- Click the
 icon for the camera whose display name you want to change, and click [ General Settings ].
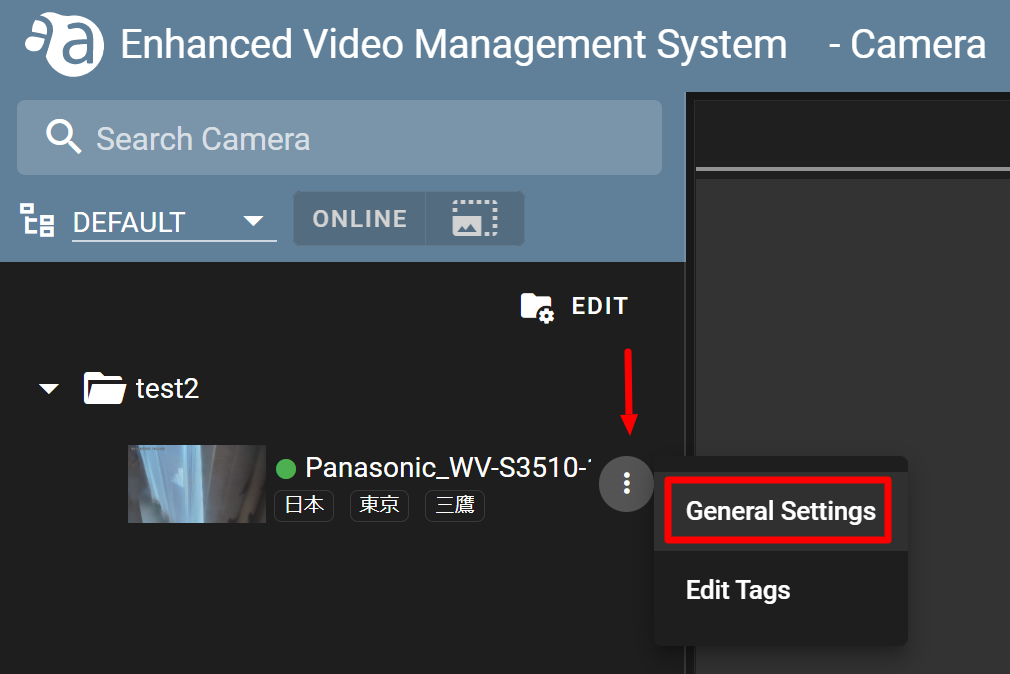
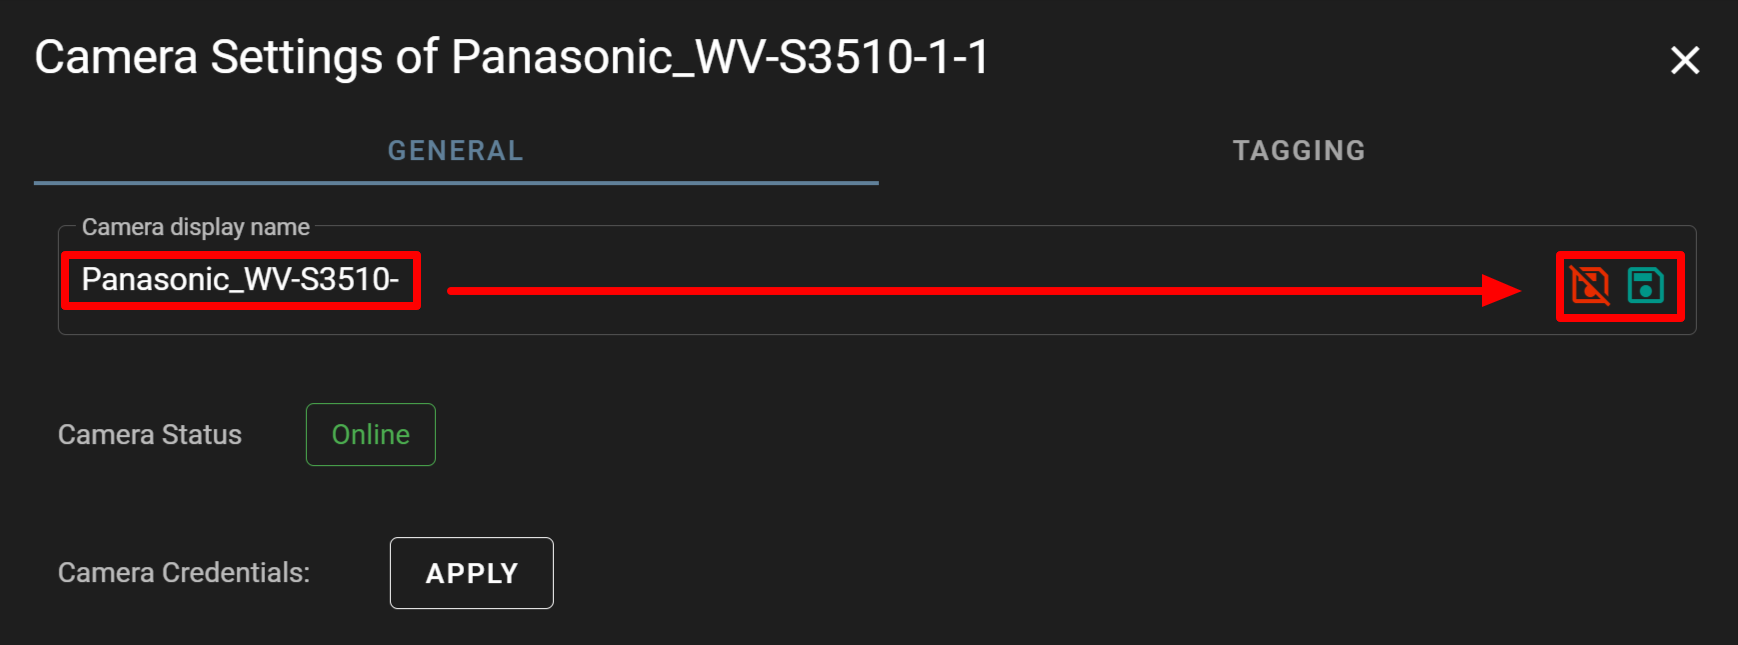
- Change the camera display name to the one you like, and click the save icon (
 ). If you do not want to reflect the change, click the cancel icon (
 ).
).
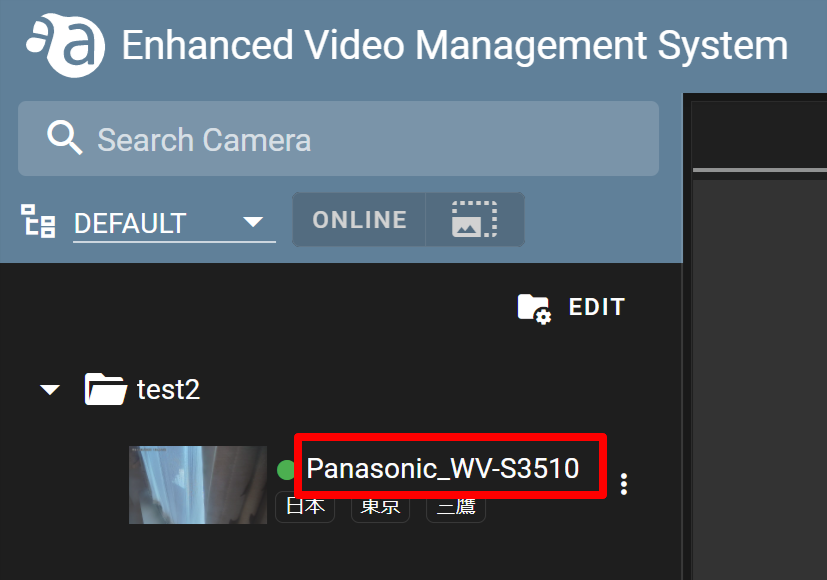
- Confirm that the name has been changed to the new one.
- Click the
-
Updating the credentials of a cameraUpdating the credentials of a camera
Each camera may require the credentials. If you update the credentials from the Enhanced Video Management System, the settings you configured with Nx Witness will be overwritten.
- For the target camera, click the
 icon, and click [ General Settings ].
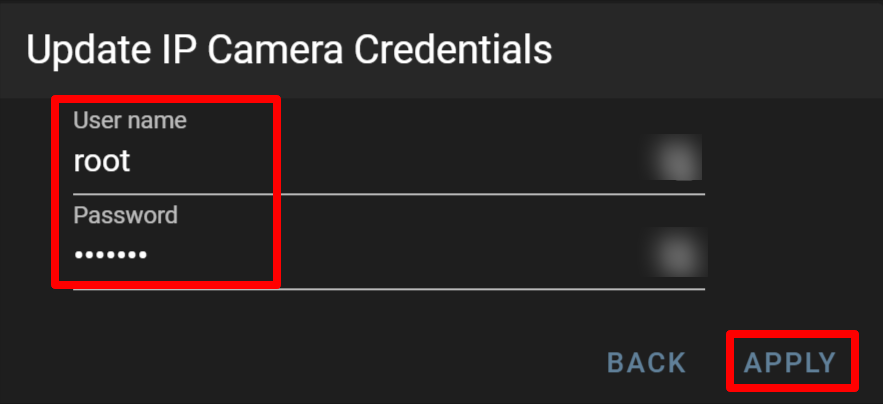
- Click the [ APPLY ] button for [ Camera Credentials ].
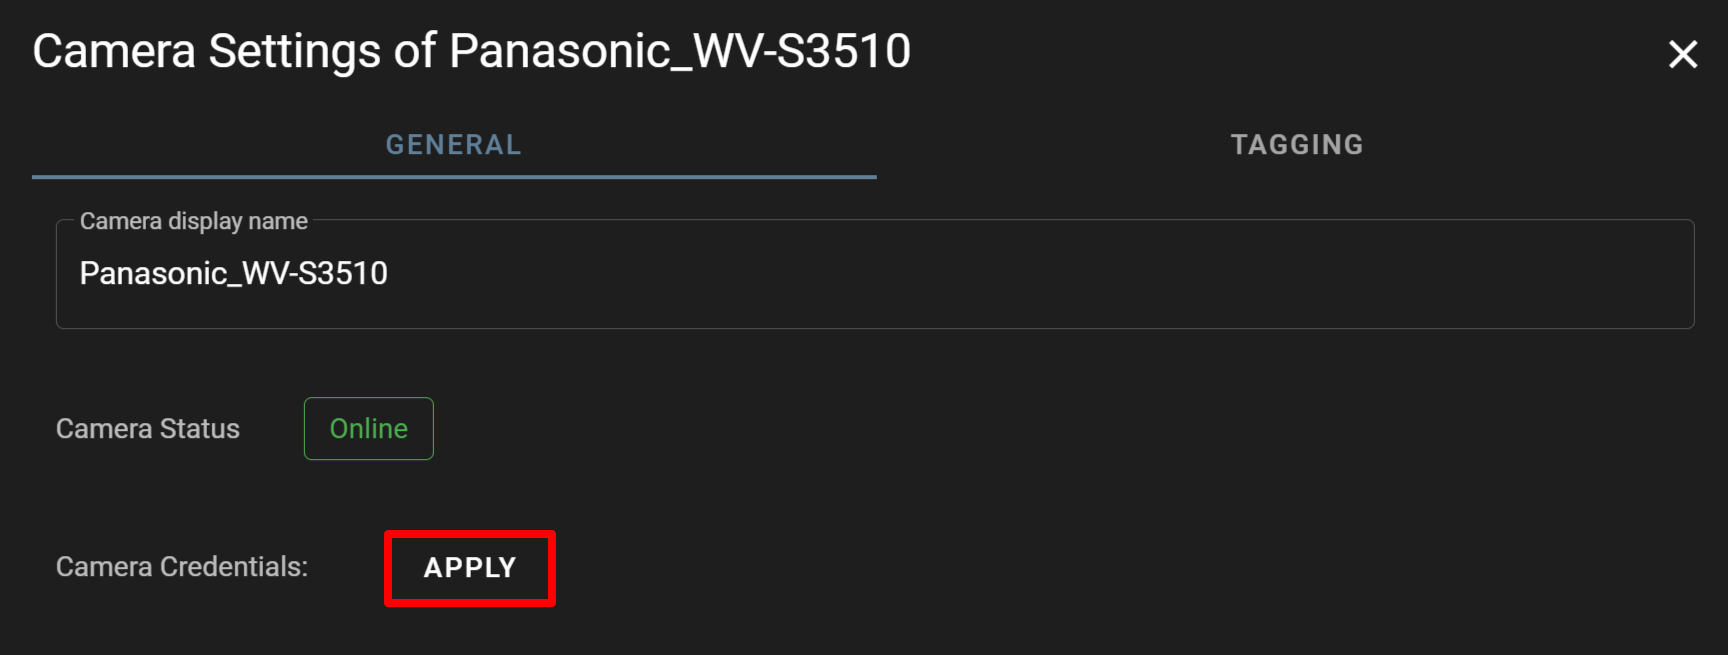
- Enter the camera credentials, and click [ APPLY ].
- For the target camera, click the
-
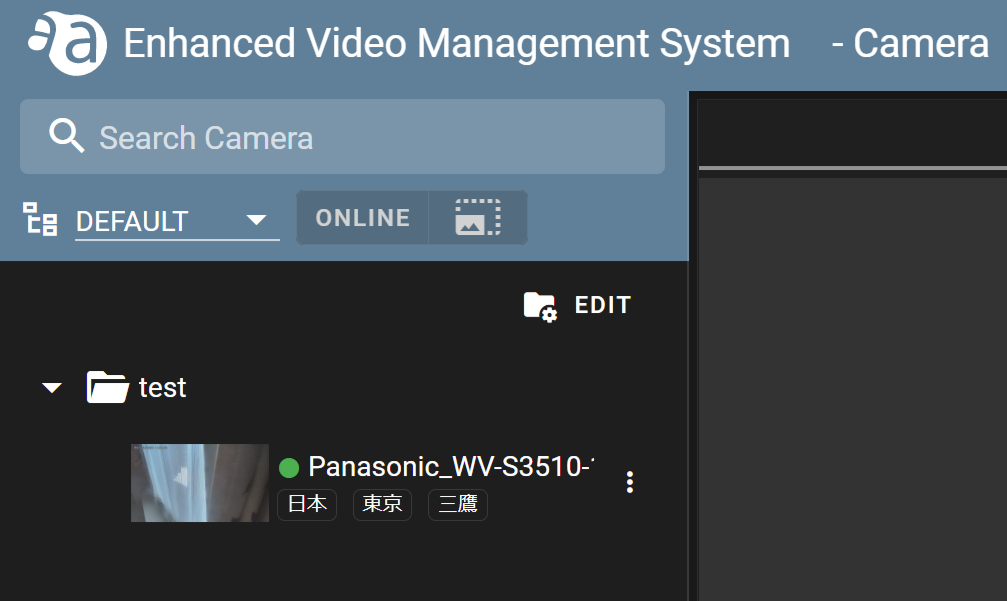
Adding tags to a cameraAdding tags to a camera
You can register up to 8 tags of your choice to a camera. Tags can be used as search keywords (e.g location, department name, company name, person's name).
This section explains the procedure for registering tags to a camera.
- Click the
 icon for the camera to which you want to add tags, and click [ Edit Tags ].

- Click
 .
.
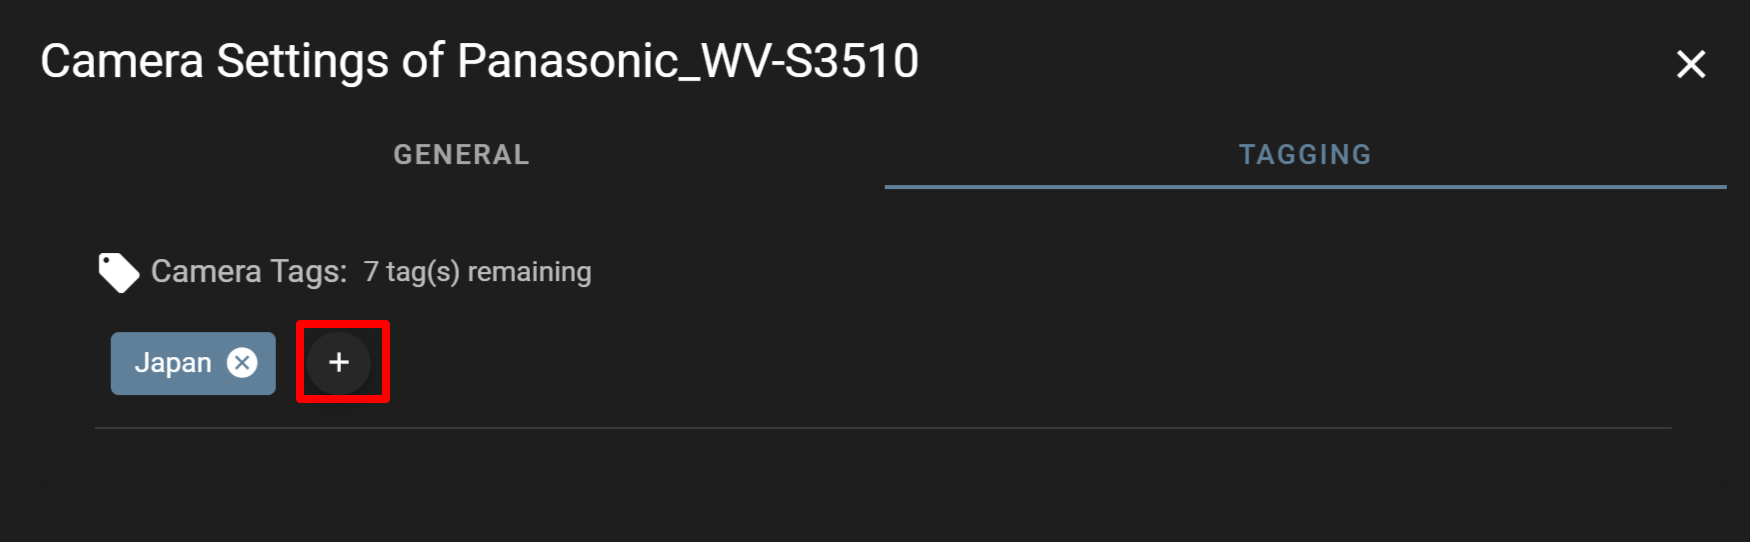
- Enter the tag you like in the text box and press the Enter key on your keyboard to confirm it. (In the following example, "Tokyo" is entered in the text box.)

- If the tag is registered, it will be displayed as follows. (If you click
 , the tag will be deleted immediately.)
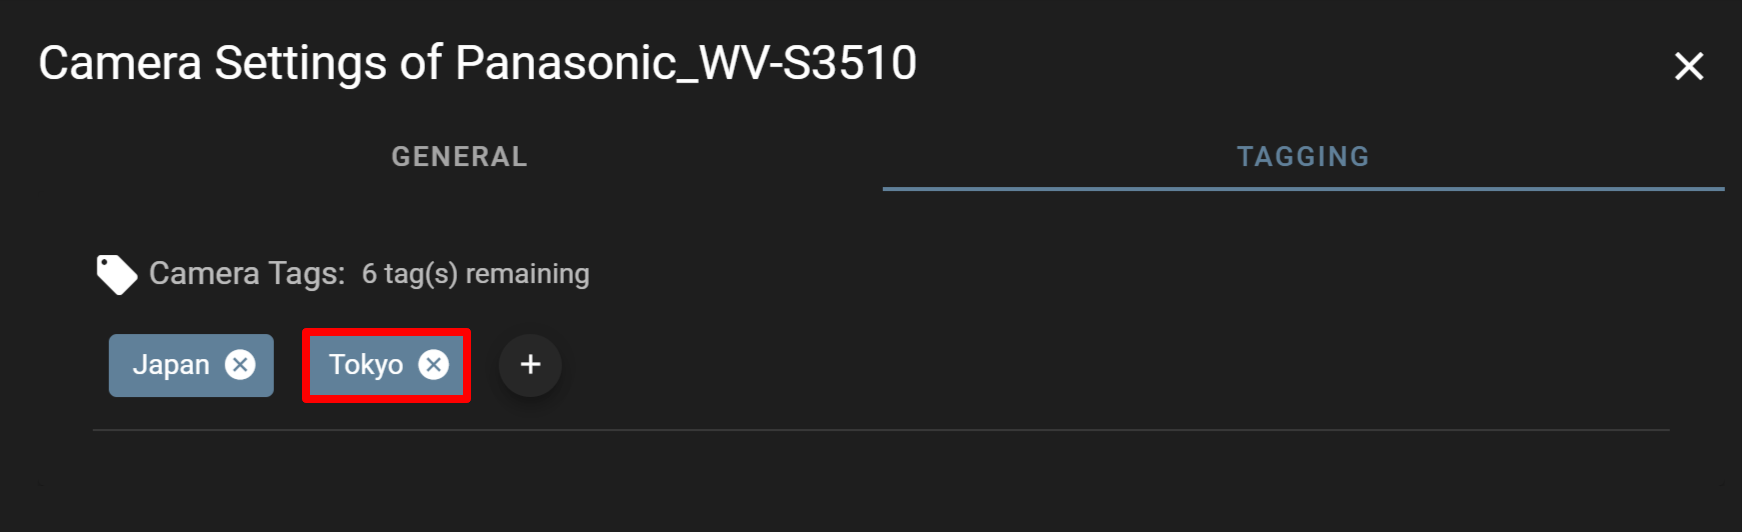
- Click the
-
Configuring the fisheye correction settingsConfiguring the fisheye correction settings
If fisheye correction is enabled, you can configure the fisheye correction settings for the target camera. The fisheye correction settings you configured will be reflected in LIVE and DIRECT modes.
- For the target camera, click the icon and select [ Fish eye Correction Settings ].
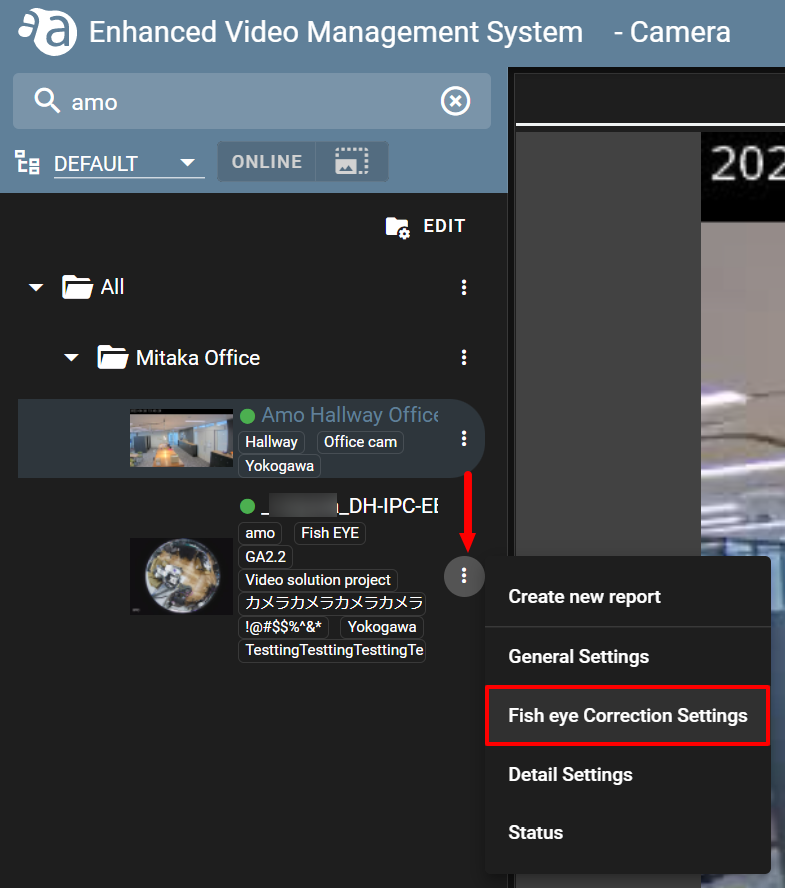
- On the settings screen, configure the display and projection settings. If you configure the settings for each of them, click [ SAVE ] lastly to reflect the setting.
Projection Settings 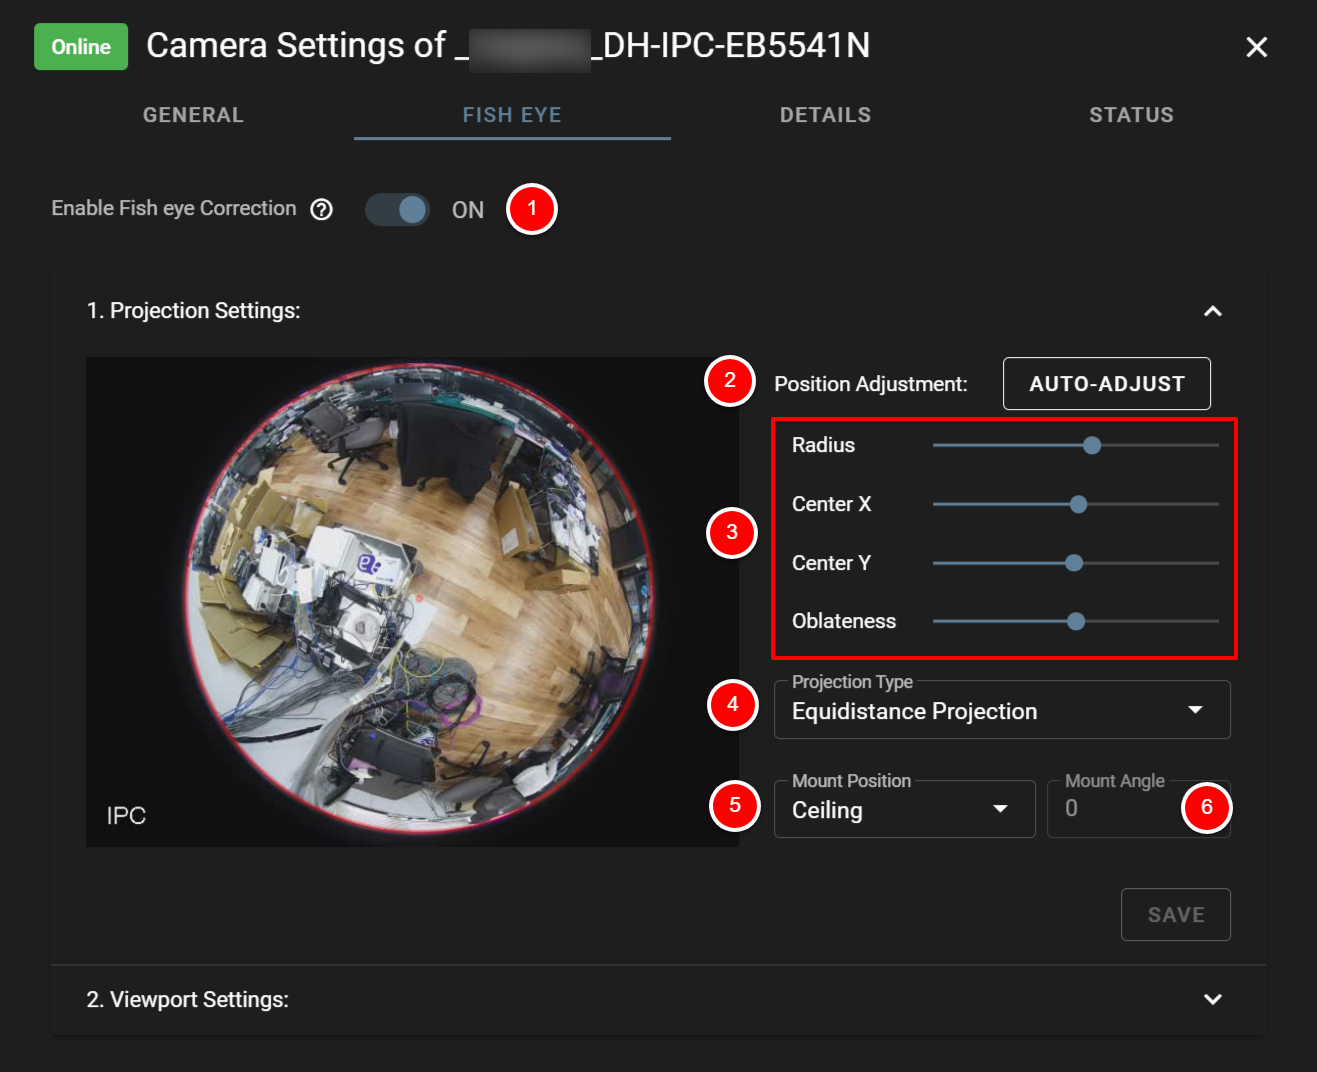
① Enable Fish eye Correction: Set ON/OFF for fisheye correction.
ON: Fisheye correction will be enabled, and an image obtained after performing fisheye correction will be displayed on the [ Camera ] page.
OFF: If not performing fisheye correction, turn off the toggle.
② Position Adjustment (AUTO-ADJUST): If automatically detecting the position, click [ AUTO-ADJUST ].
③ Position Adjustment (Manual Setting): If manually setting the position, set each of the following values:
Radius: By adjusting the center, you can change the size of the circle.
Center X: Change the coordinate X set as the center, and adjust the position of the circle to the left and right.
Center Y: Change the coordinate Y set as the center, and adjust the position of the circle up and down.
Oblateness: Use the slider to adjust the shape of the lens (the shape of the circle).
④Equidistance Projection: Select the projection method.
Equidistance Projection : An image is formed in a way that the incident angle of the light beam will be proportional to the distance from the center of the screen.
Equisolid Angle Projection: An image is formed in a way that the solid angle of the subject will be proportional to the area on the screen.
Stereographic Projection:An image is formed in a way that a sphere will be mapped on a flat surface.
Orthographic Projection: An image is formed in a way that a sphere will be projected on a flat surface as it is. Compared to equidistance projection, the subject in the center will be shown larger and the one at the periphery of the screen will be shown smaller.
⑤Mount Position: Select the mounting orientation.
Ceiling: Select this when the mounting surface is a ceiling.
Floor: Select this when the mounting surface is a floor surface.
Wall: Select this when the mounting surface is a wall surface.
⑥Mount Angle: Select the angle against the mounting surface. (This is used when the mounting surface is a wall.)
Viewport Settings From the layout drop-down list, you can select the layout in which you want to display an image. The layout set here will be reflected in LIVE mode and DIRECT mode.

Layout types- Template 1: Divided into 4 and displayed at an angle of 90 degrees for each

- Template 2: Divided into the upper and lower parts, displayed at an angle of 180 degrees for each
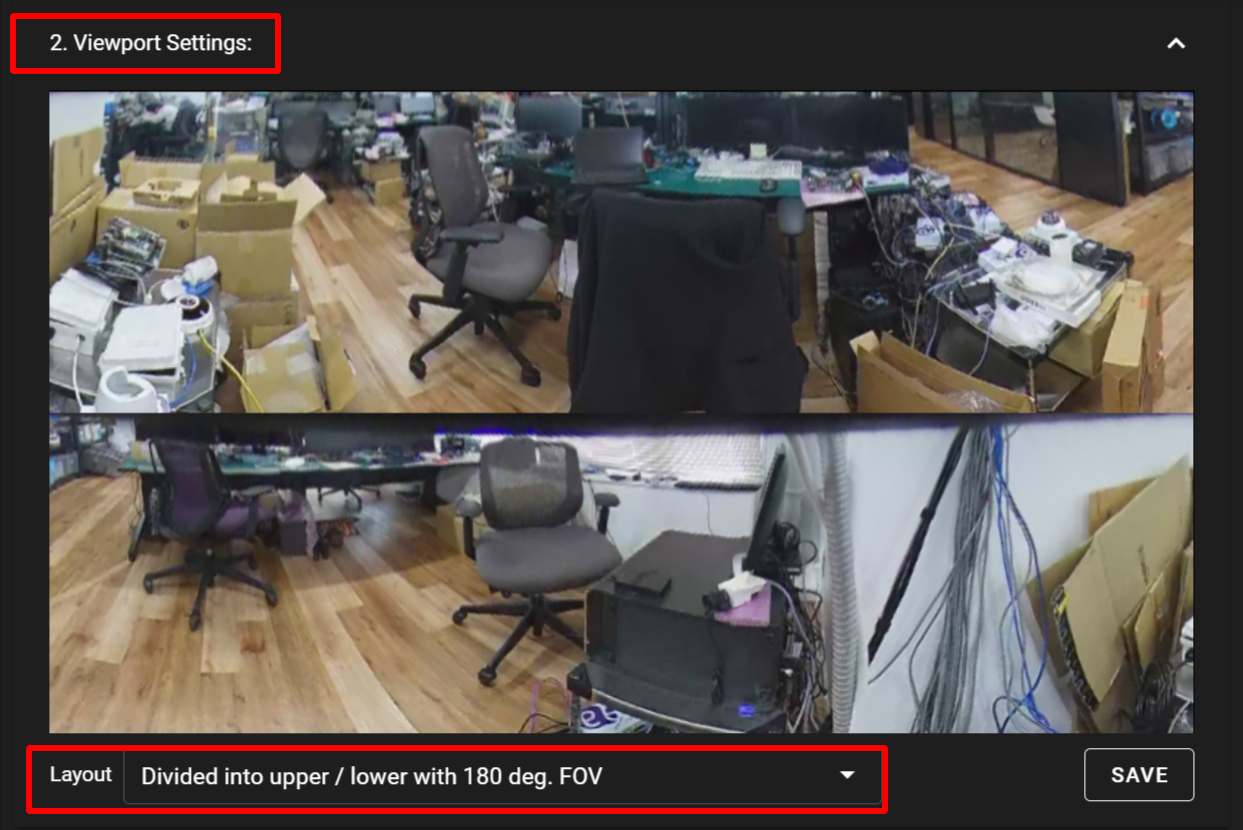
- Temple 3: Divided into 5
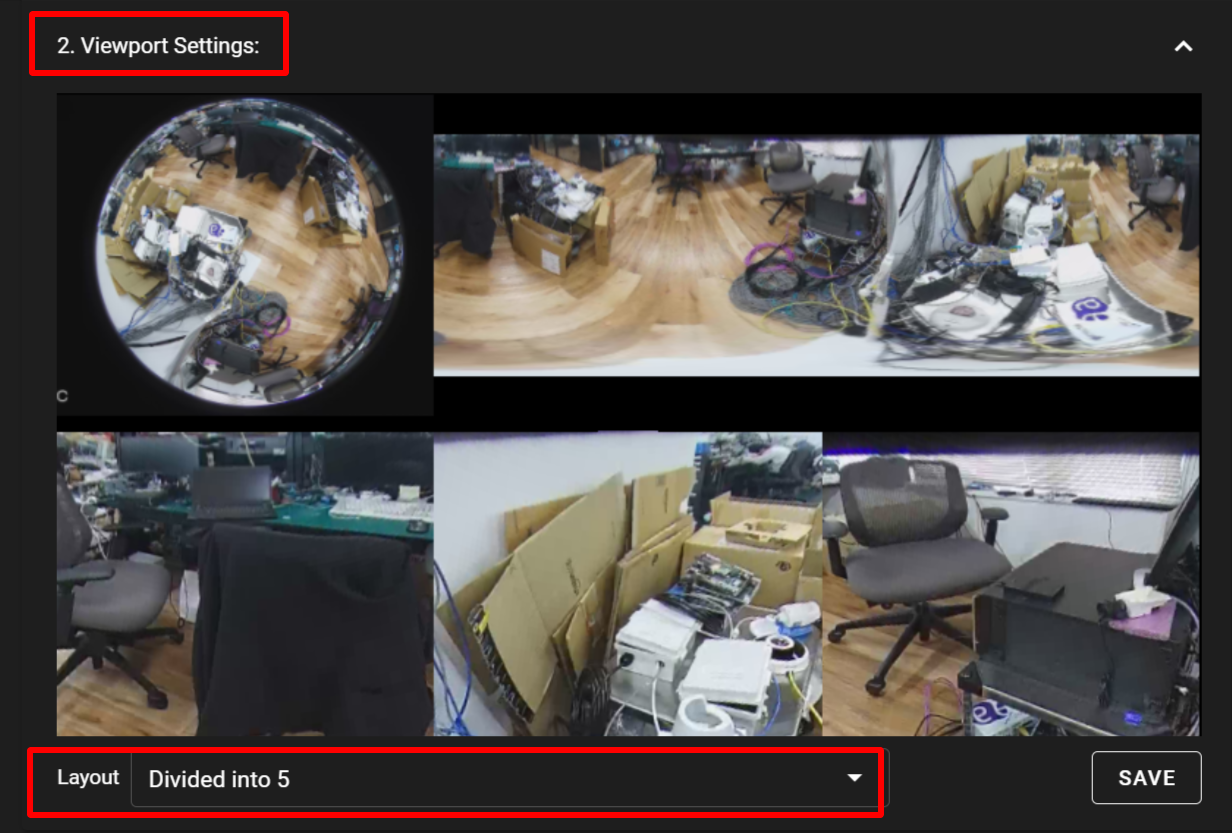
- Free layout 1×1 (column × row) ~ Free layout 3×3 (columns × rows)
Changing the display mode
You can change the display mode of an image freely.
If you place the cursor over the image, the [ Area View ], [ Panorama View ], and [ Original (Fisheye) View ] buttons will be displayed as shown in the figure below. Click the mode in which you want to display the image. Area View
 Panorama View
 Original (Fisheye) View
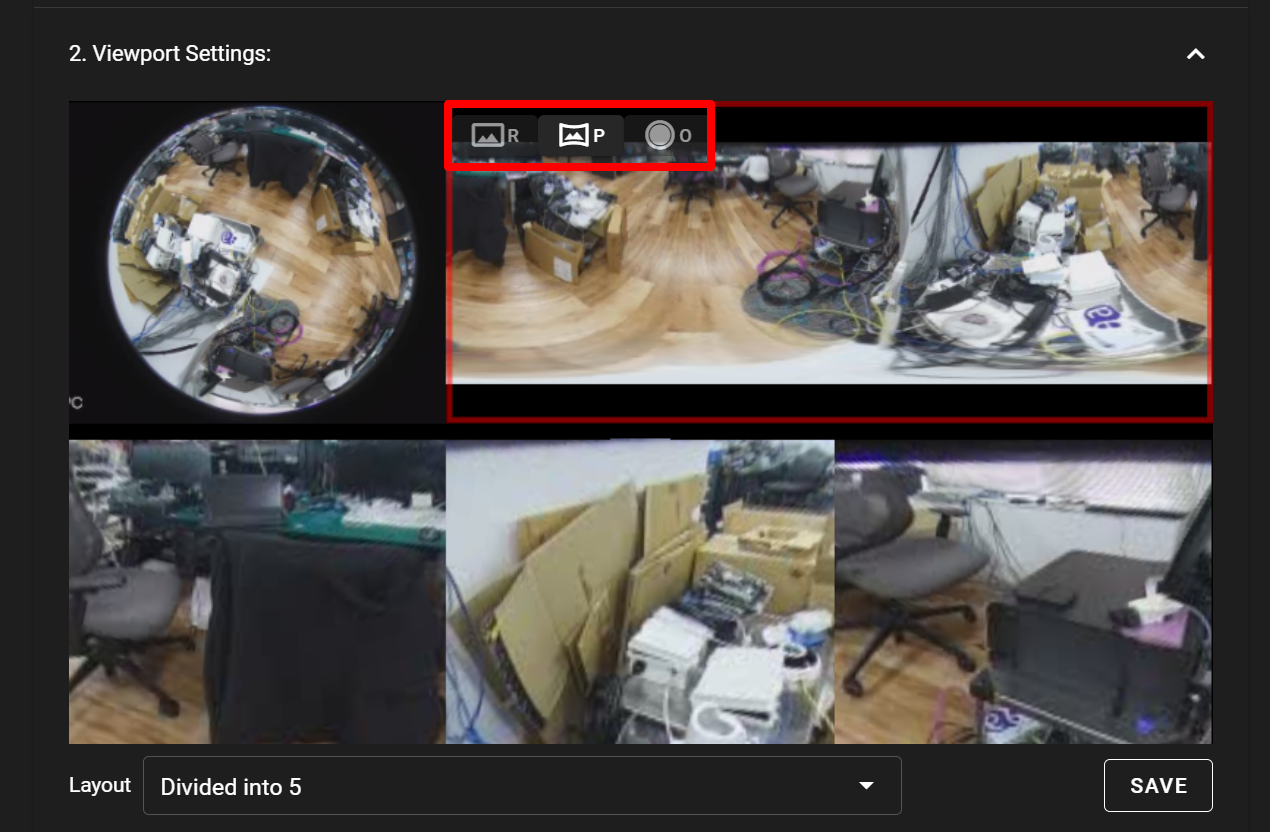
You can save an image in [ Area View ] or [ Panorama View ] while enlarging/shrinking it or adjusting its angle. After making an adjustment with the mouse as follows, click [ SAVE ] to reflect it.- Enlarging/shrinking an image ‐ Adjust it with the mouse wheel
- Adjusting the angle of an image - Drag it with the mouse
- Template 1: Divided into 4 and displayed at an angle of 90 degrees for each
- For the target camera, click the
-
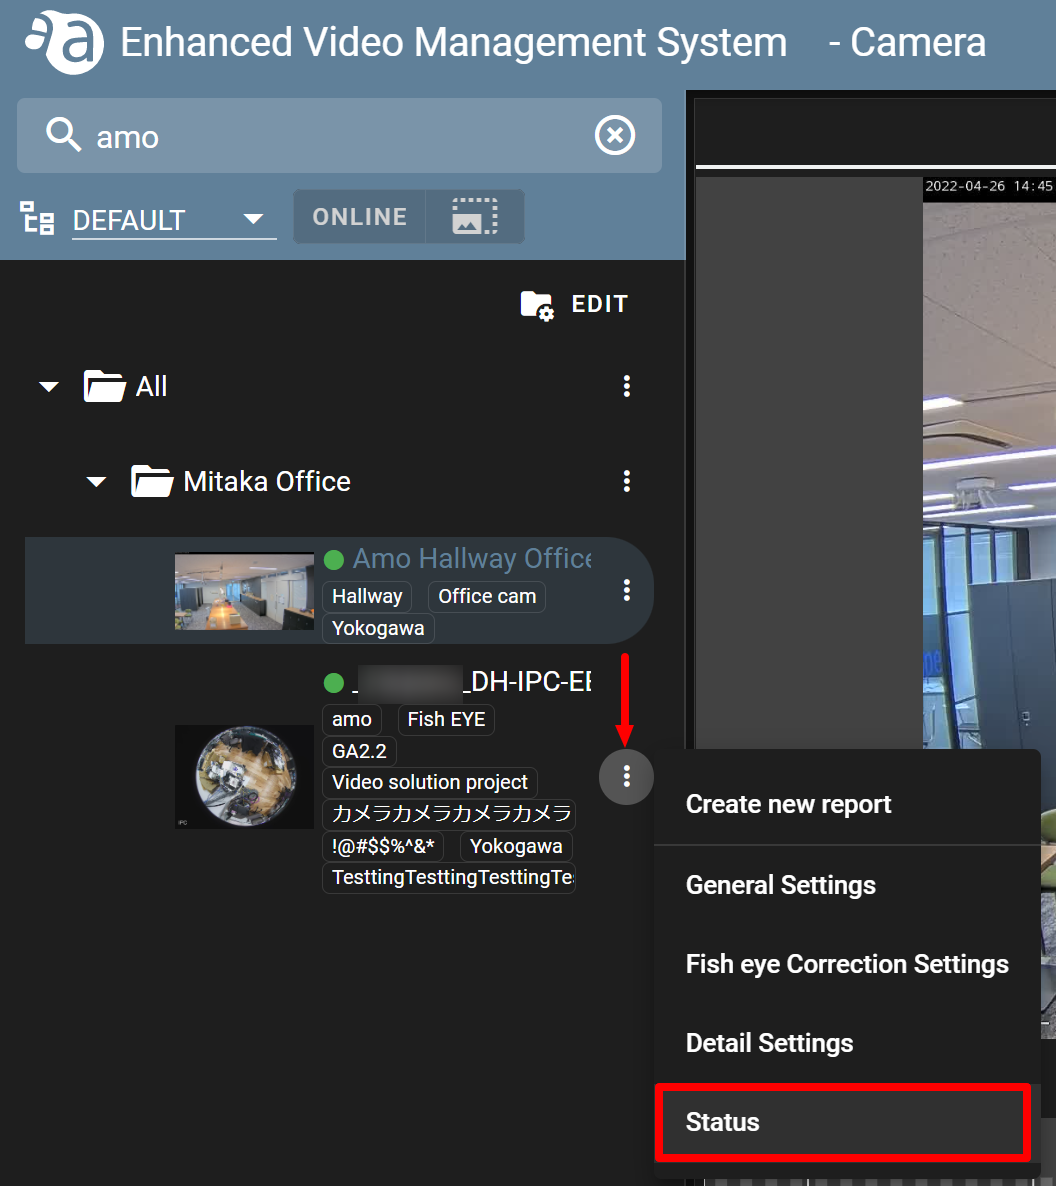
Deleting camerasDeleting cameras
You can delete cameras.
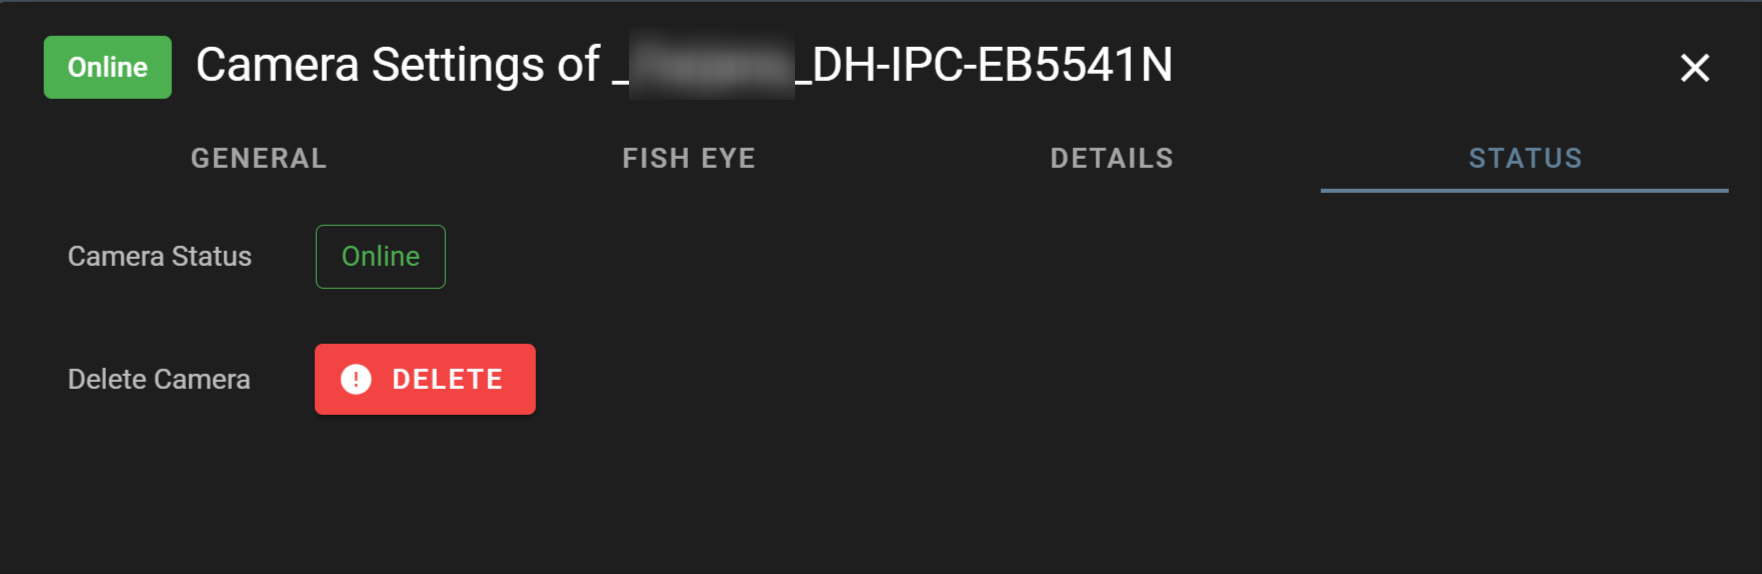
If you delete a camera, video clips and snap shots taken with it will be deleted as well. - Click the icon for the target camera, and click [ Status ].
- From the [ Delete Camera ] field, click [ DELETE ].
- The cautionary note will be displayed. Confirm it and click [ YES ].
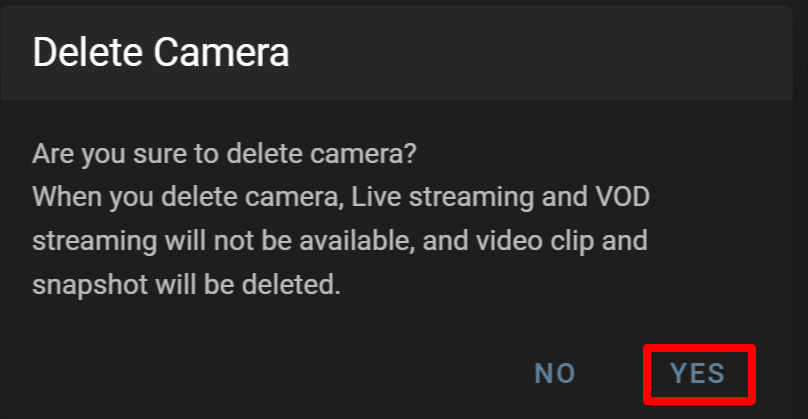
- Confirm that the target camera has been deleted.
- Click the